In this tutorial, we’ll be looking at Laravel applications and how to deploy them to Heroku. We will also set up Semaphore for continuous integration and deployment. Continuous integration is very important as it helps us make sure our test suite still passes after making changes to our code. Let’s get started.
Prerequisites
- A Heroku account,
- A Laravel project with authentication already set up. If not, clone this repo, and
- Heroku toolbelt installed, since we’ll be running a few Heroku commands from the command line.
Continuous Deployment with Semaphore
For this tutorial, we’ll be using Semaphore for continuous integration and delivery. Before looking into it, let’s first make sure our application is properly set up.
Setting Up the Application
Move to the directory containing the project. If not using version control already, initialize git with the git init command. Semaphore will be fetching code from GitHub, so we should create a repository on GitHub if one does not exist.
For those who cloned the blog repo, you’ll have to create a new remote. As it stands, the remote points to the author’s account:
git remote -v
git remote rm origin
git remote -v
Then, link the project to your remote:
git remote add origin [your remote url]
git push -u origin master
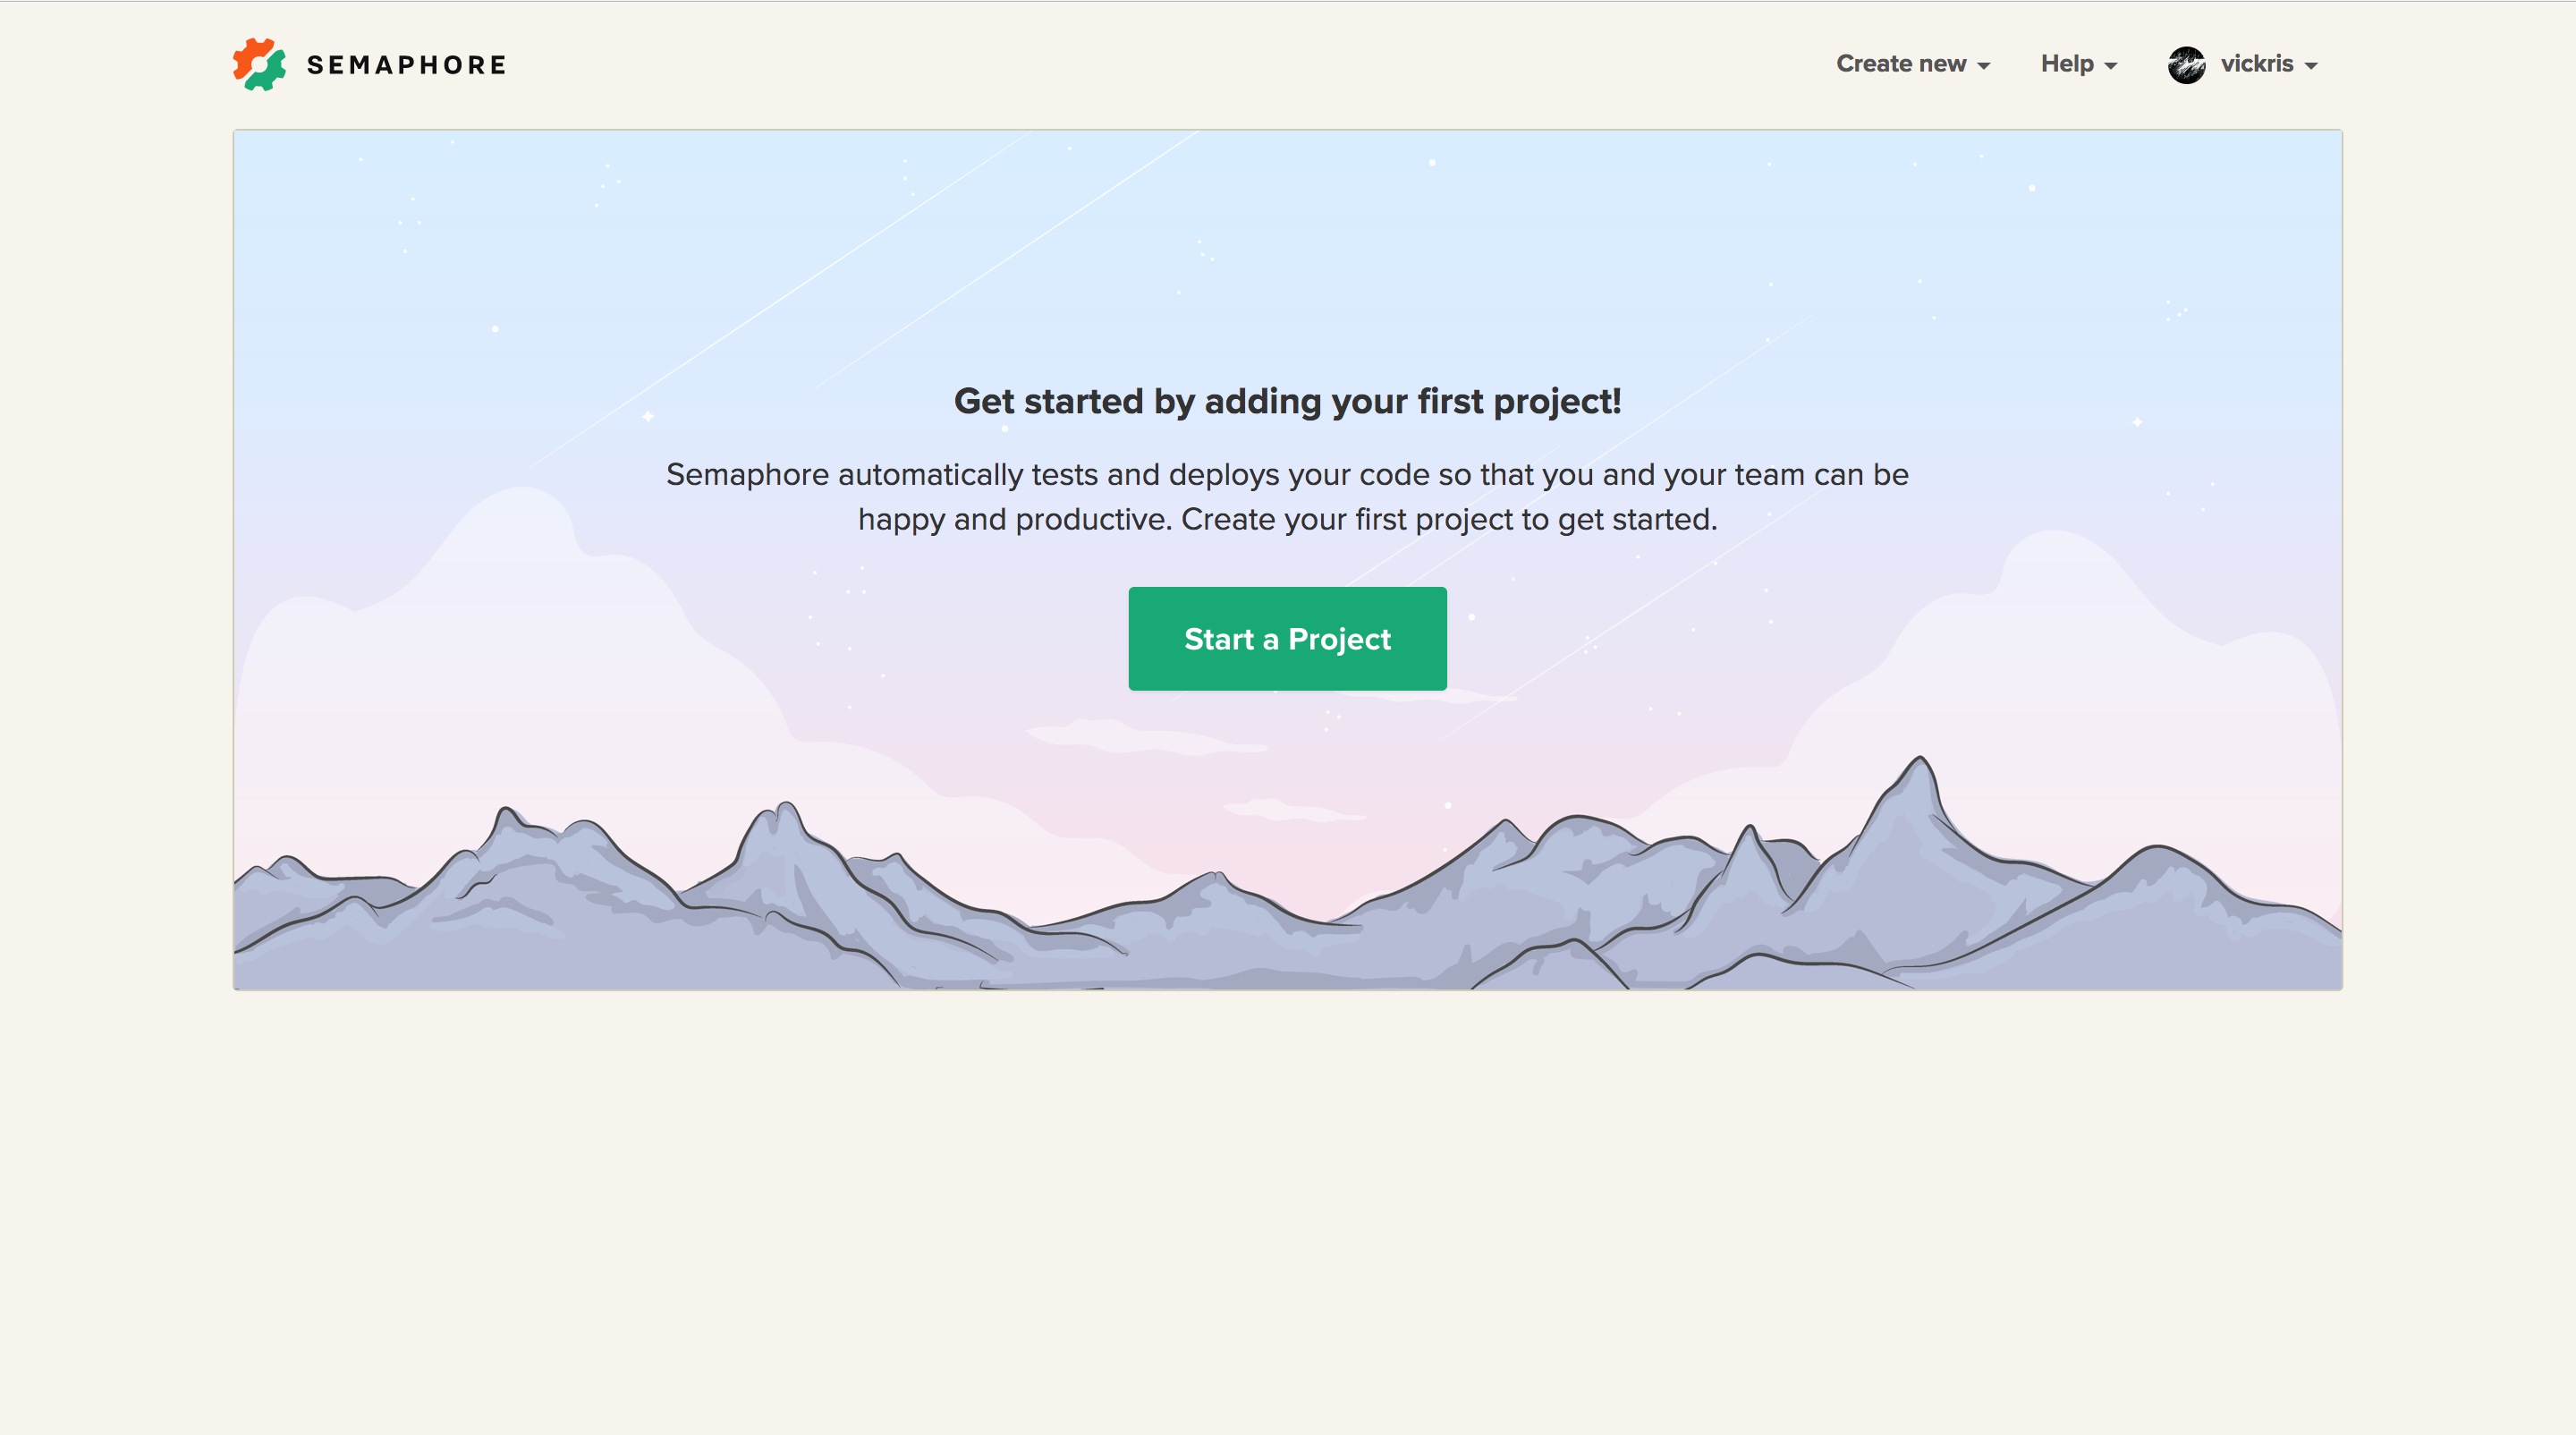
All set, we can now set up a new Laravel project on Semaphore. If you’ve never used Semaphore before, sign up for a free account. Once you have logged in, follow these steps:
- Click the “Start a Project Button” button:
- Choose the account to create a project from. Semaphore supports GitHub and Bitbucket by default.
- Select the repository that holds the code you’d like to build:

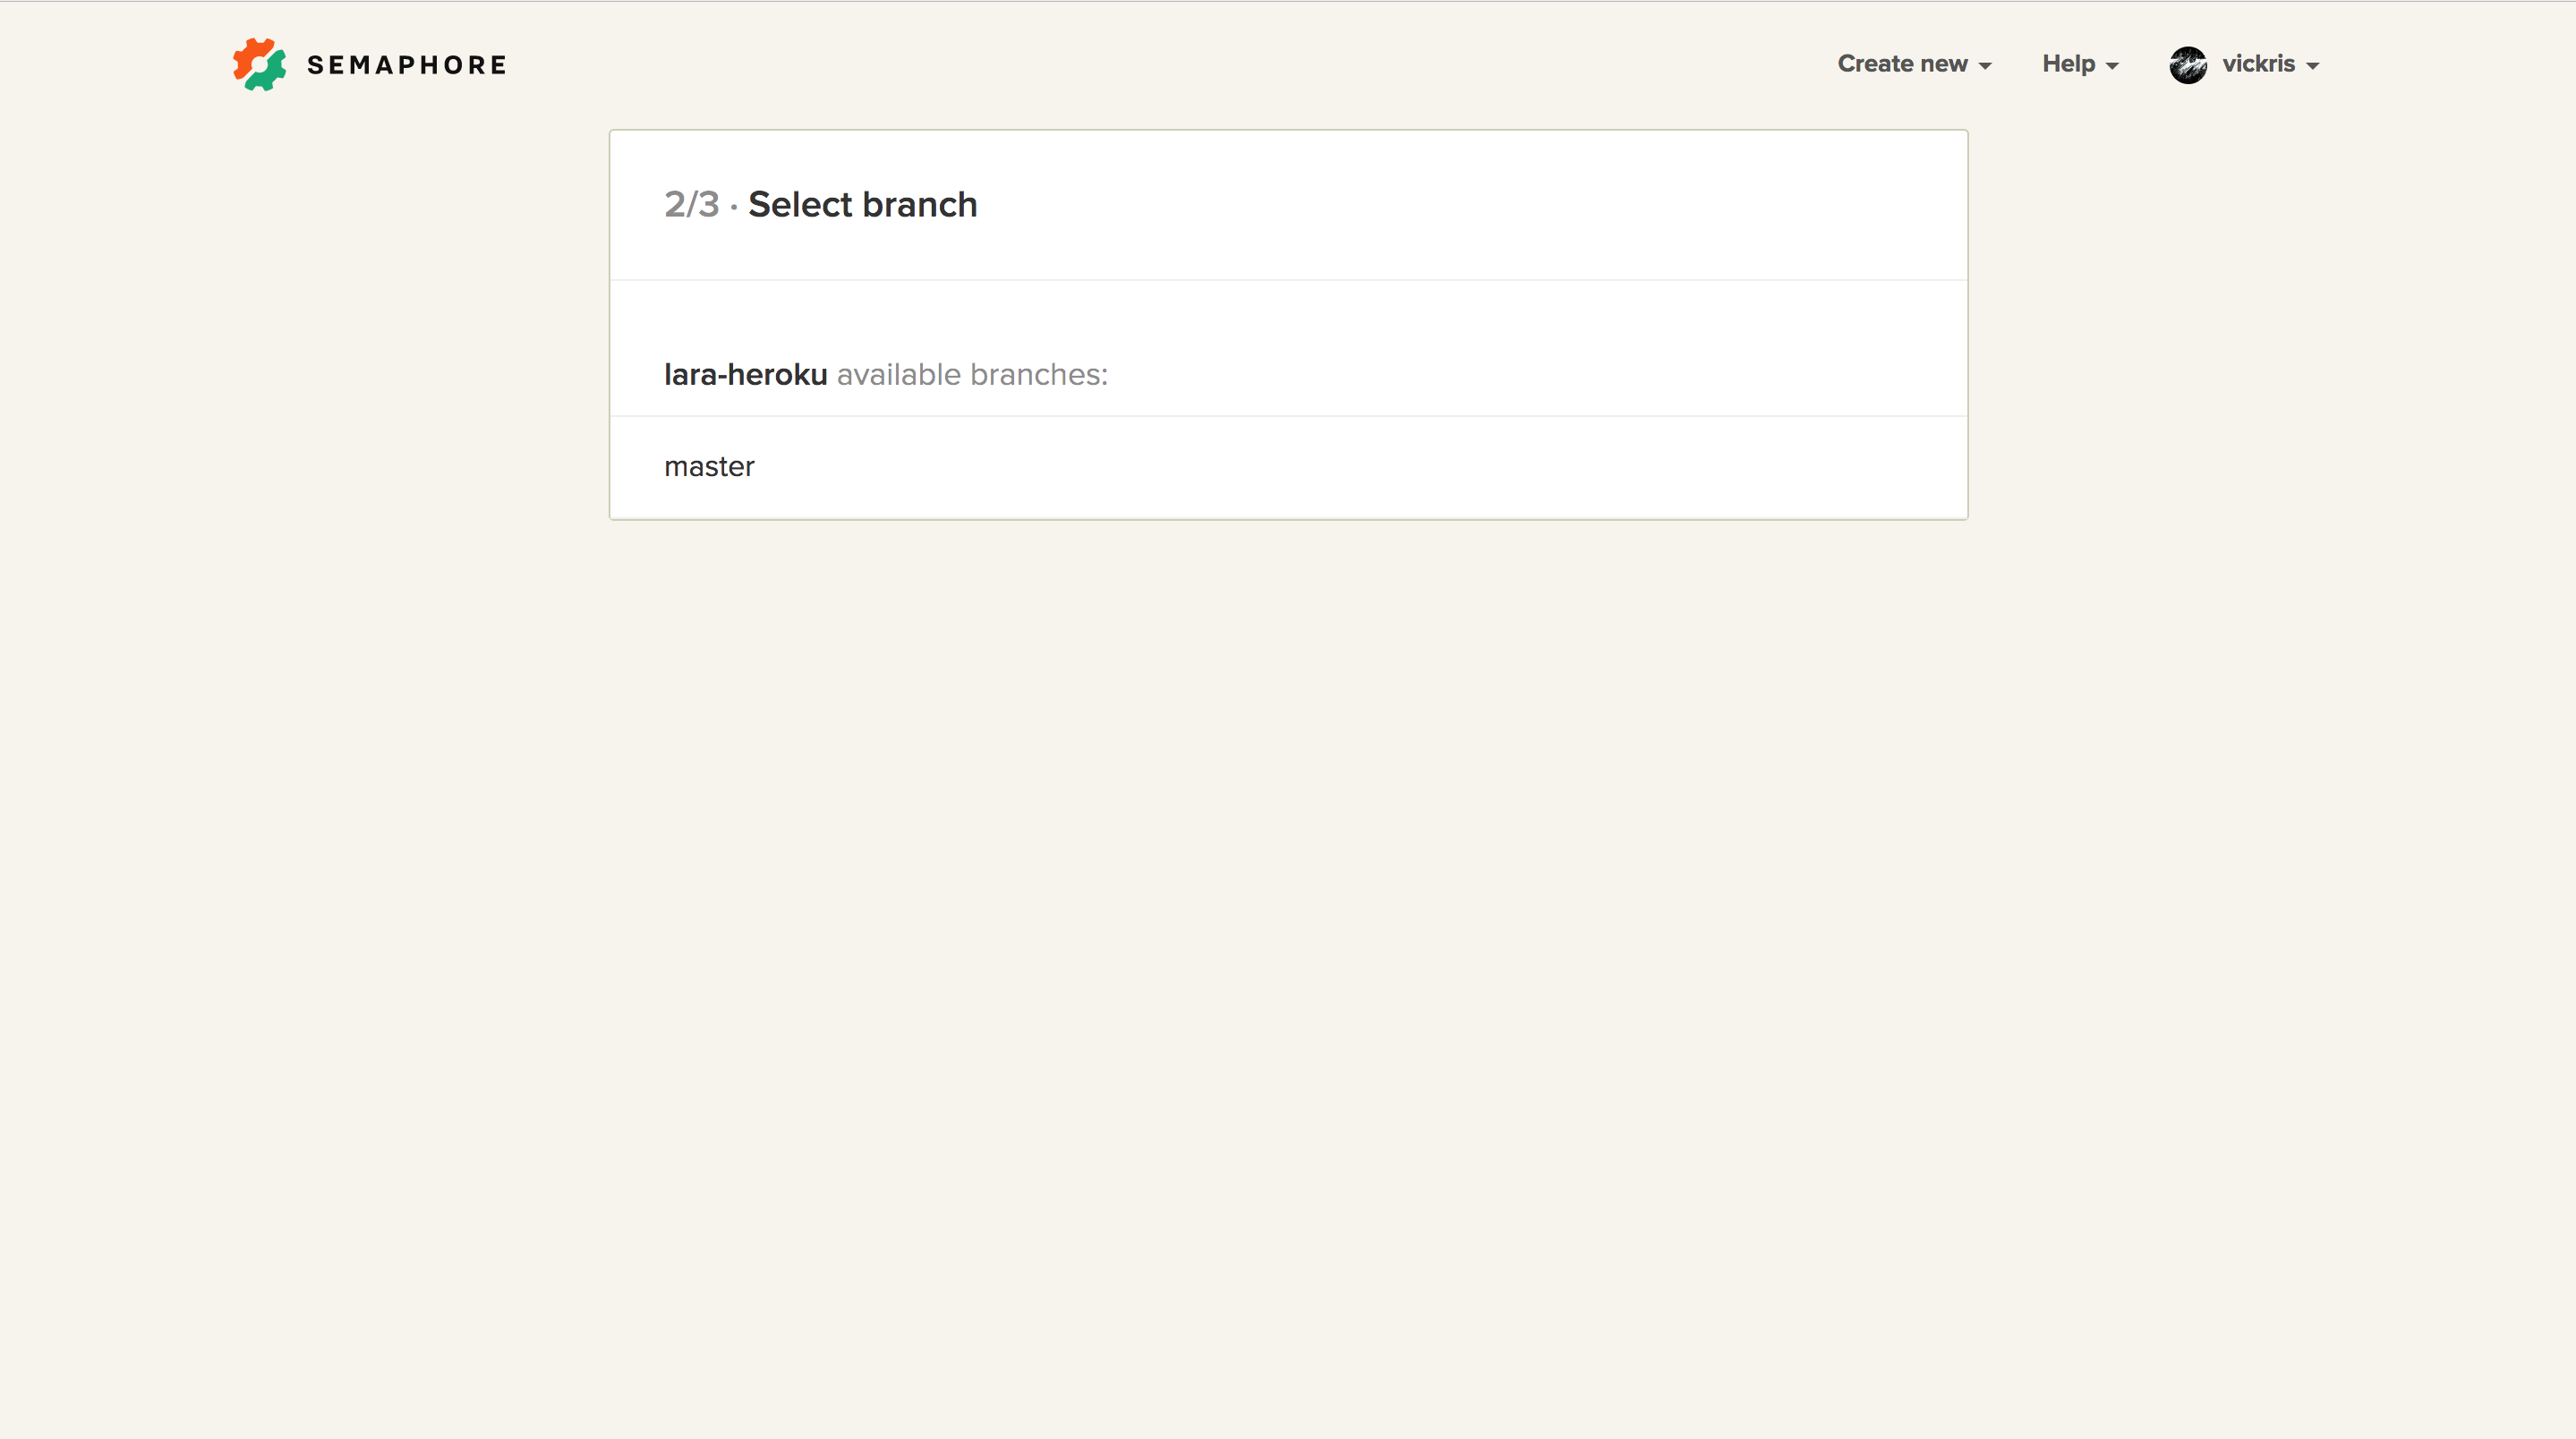
- Select the branch you would like to build. The
masterbranch is the default.
After this step, Semaphore will start analyzing the project. Then get back to you with a new page to configure your project.
- Change the
PHP versionto 7:
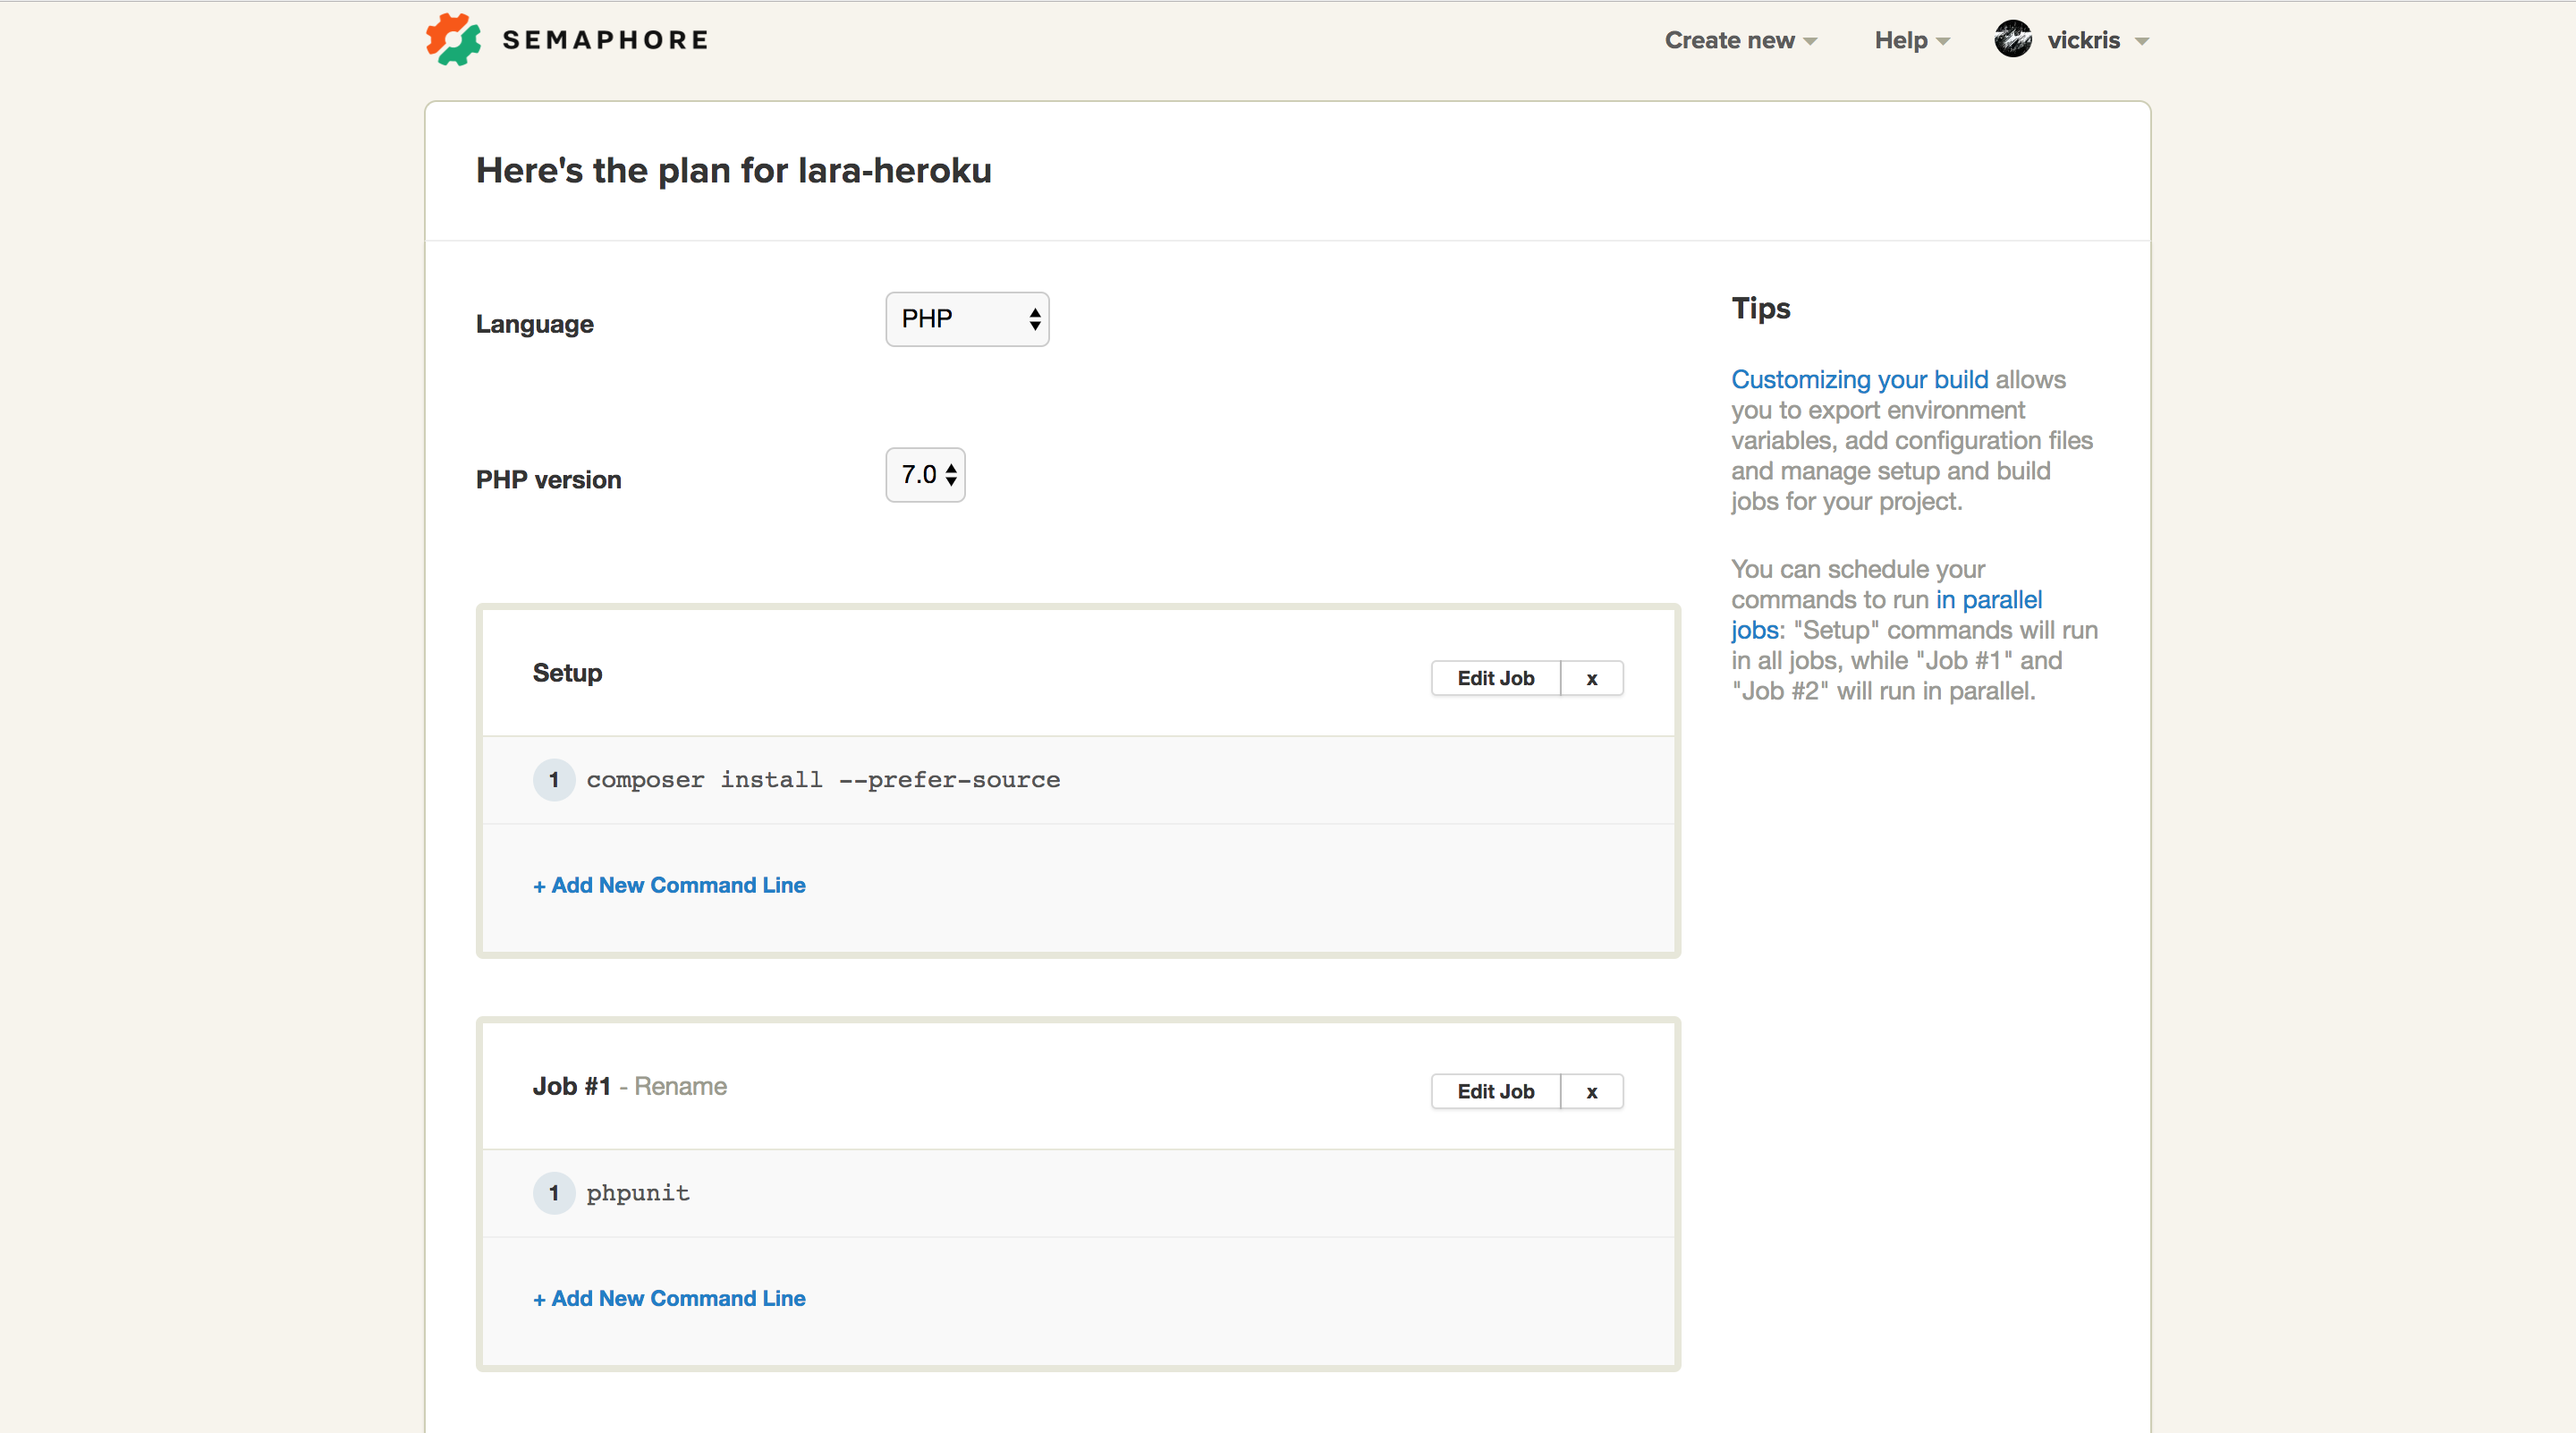
Leave the other settings as they are.
- Click on the “Build With These Settings” button at the bottom of the page. The build may take a few minutes but notice the first build fails?
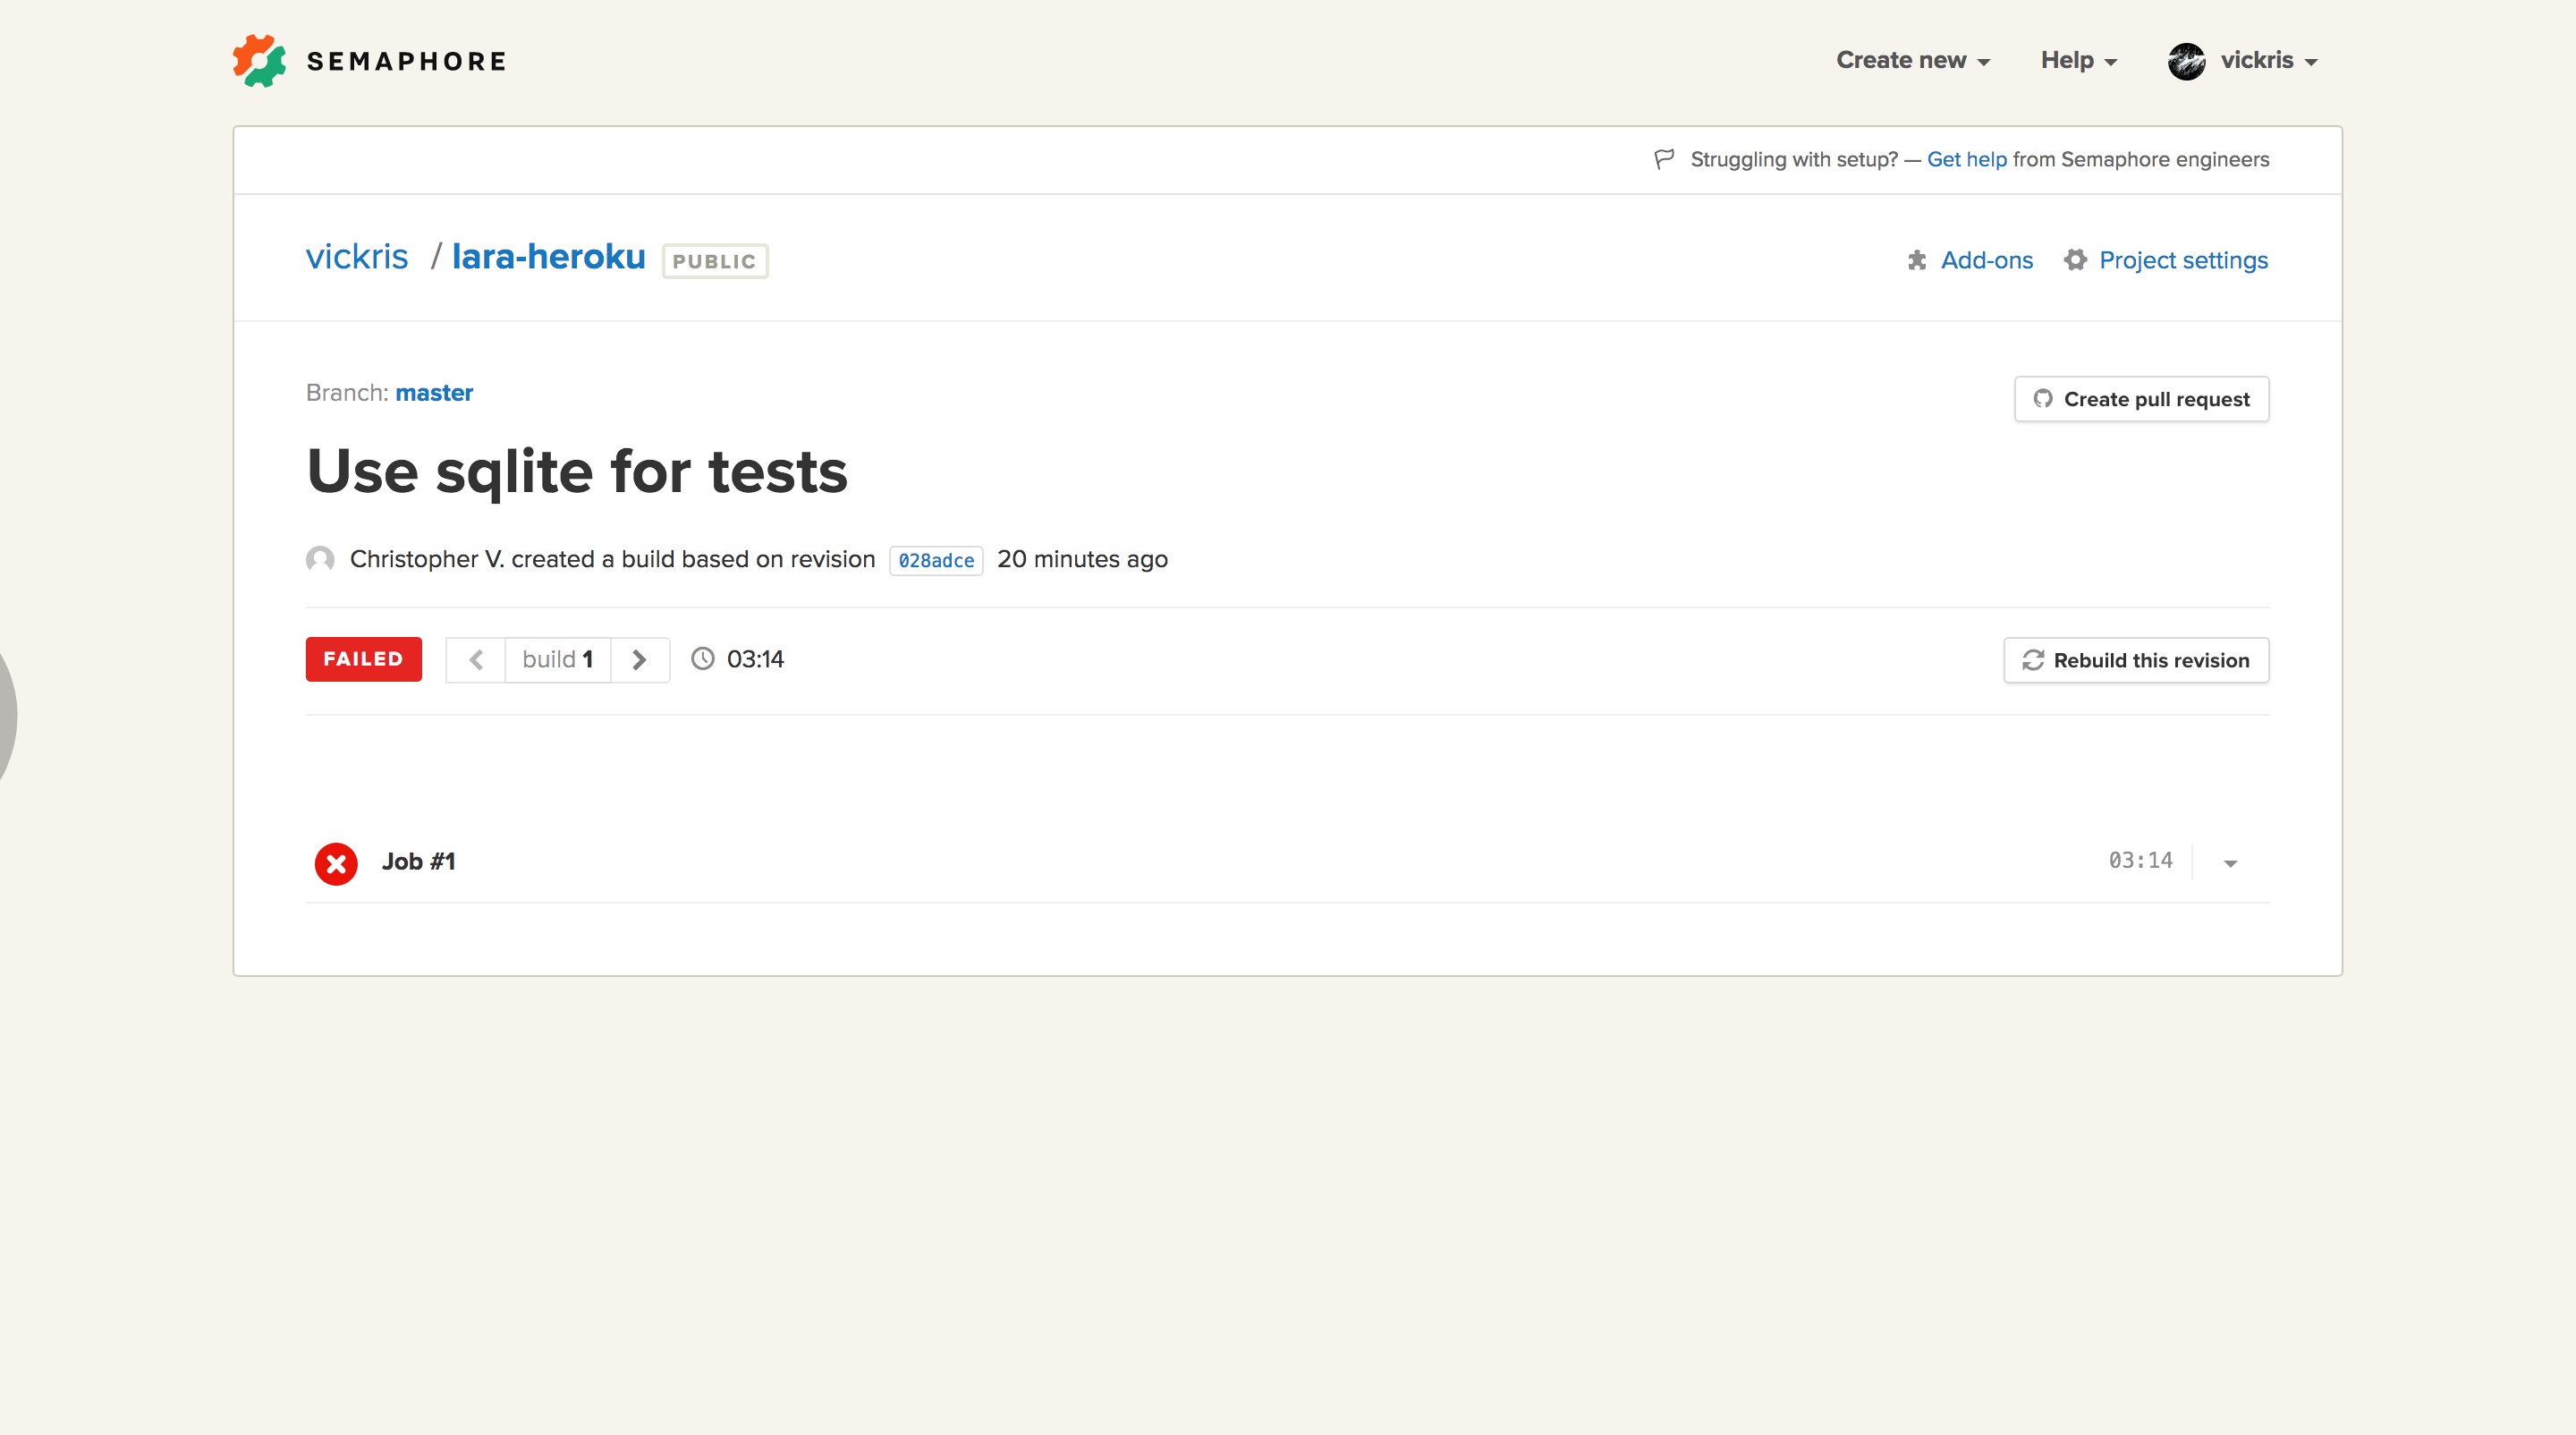
We can always check why the build has failed by clicking the down arrow on the job that failed. In our case, Job #1:
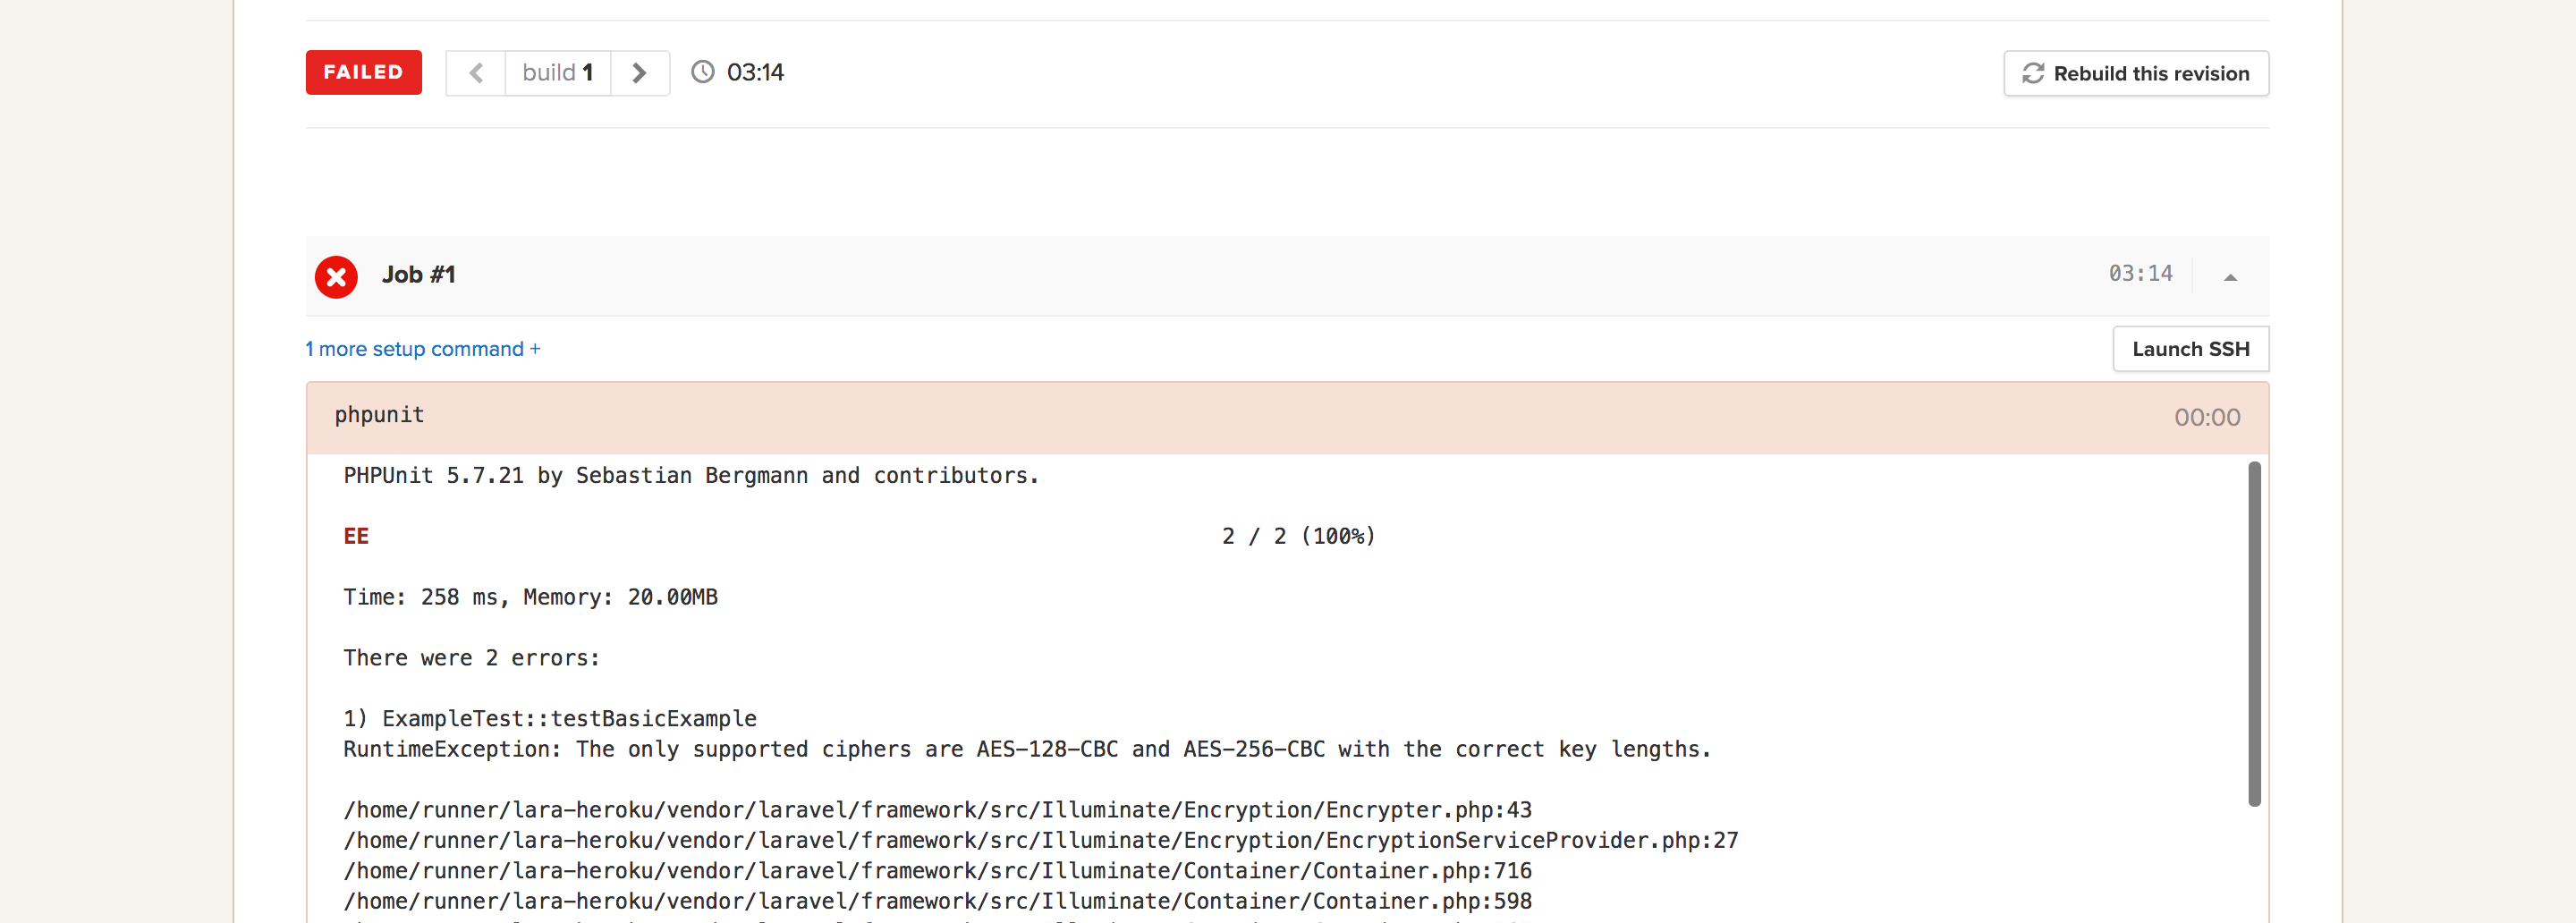
From the logs, we see that our tests failed because our application lacks an encryption key. This is usually the value set for the APP_KEY variable in the .env file. With Semaphore, we can directly copy the contents of our .env file into a new configuration file. Click on the Project Settings then Configuration Files on the left sidebar to create a new .env configuration file:

We should paste the contents of our .env file into the content section of the new configuration file like we did in the screenshot above. After that, save the new changes. Let’s run the build again.
To get to the builds page, click on the application name towards the top left corner, then click the red button that says FAILED under the Branches section. You should be redirected to the page shown below:
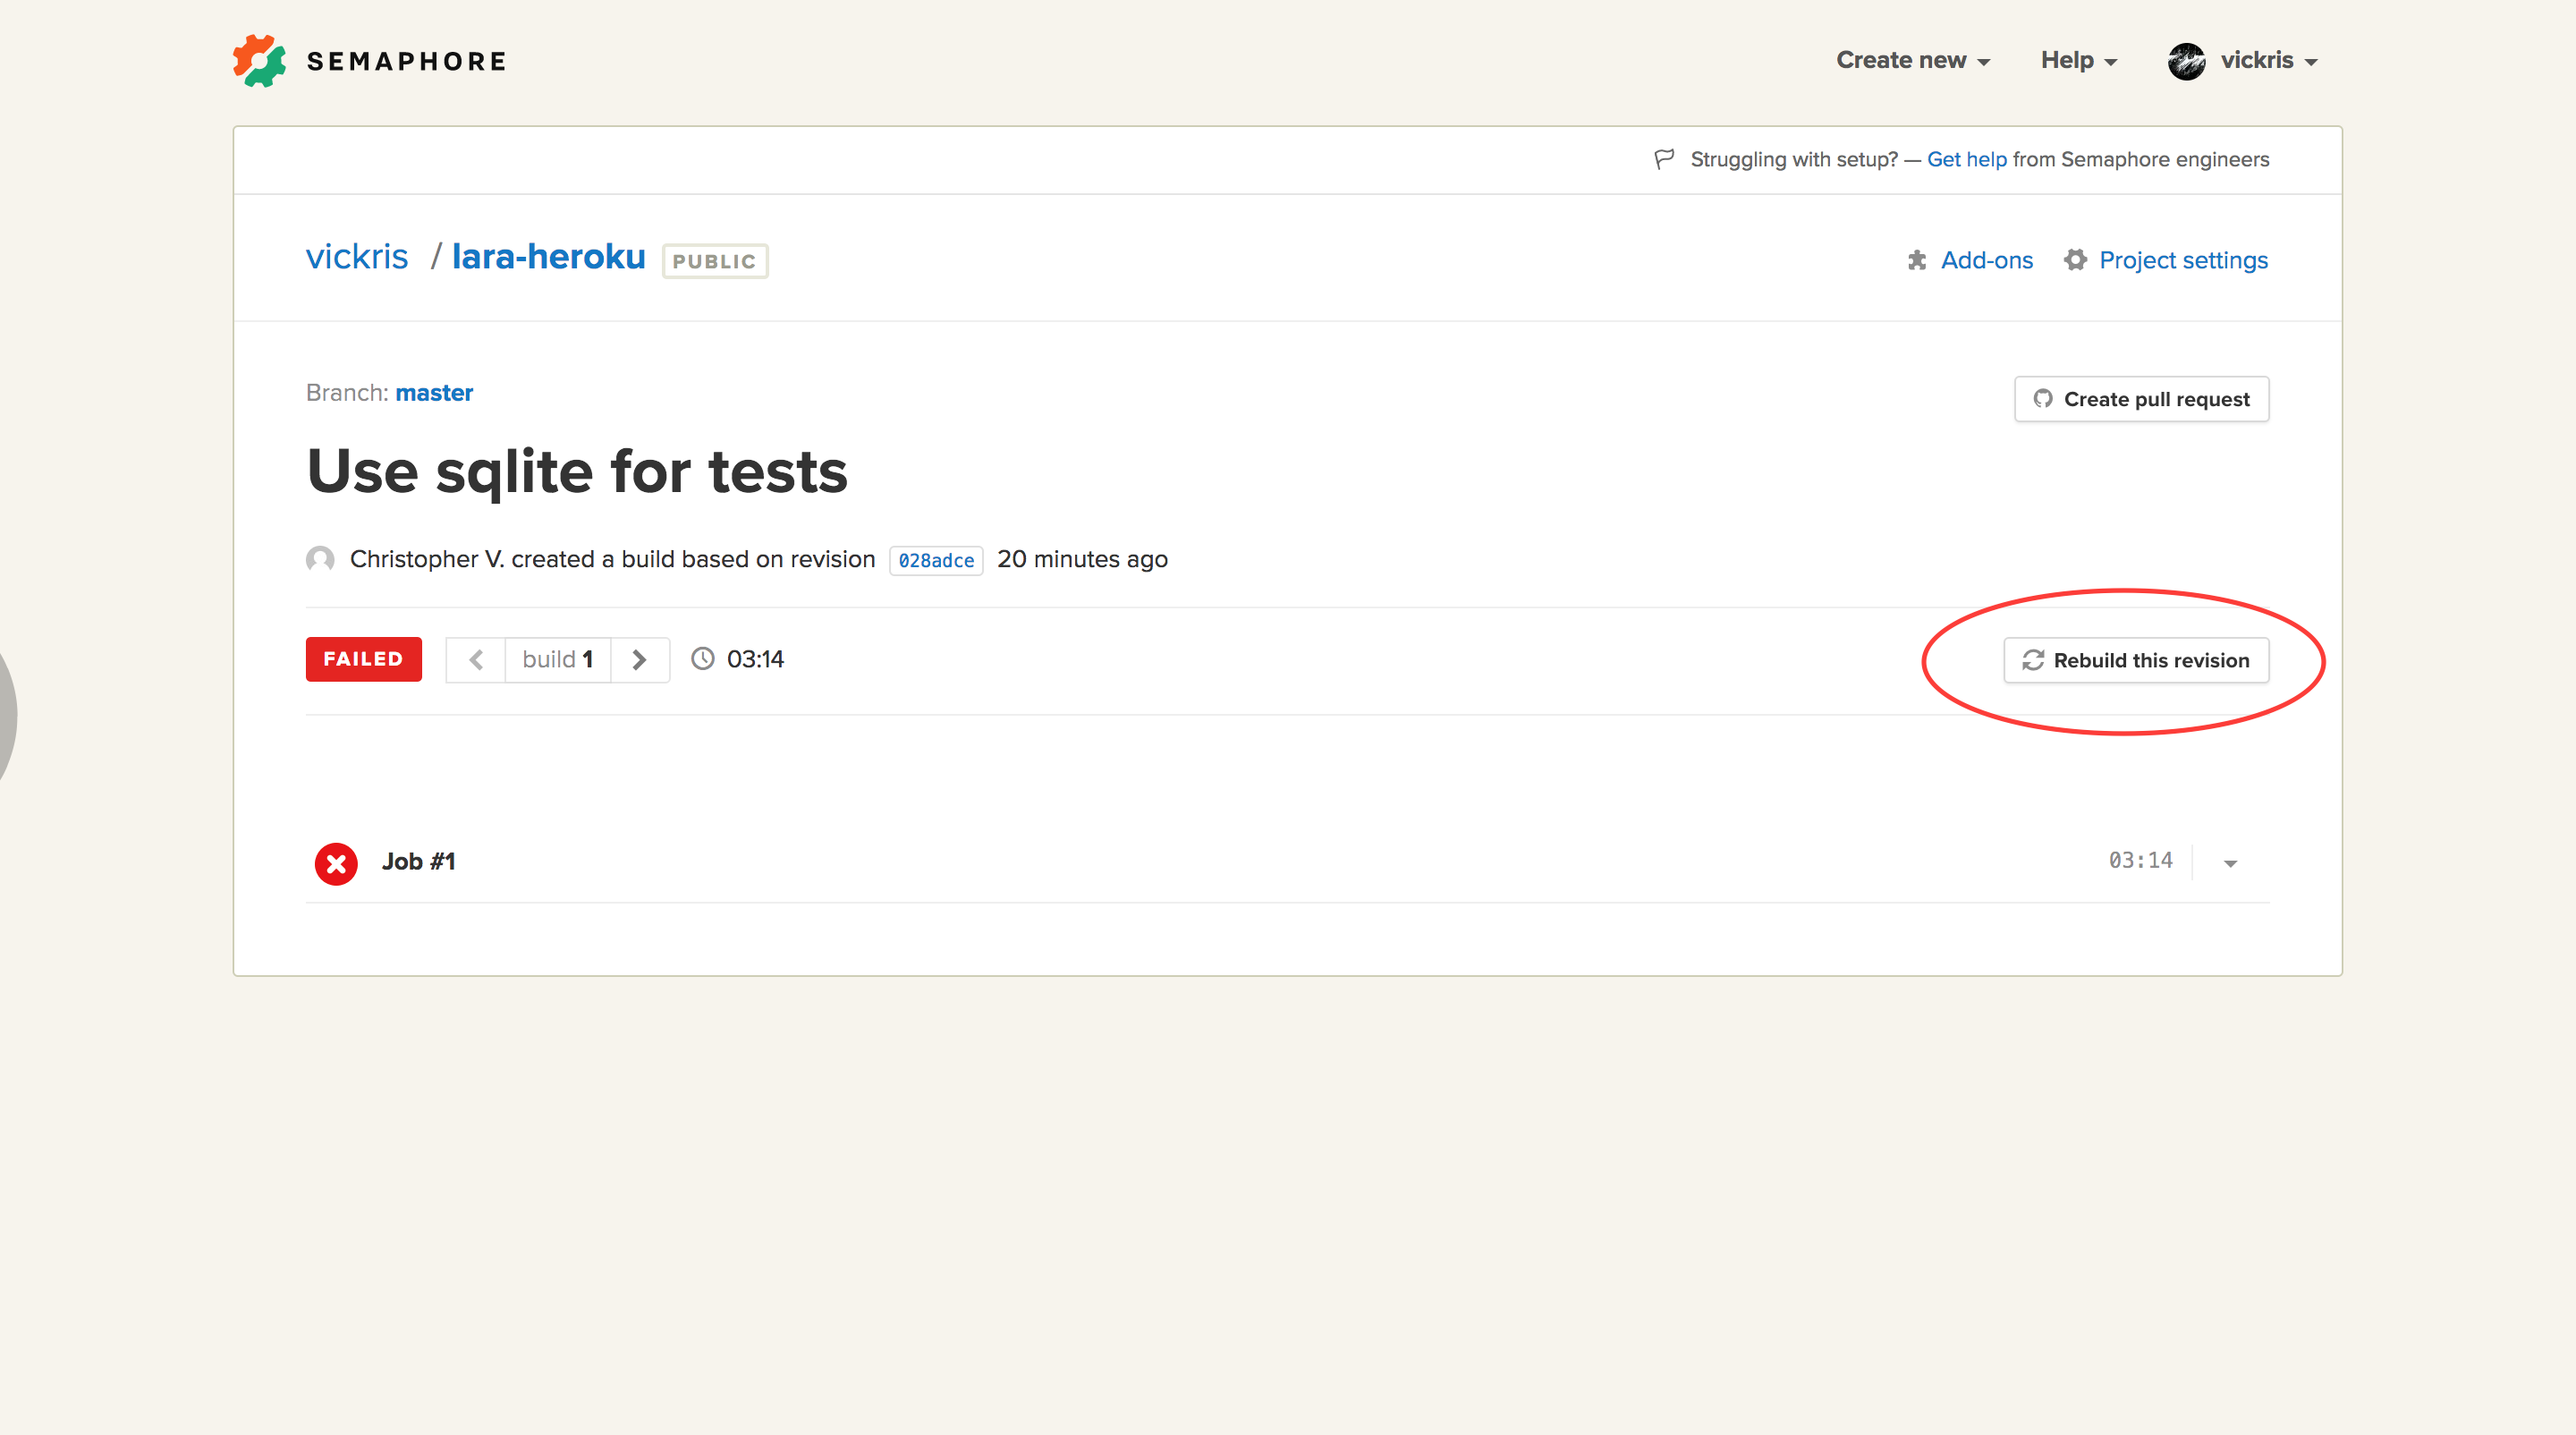
Click the “Rebuild this revision” button. This time round, the build will pass.
Let’s now look into Continous Deployment to Heroku with Semaphore. With Continous Deployment, every time we have a successful build, the new changes will be deployed to our Heroku application.
Creating the Heroku Application
When creating a Heroku application, we have two options. We can create the application from Heroku’s dashboard then add the heroku remote to our local application, or, we can create the application from the command line. The later is a faster way to do so, because all we need to do is enter the following commands:
heroku login
heroku create
The heroku create command will generate a new Heroku application linked to this repo. Heroku will also generate a unique name for the application. If we wanted to explicitly specify the application name, then we’d have to pass in the name we wanted as a parameter to the heroku create command. Like so:
heroku create desired-app-name
Note, the application name has to be unique otherwise Heroku will ask you to choose another name.
It’s also a good practice to tell Heroku the language we should use for our builds, and that’s PHP:
heroku buildpacks:set heroku/php
Continous Deployment
Continuous Deploymenr with Semaphore can be set up in just a couple of clicks.
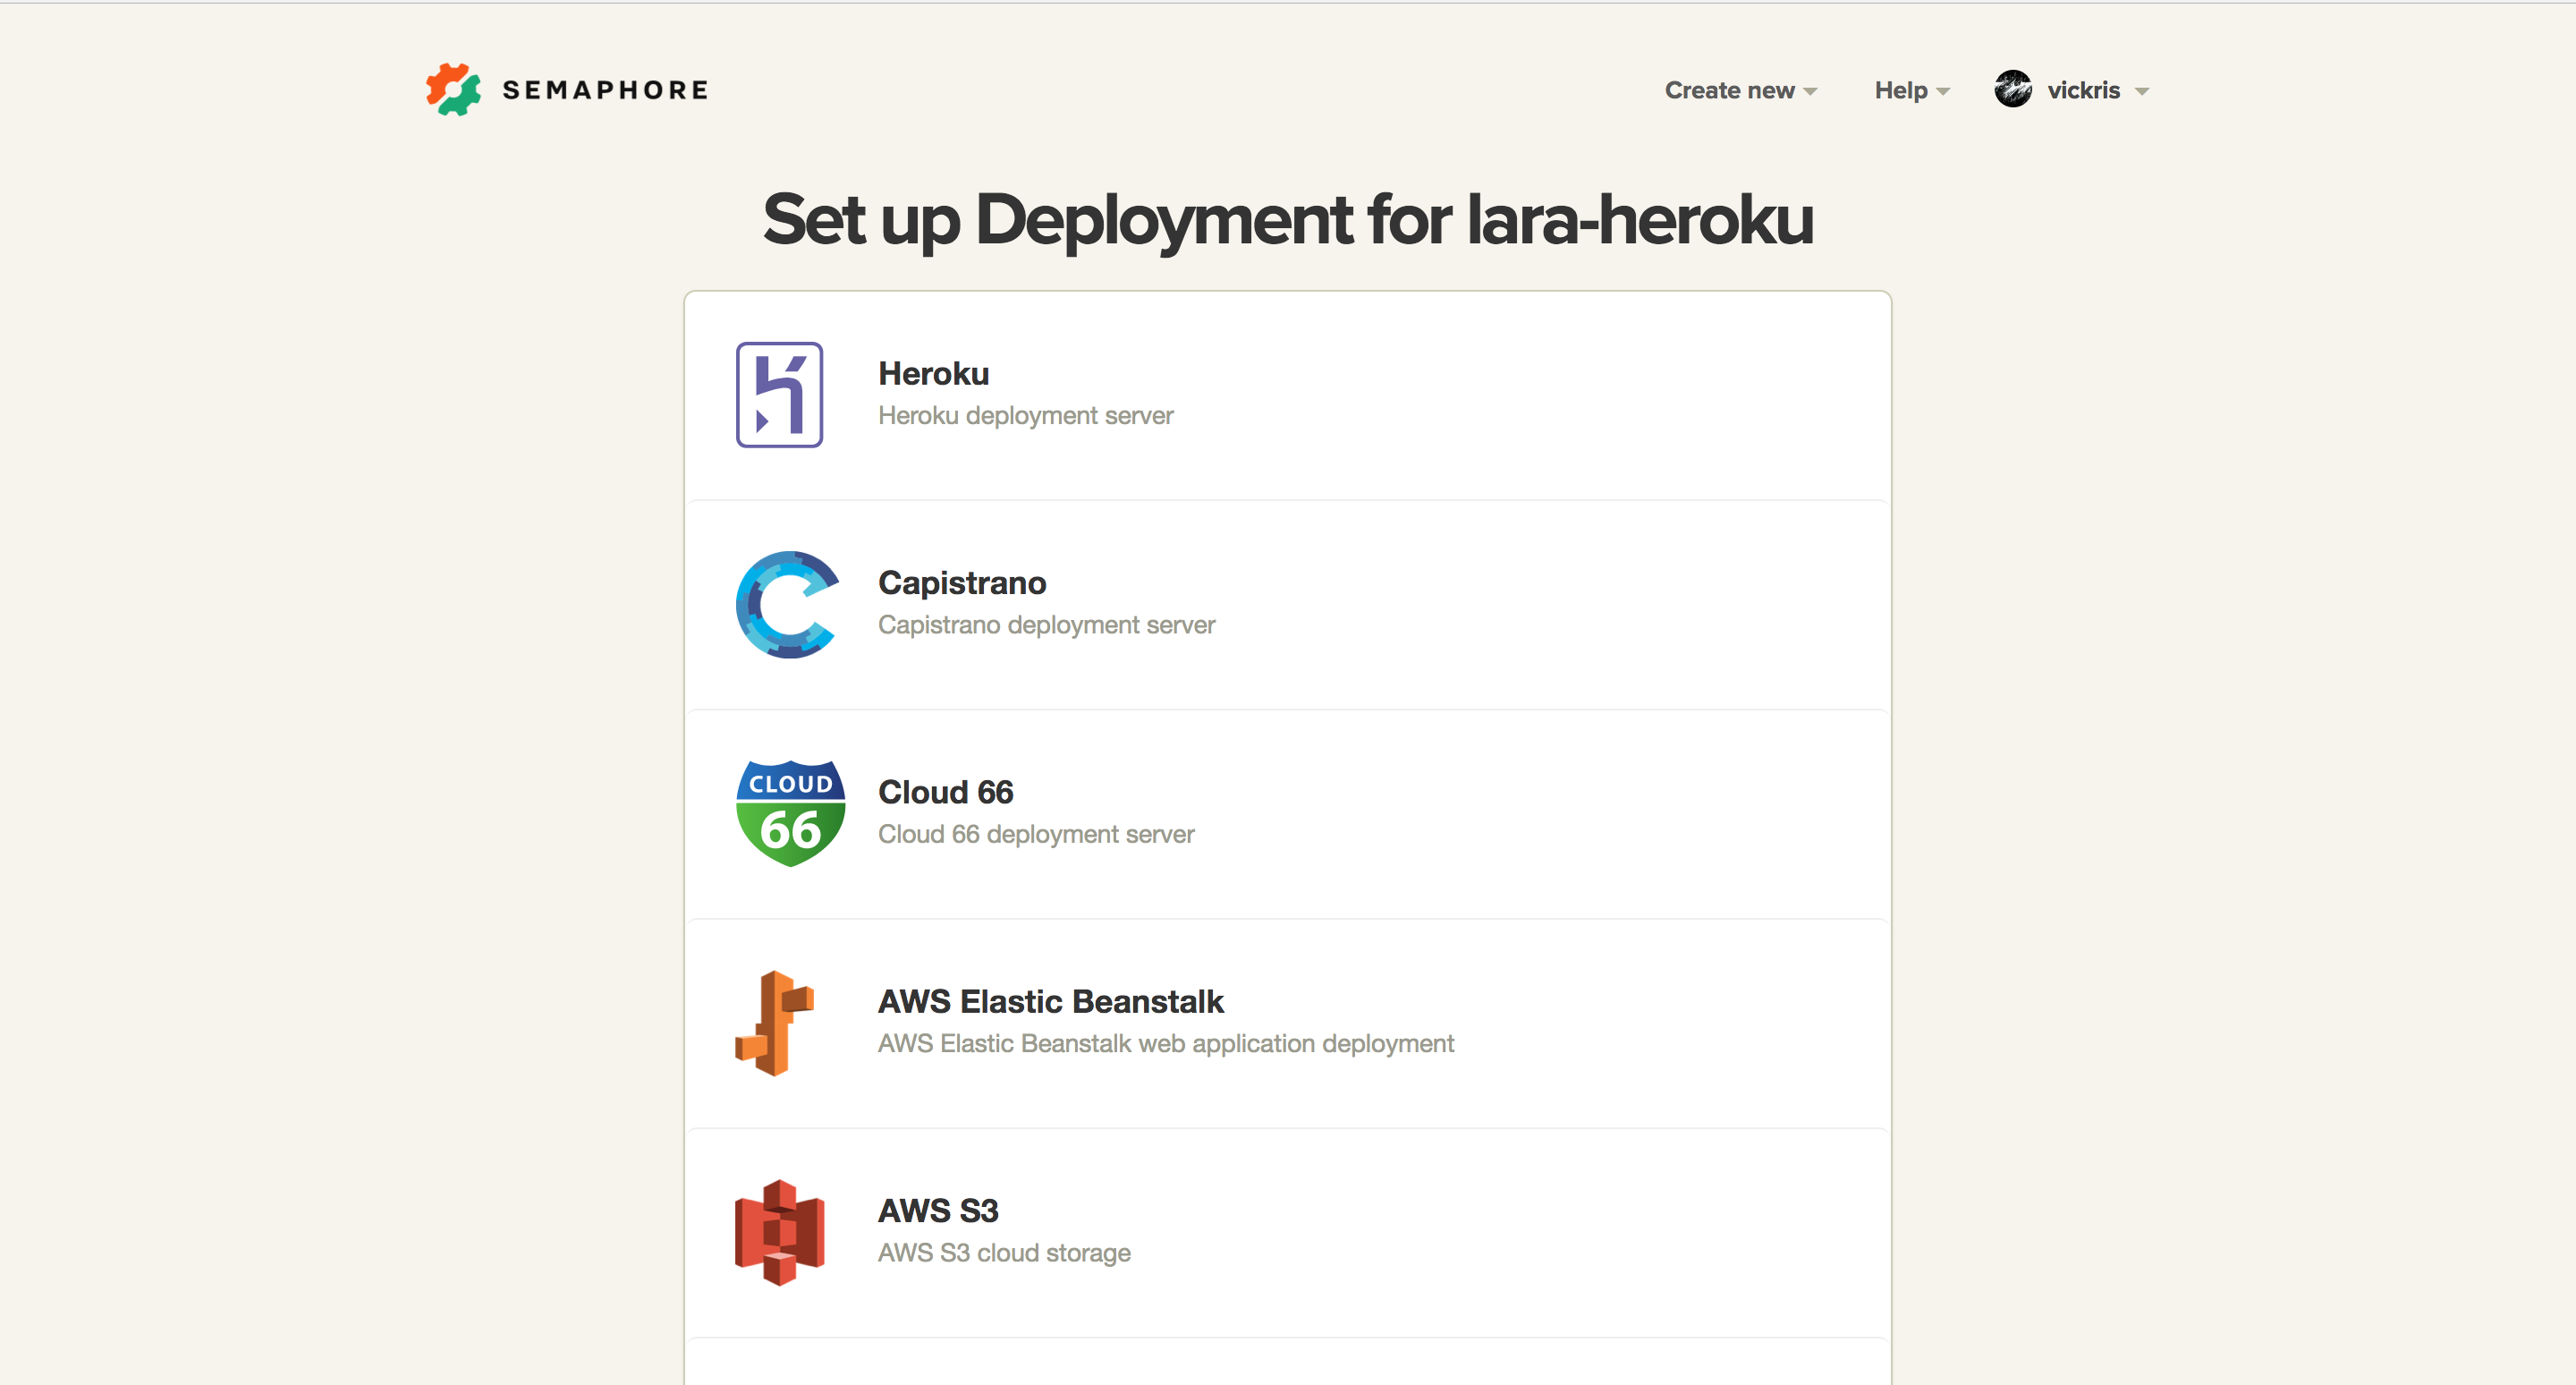
- Click the “Set Up Deployment Button”. If you can’t find it, just click on the application name towards the top left corner. You should be redirected to a page with the button:

- On the “Set Up a Server for Deployment” page, choose Heroku:
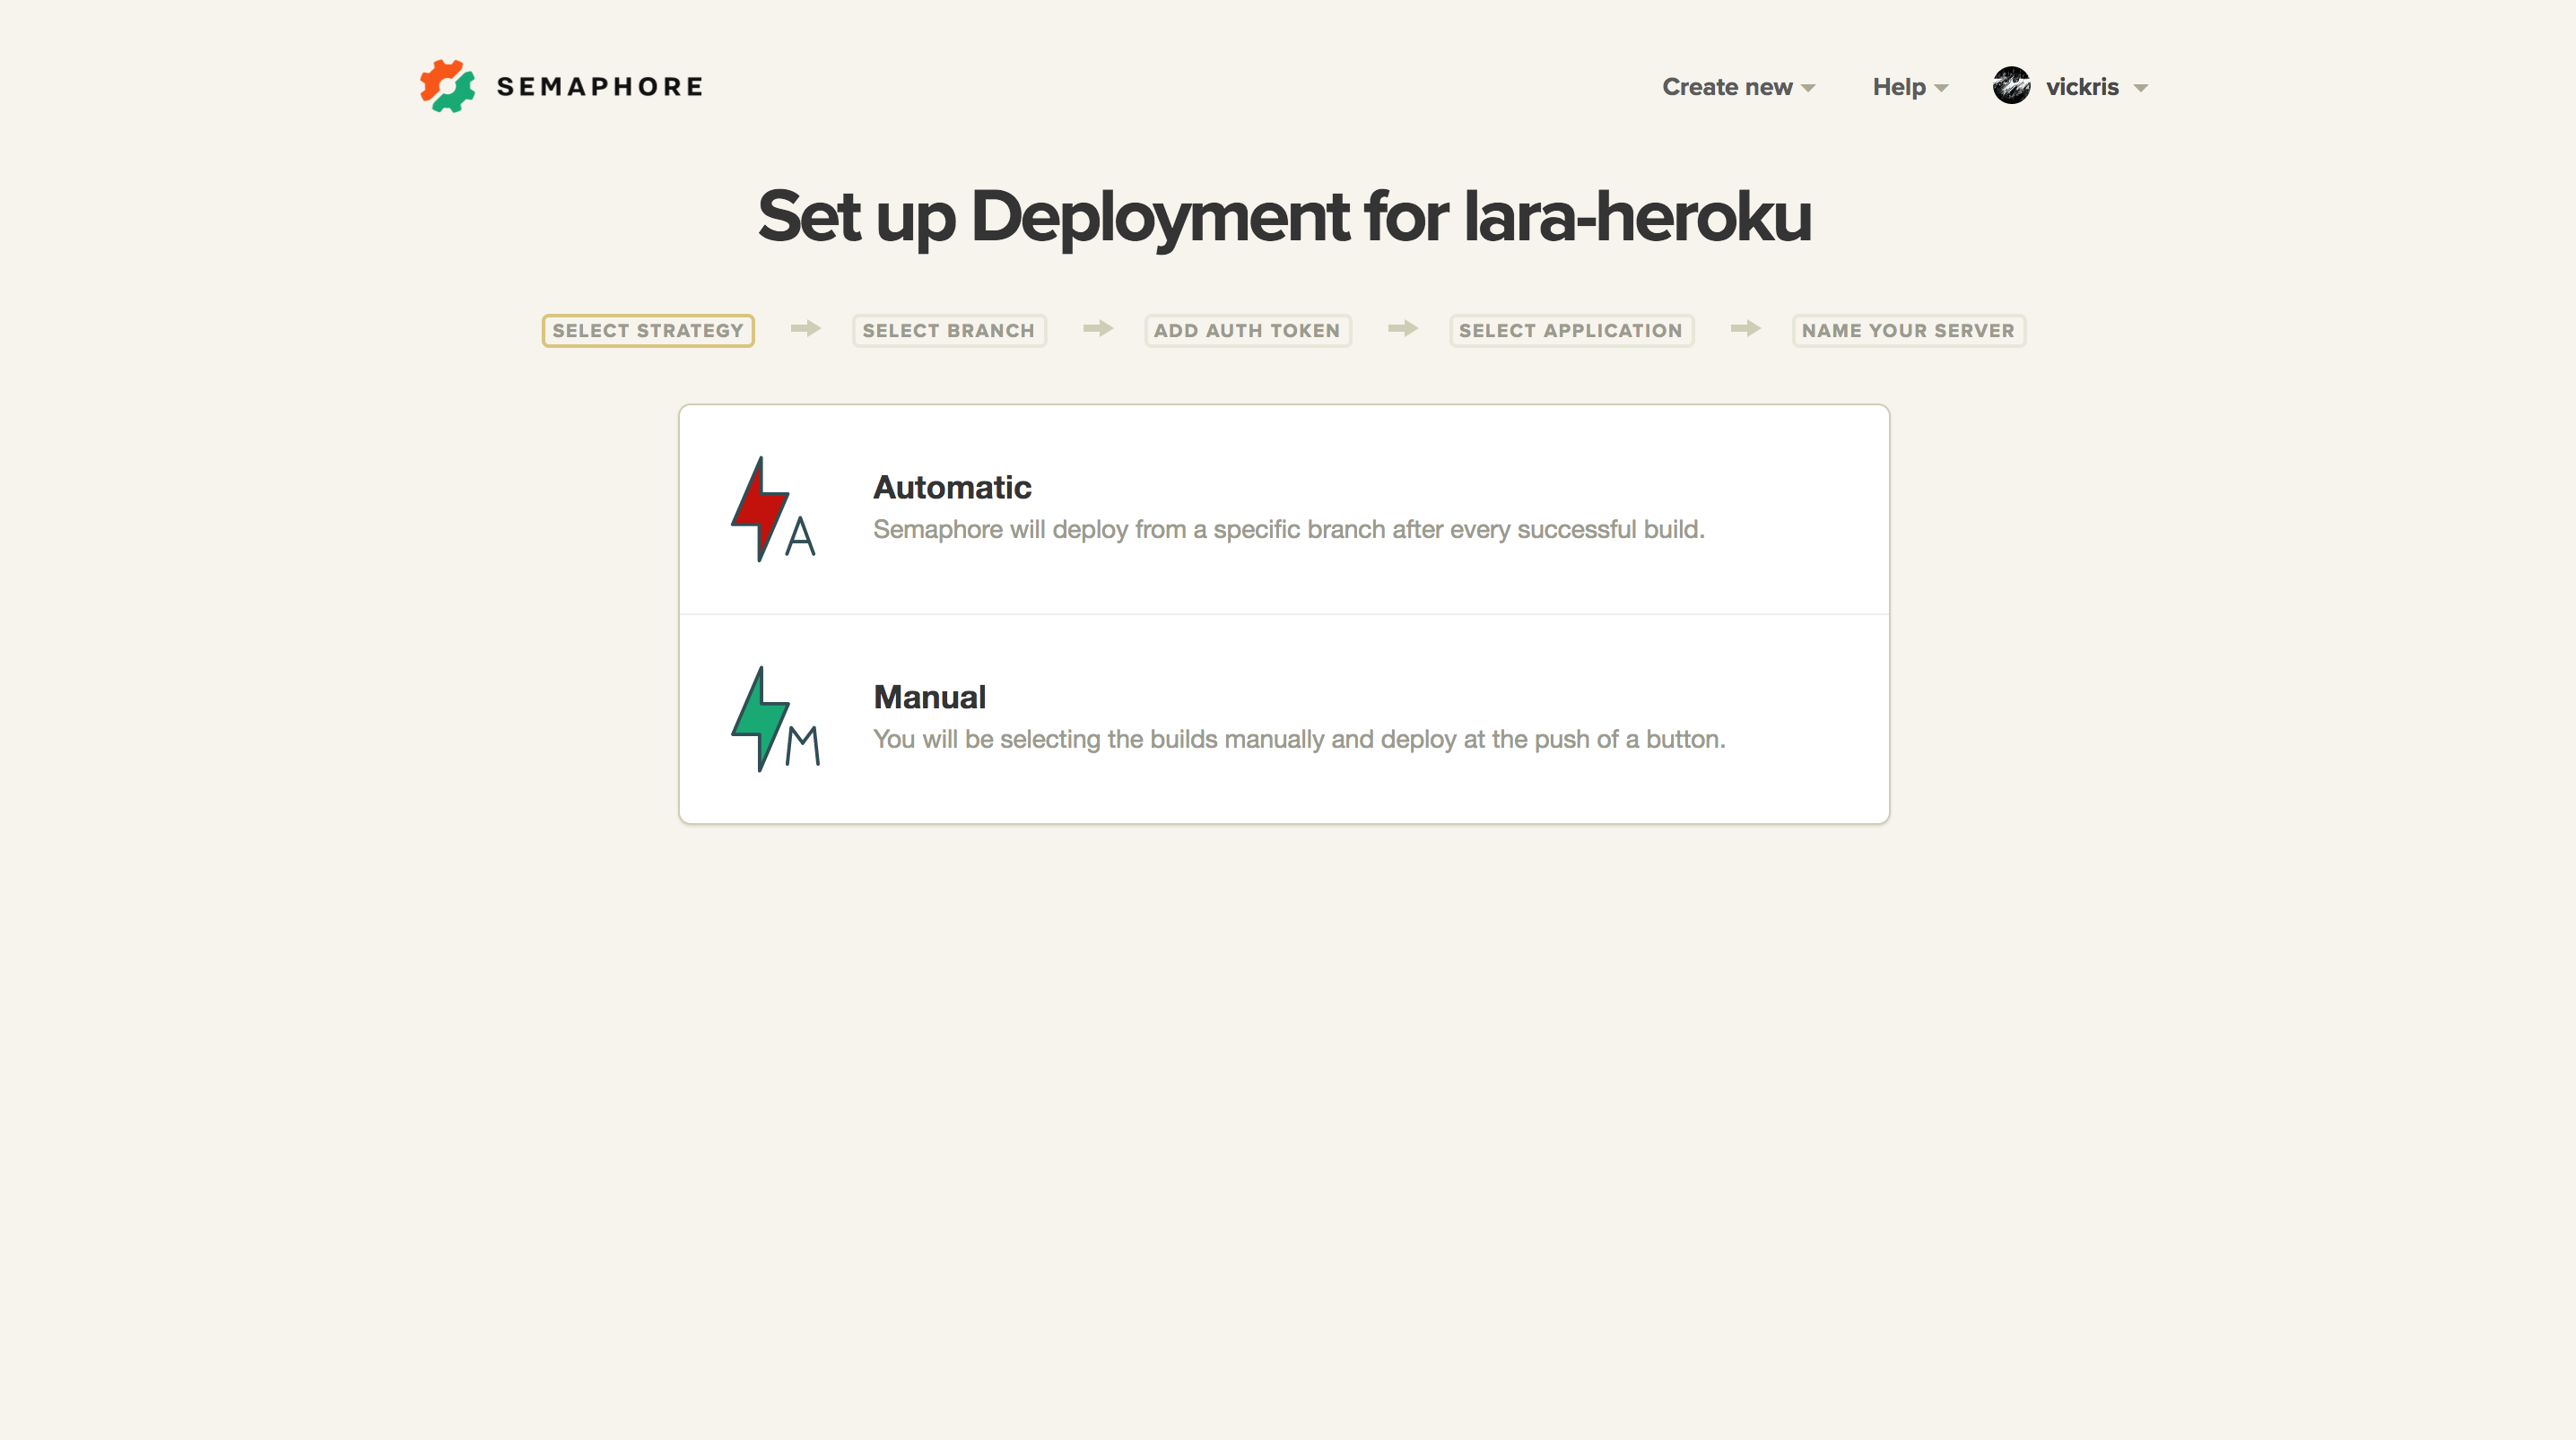
- Select the “Automatic” deploy strategy. With automatic deployment, new changes will be deployed to production after every successful build:
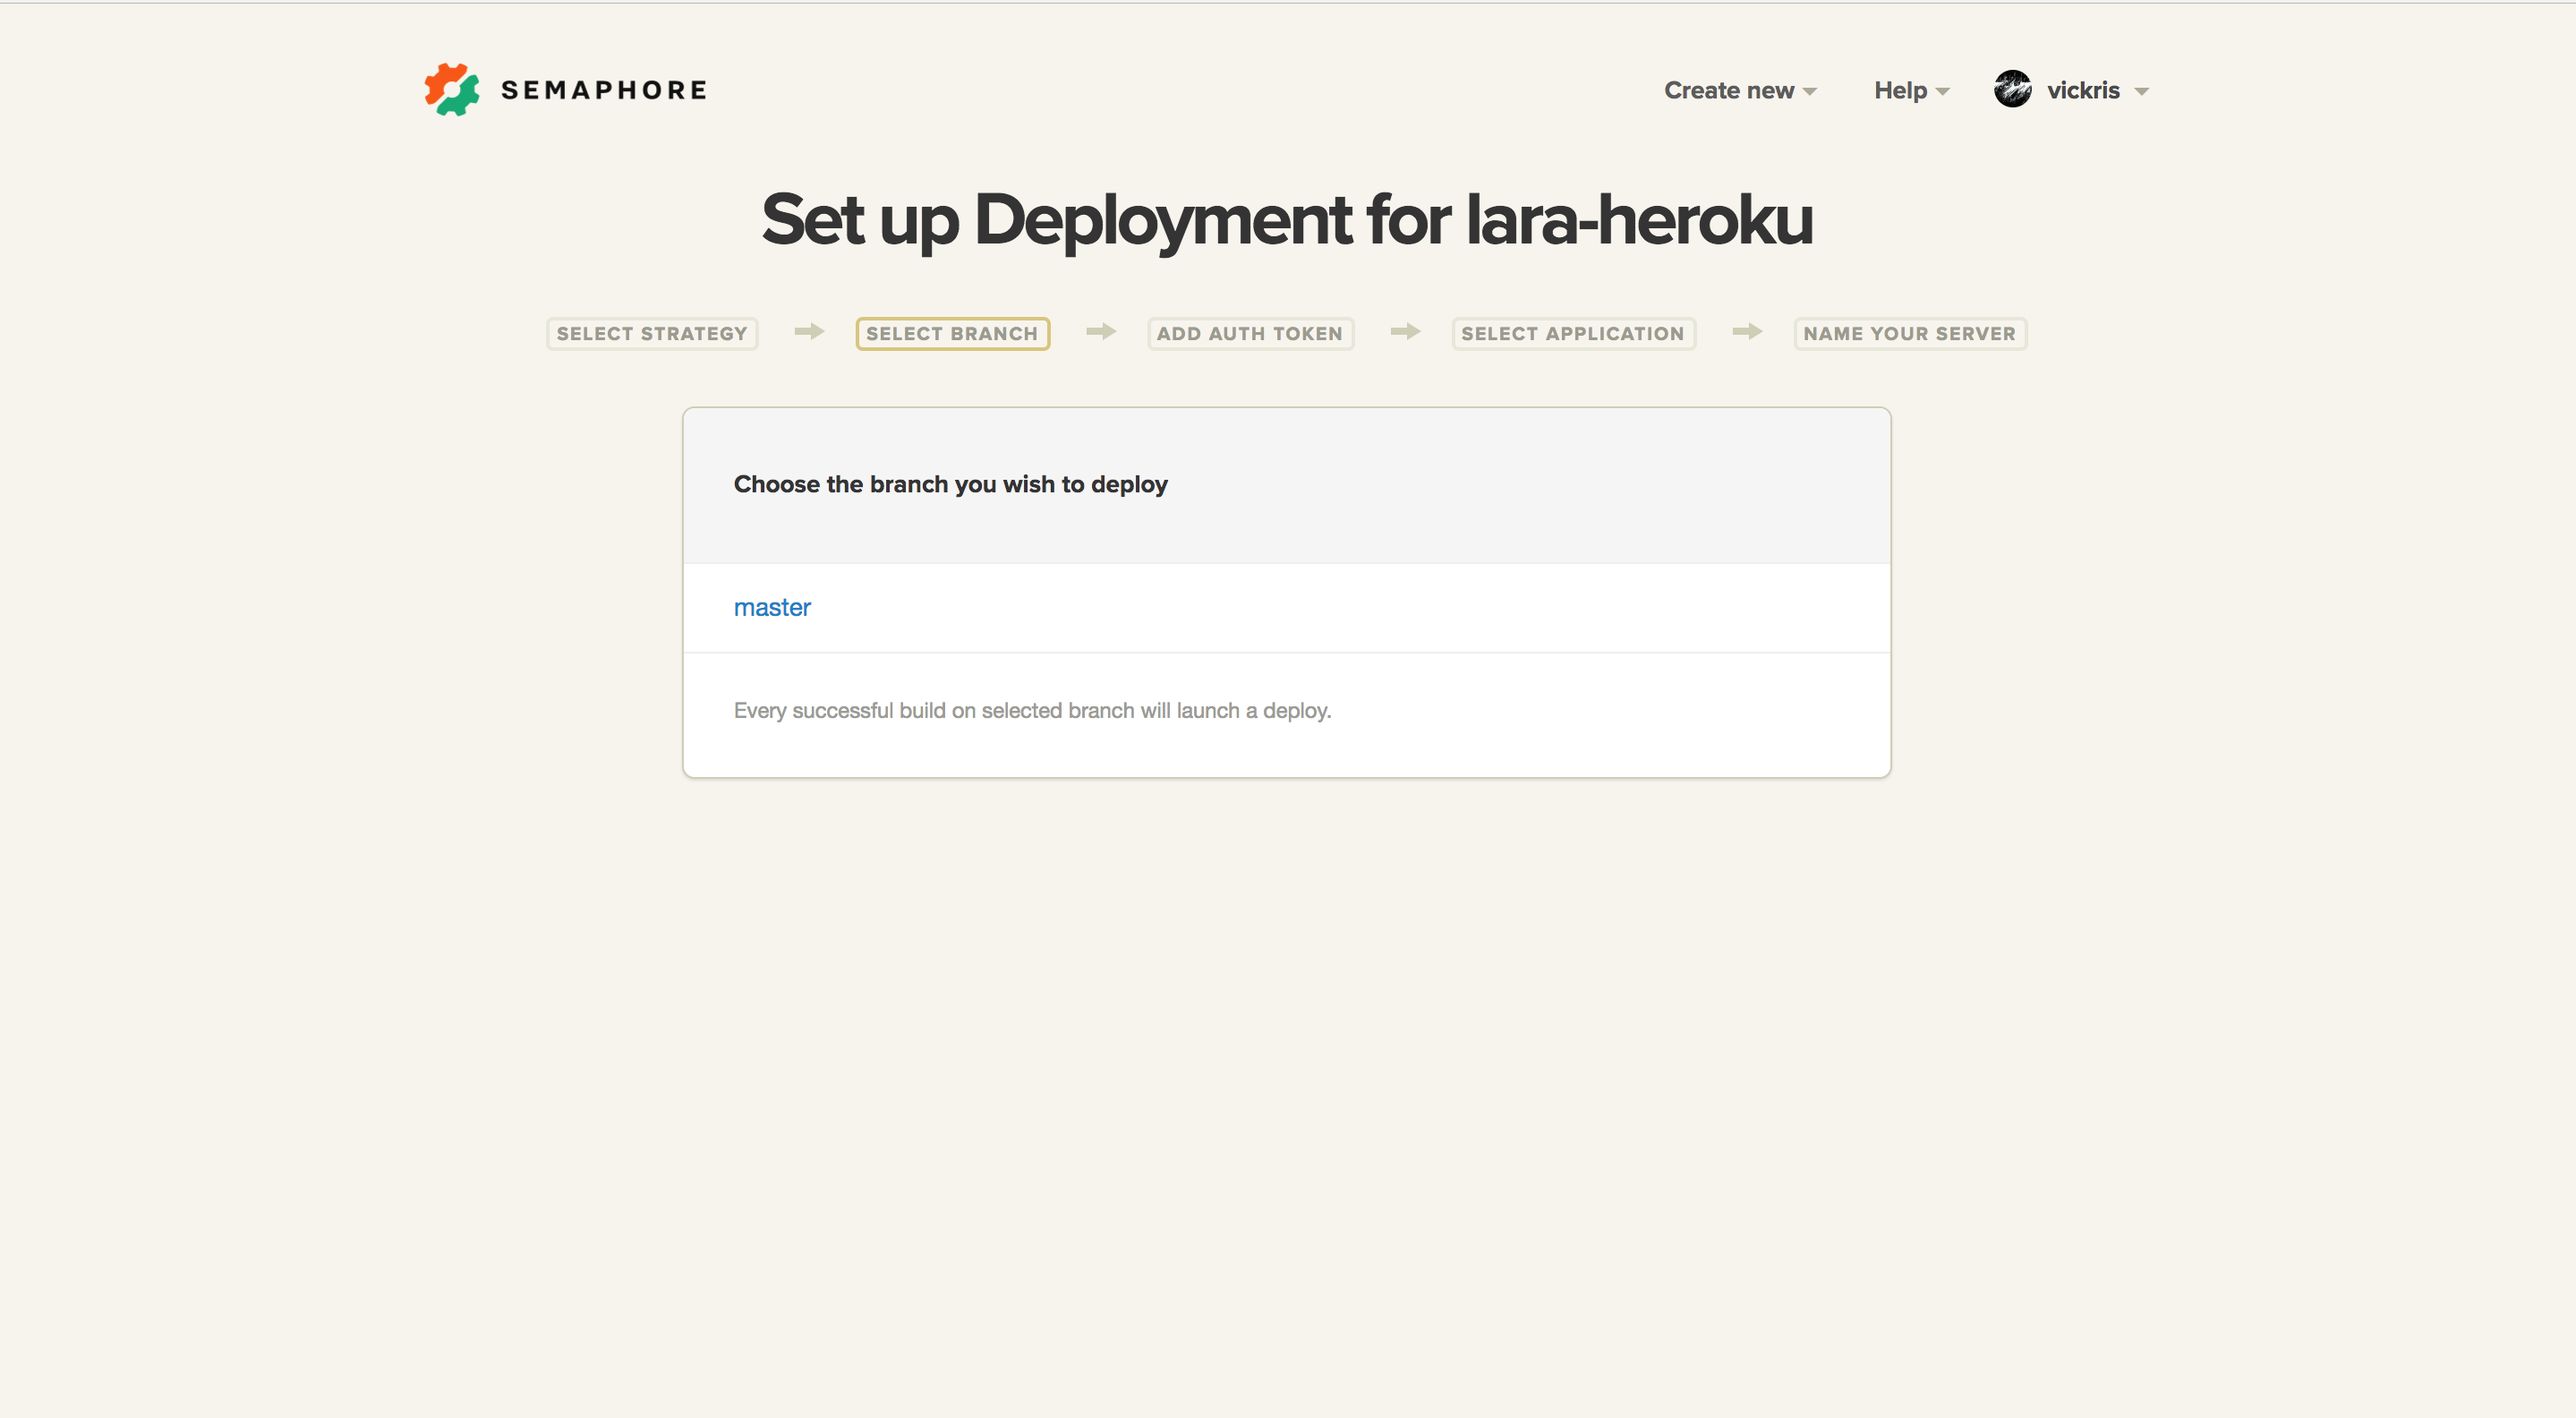
- Select the branch which you wish to deploy to. We’ll choose
master, but it could be any branch you need, e.g. astagingbranch:
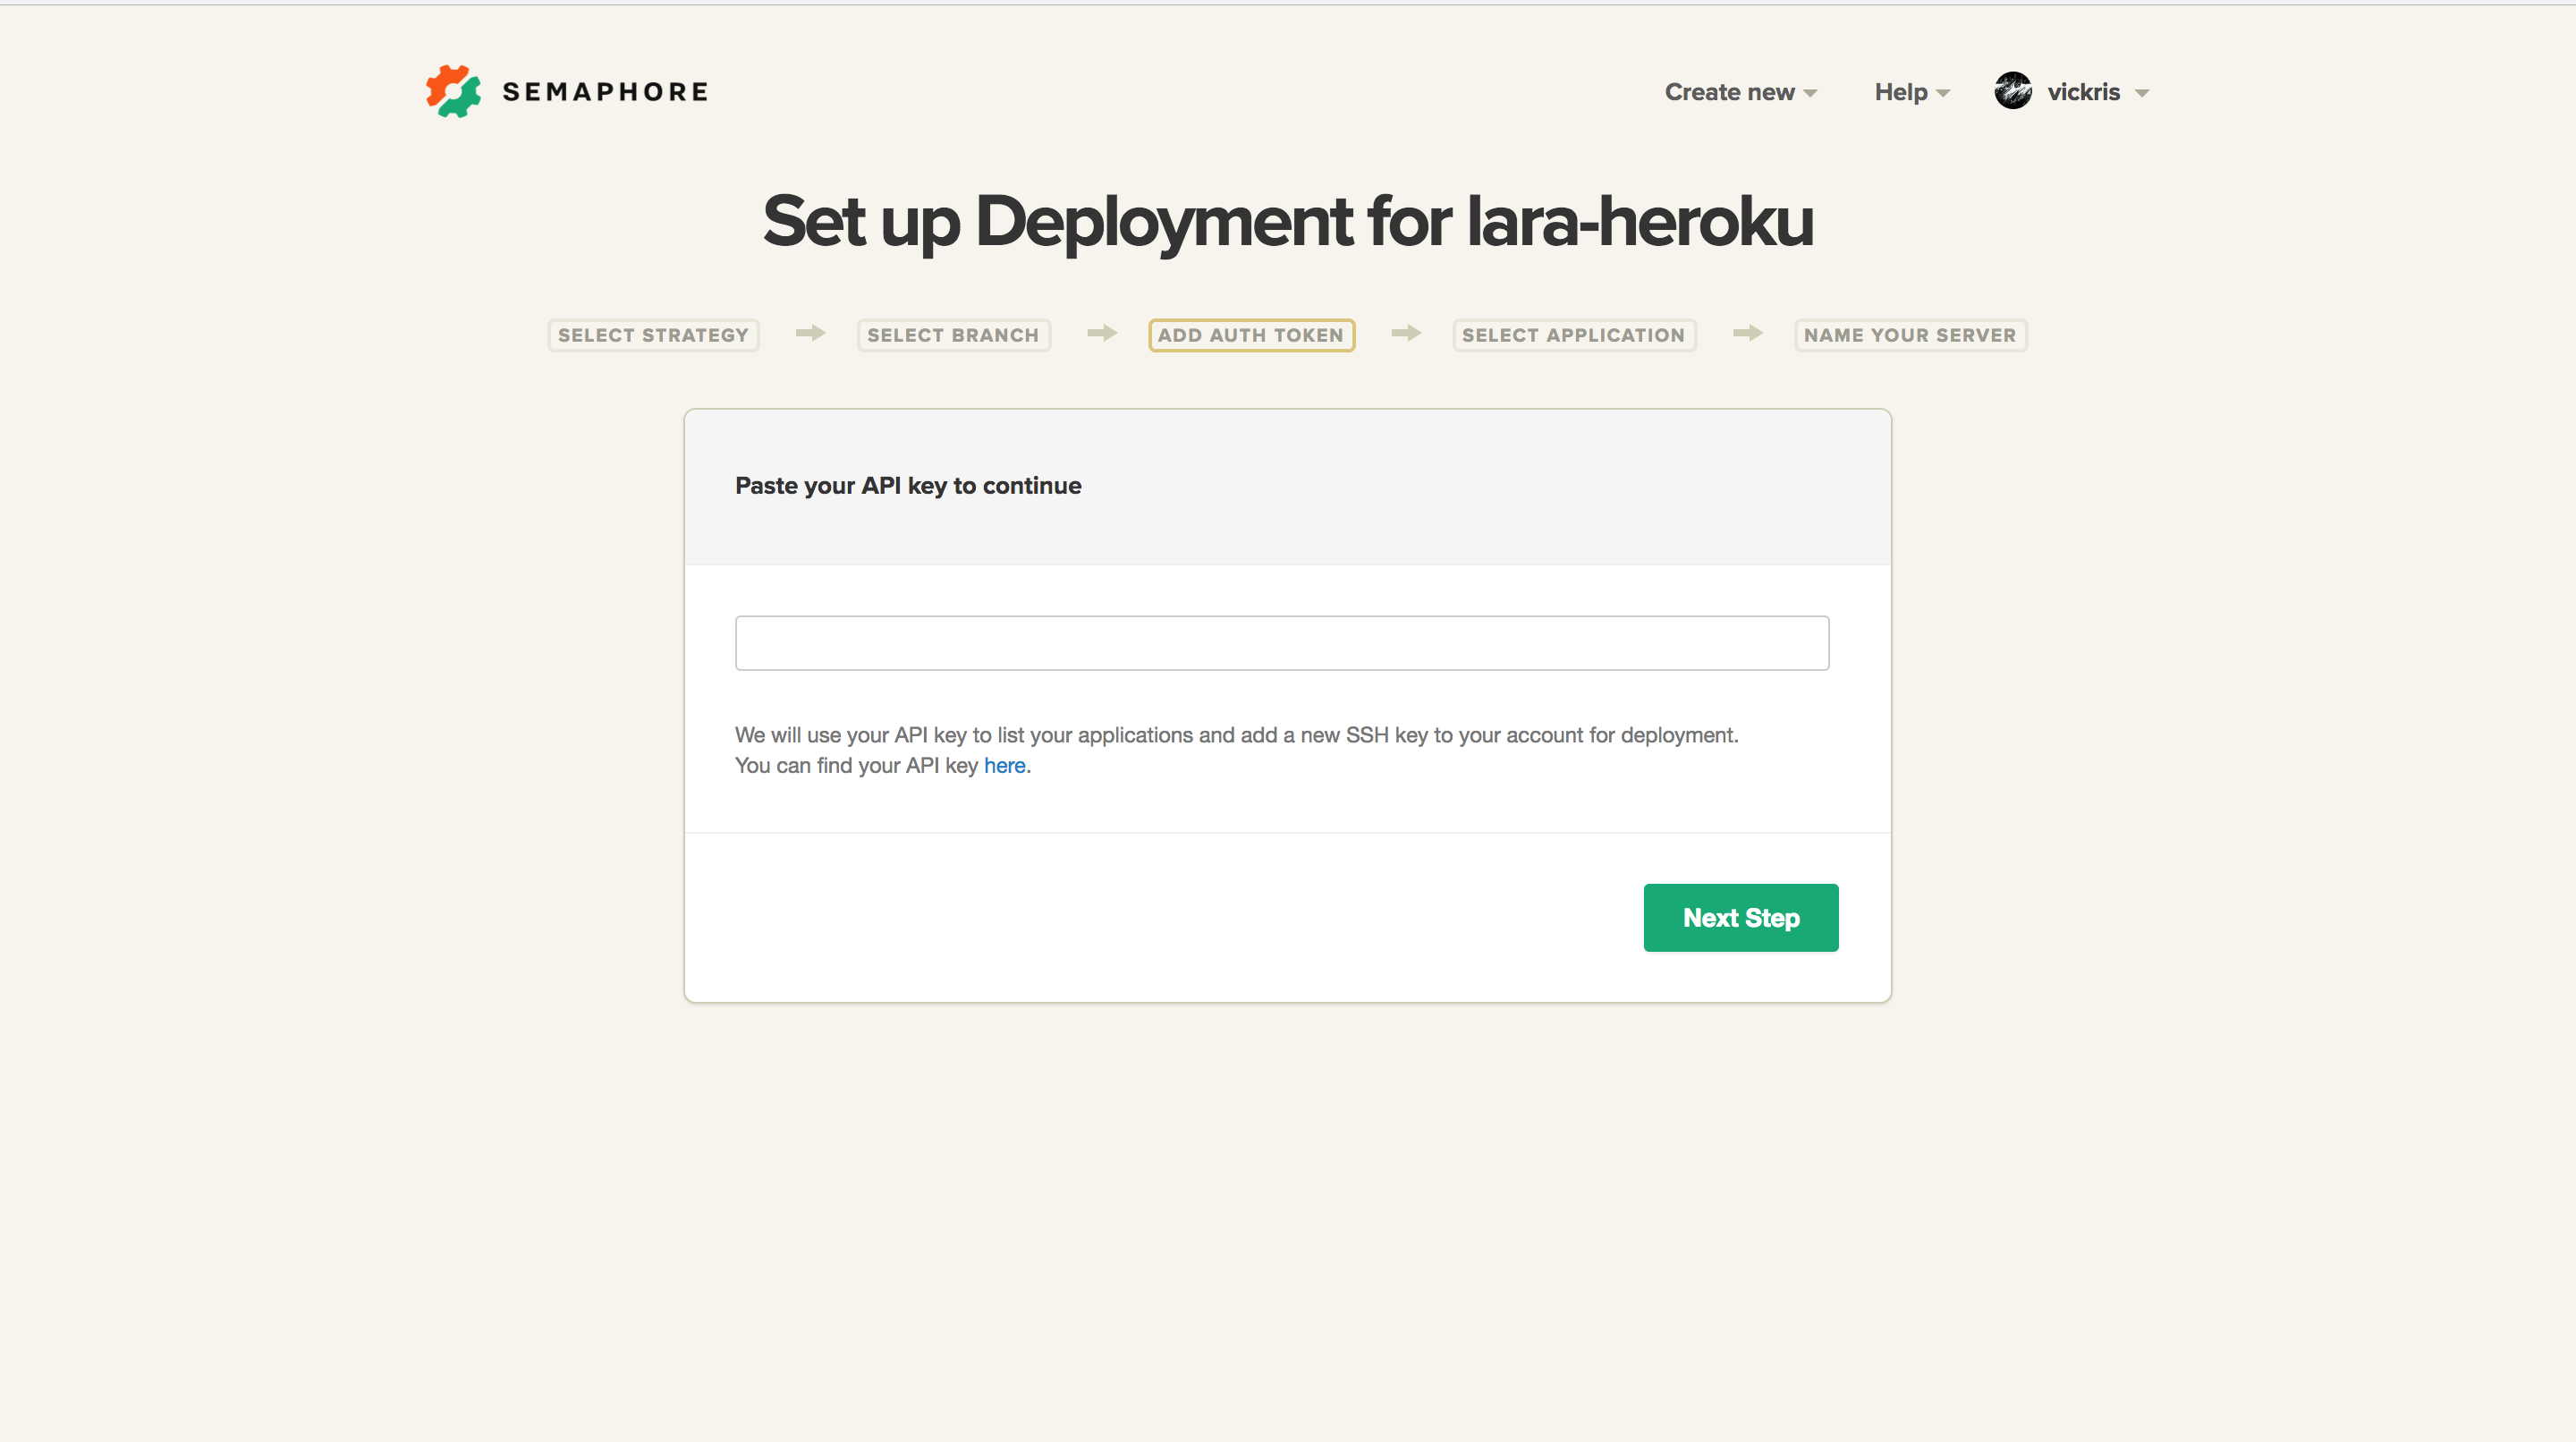
- We need a Heroku API key for Semaphore to be able to communicate with Heroku. The link below the text box will take you to Heroku settings where the API key is accessible:
After this, we should see all our Heroku applications listed. Choose the one we just created.
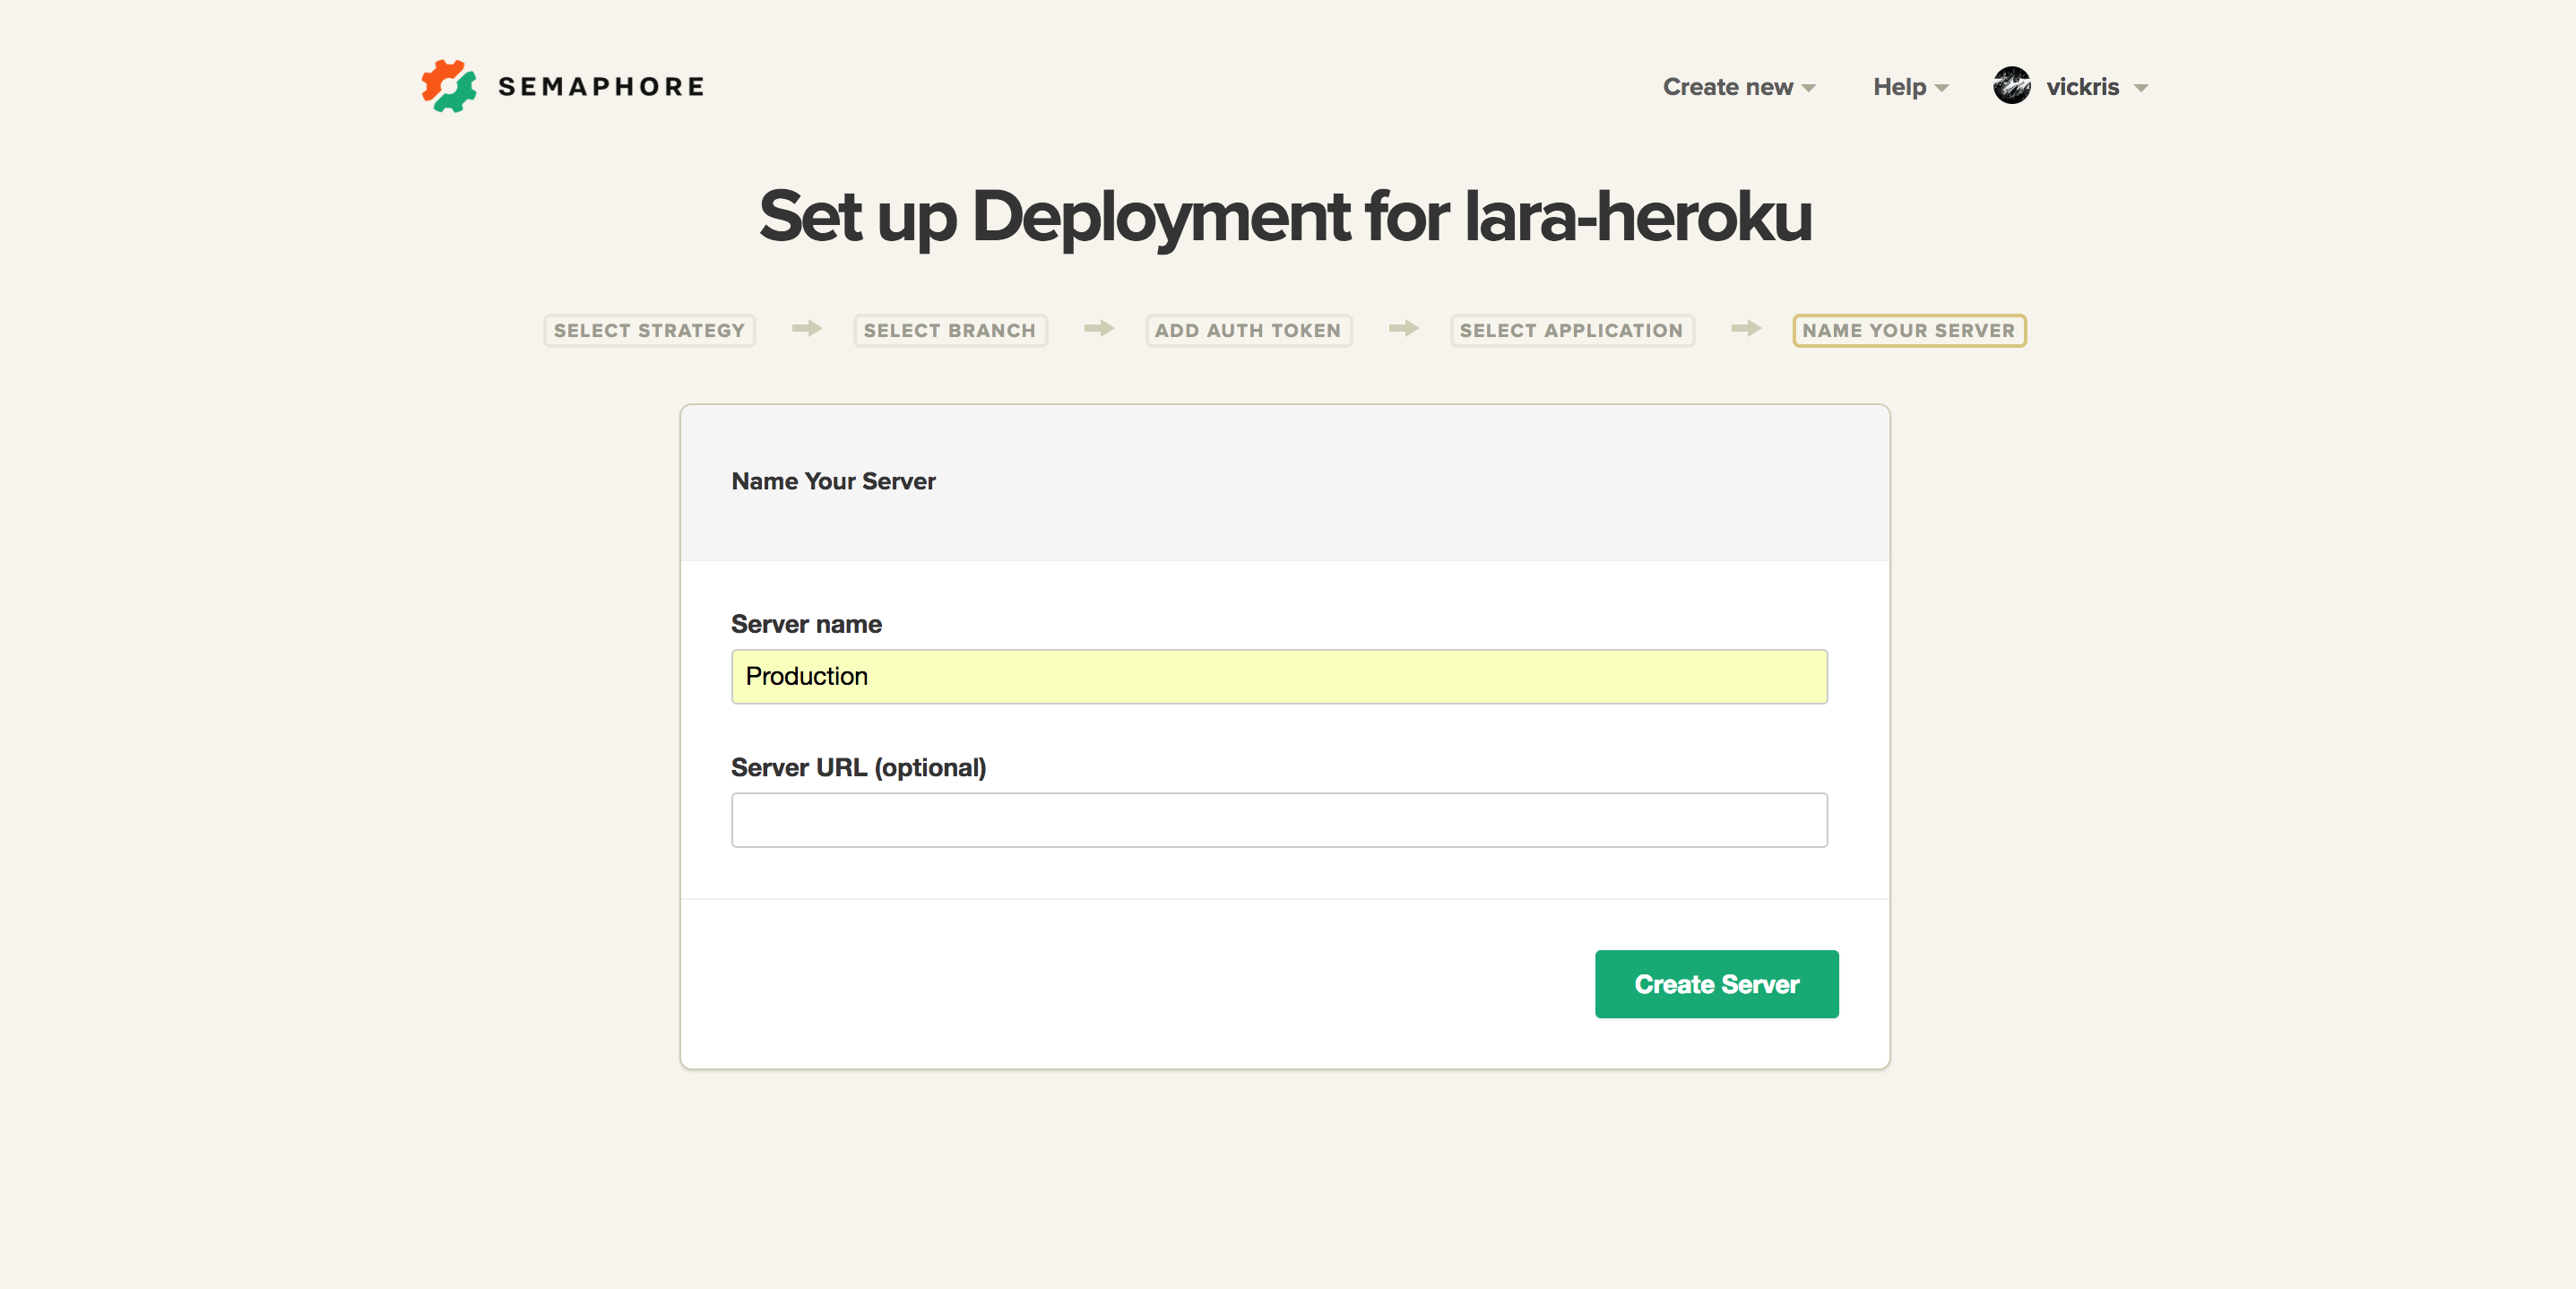
- The last step is naming our server. Semaphore will choose a name for us but it’s possible to change the name:
You should now be taken to a new page from which you can deploy to Heroku with a click of a button:
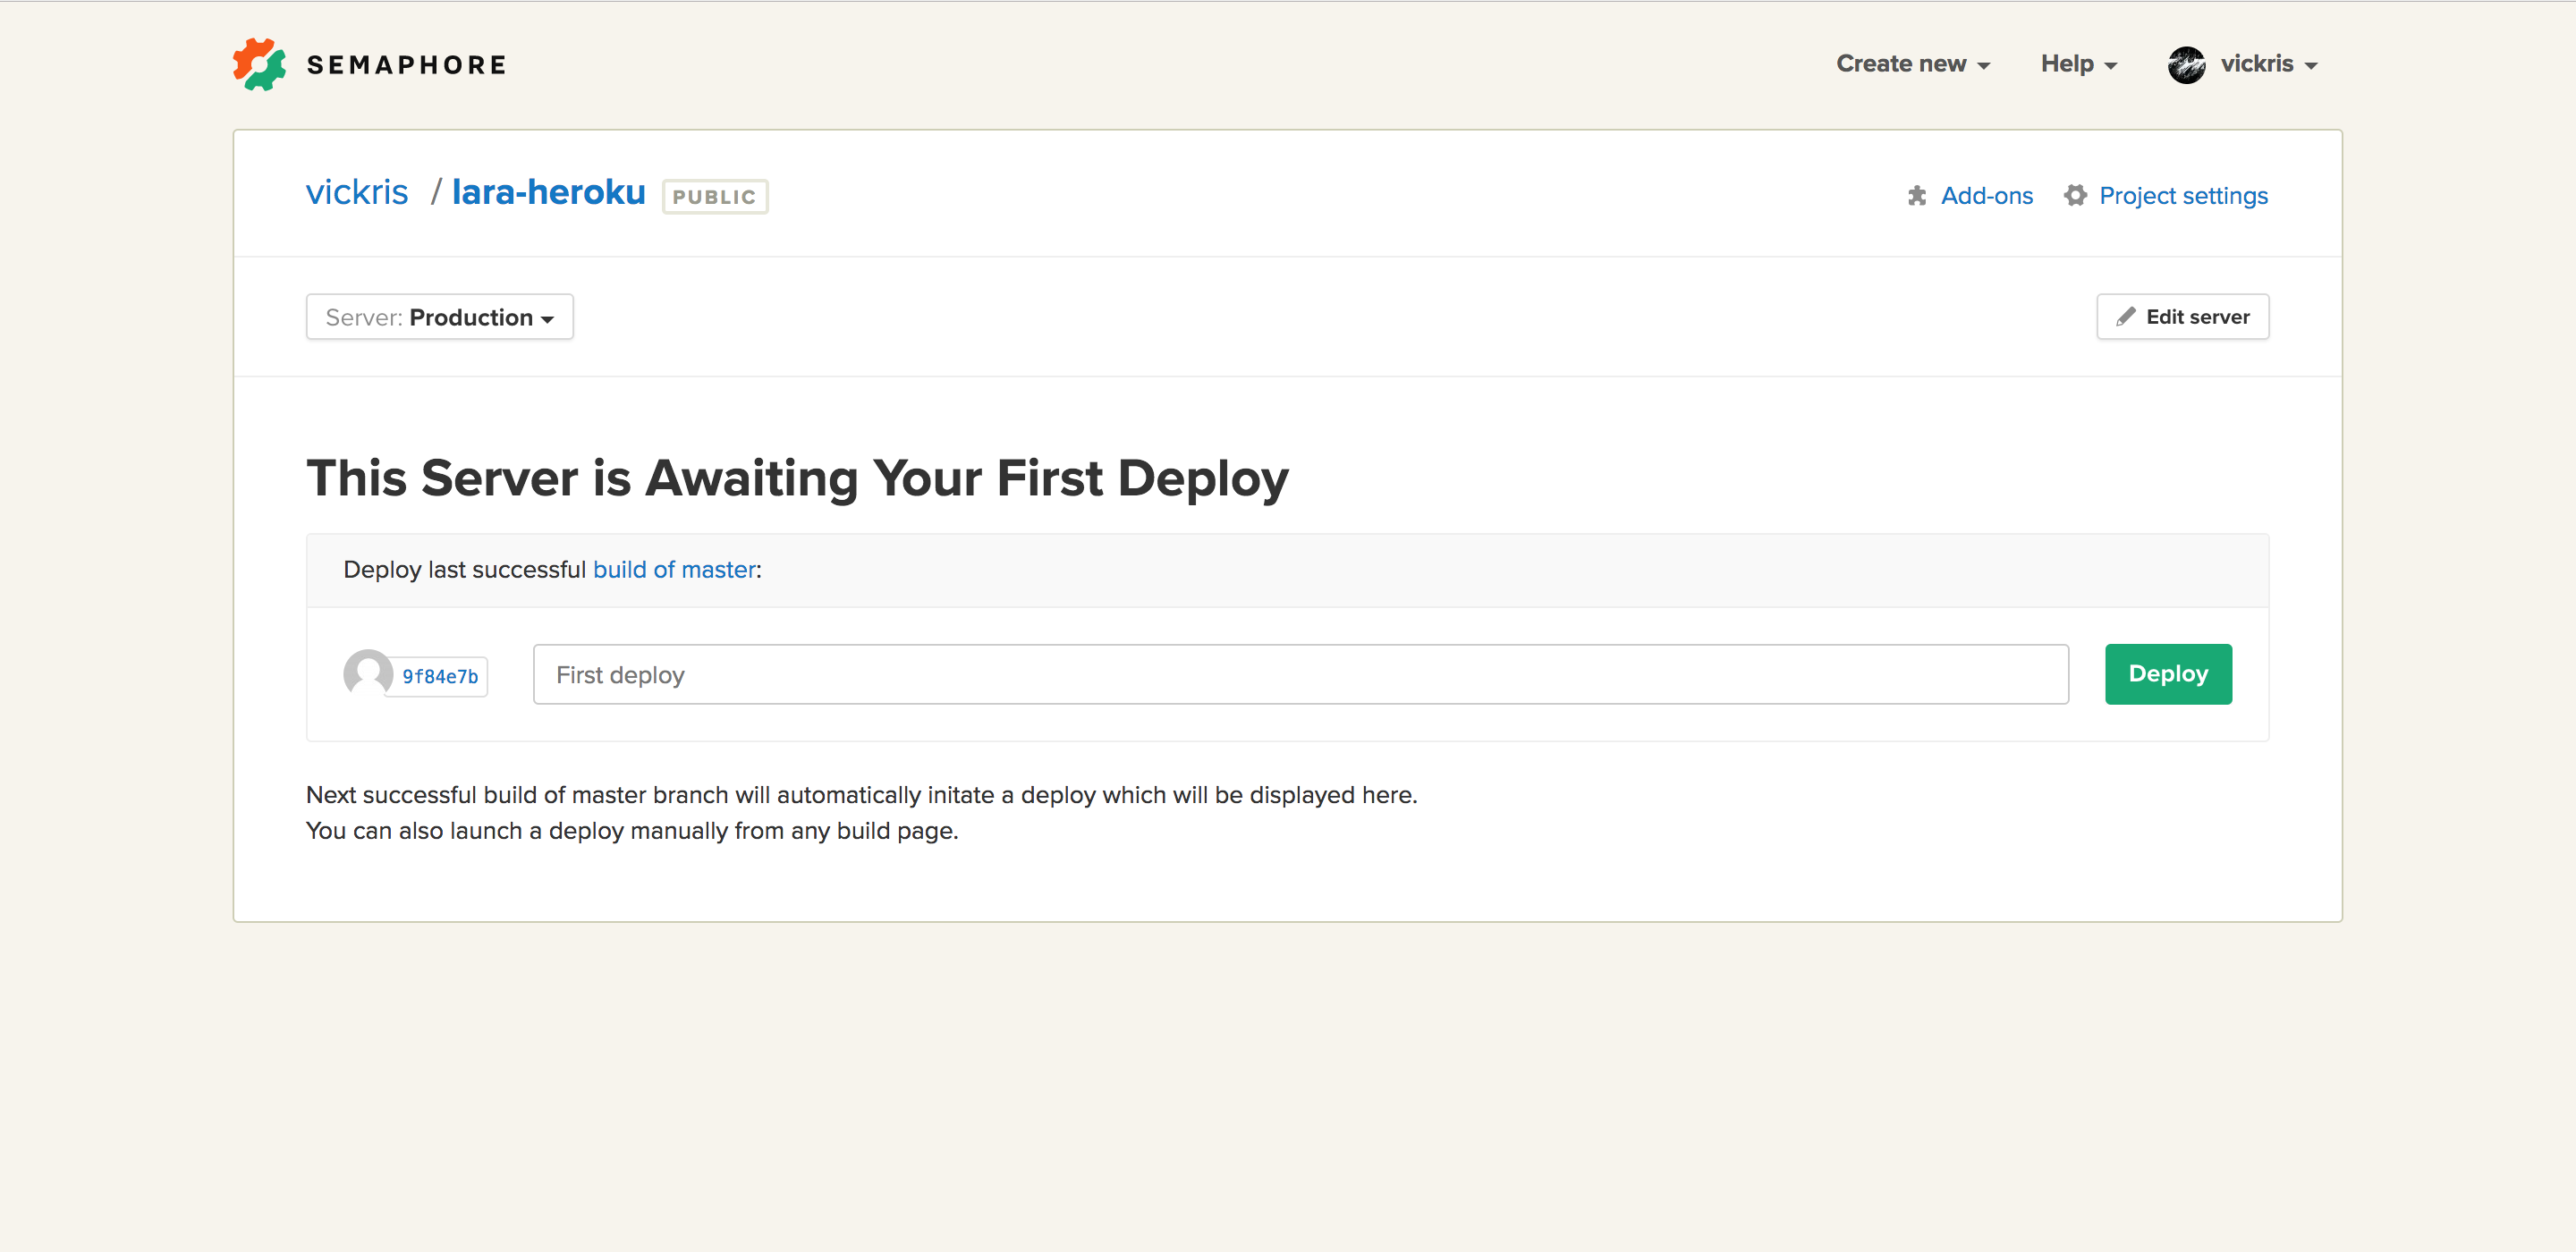
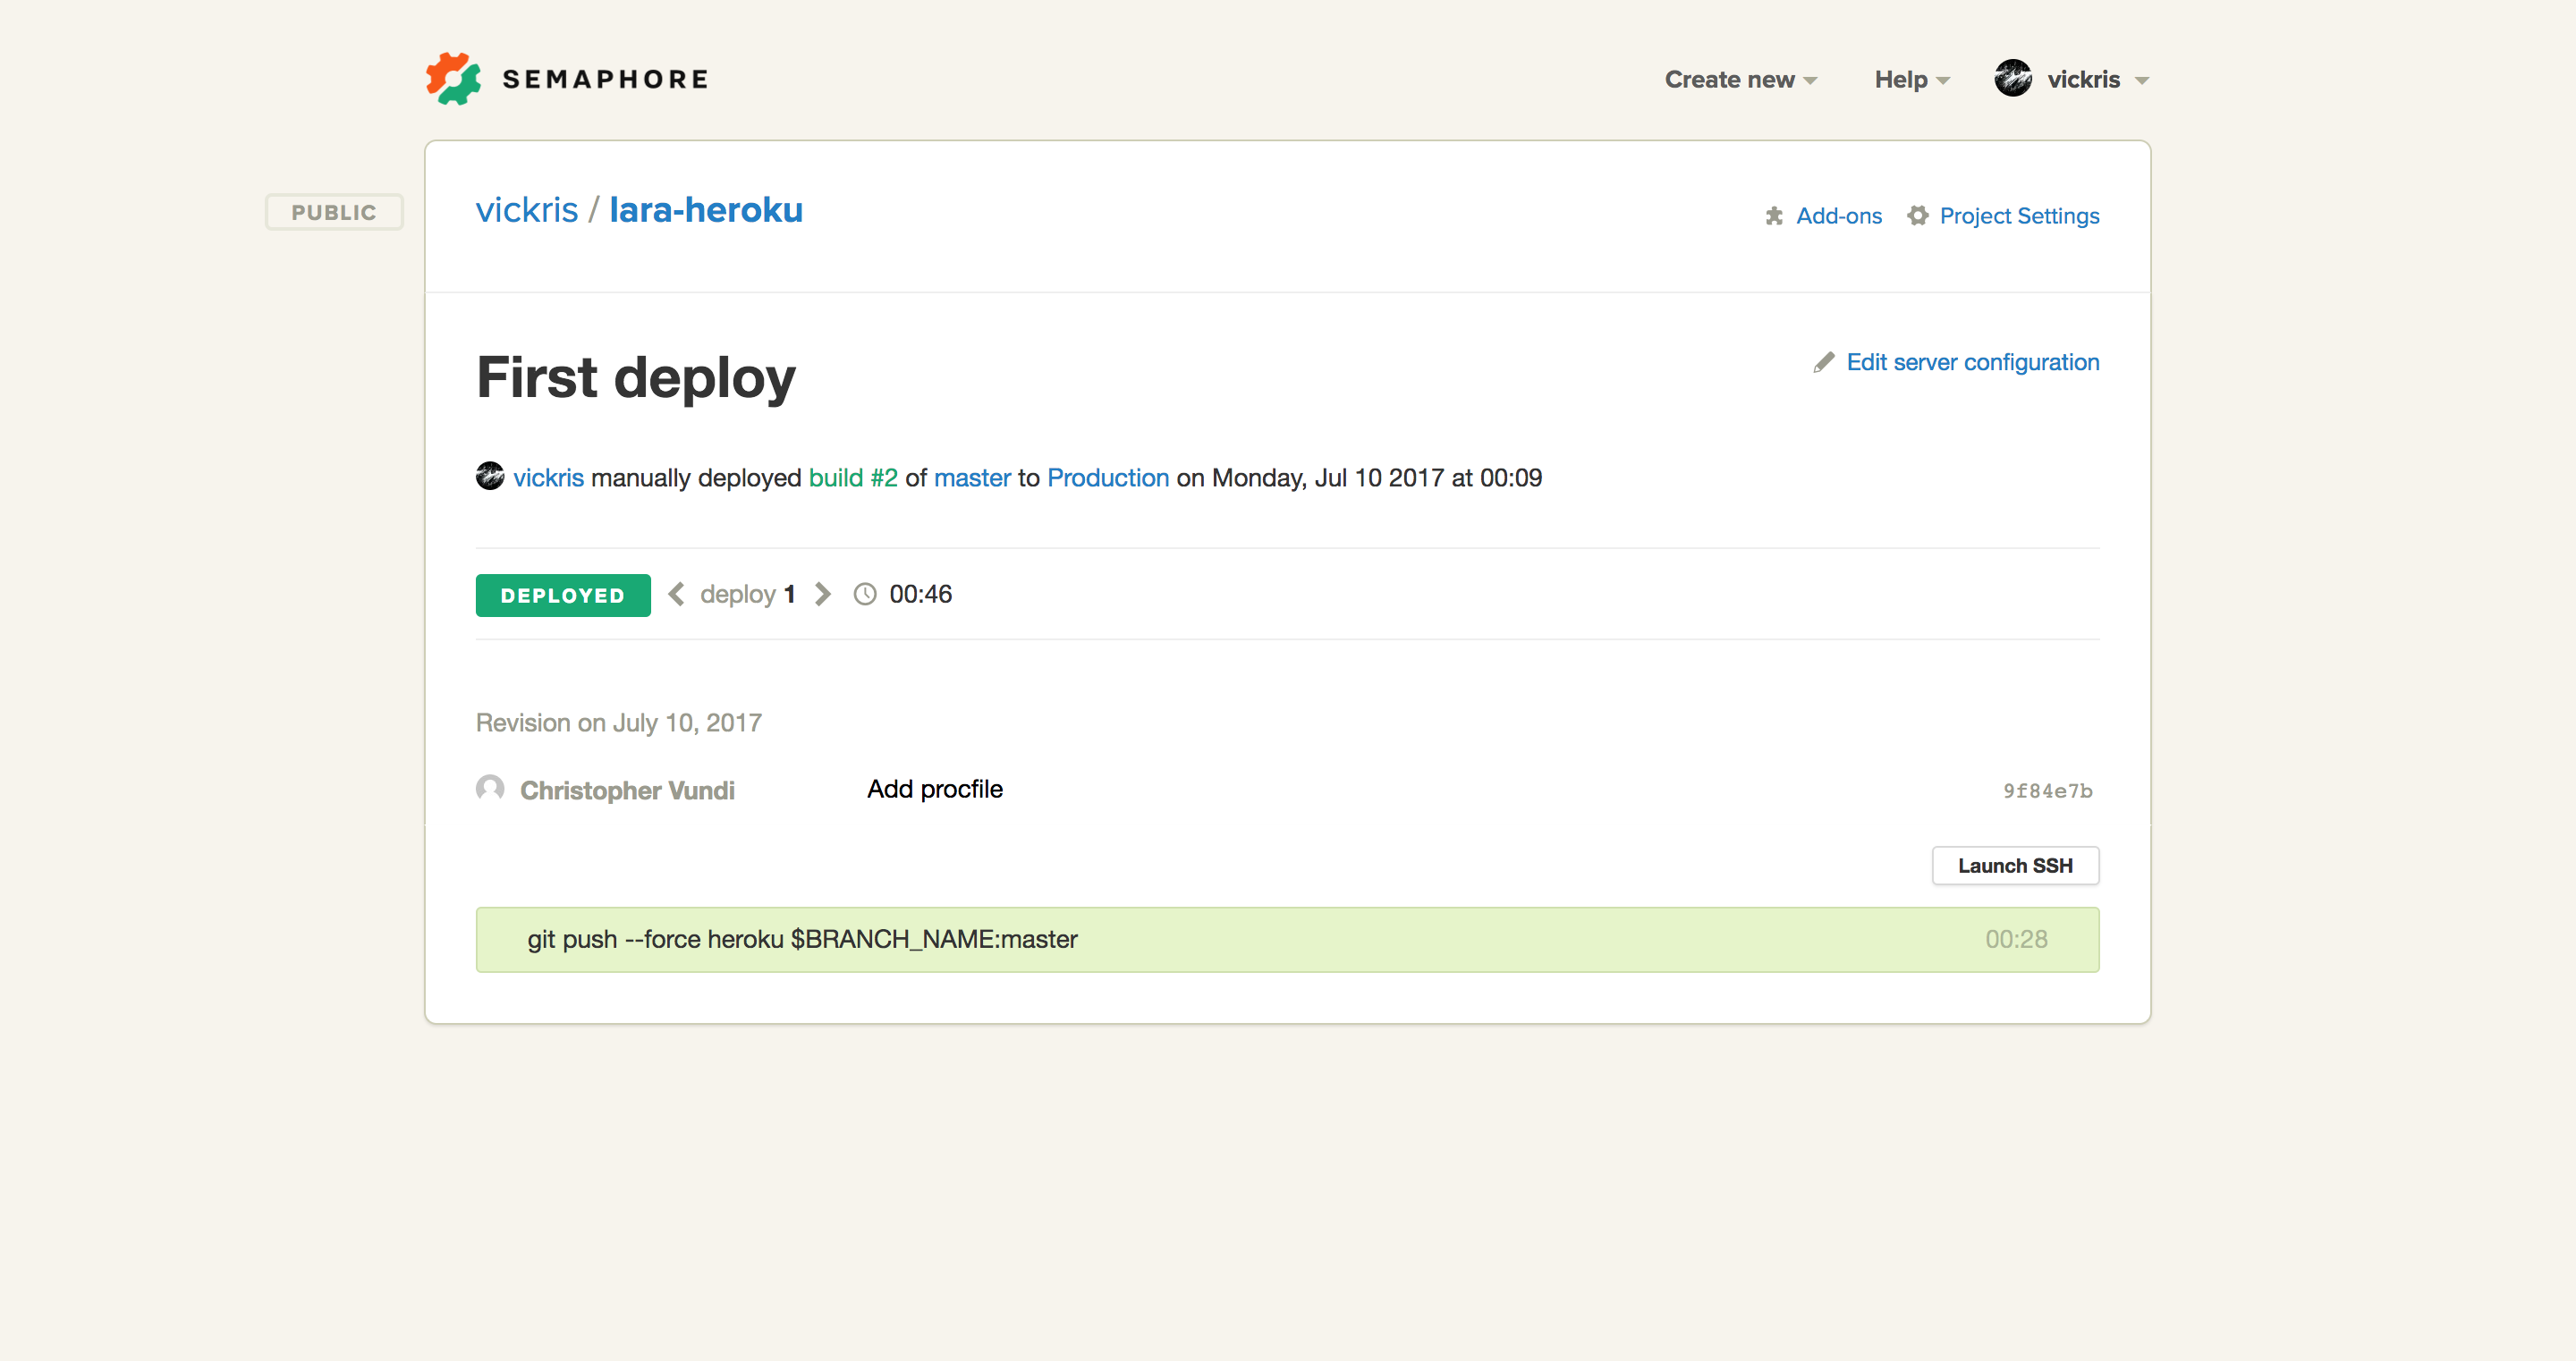
Note that this will be our last manual deploy, subsequent deploys will happen automatically every time we push to GitHub.
As you can see, our deploy was successful:
Let’s try launching the Heroku application from the command line:
heroku open
Notice we get a 403 Forbidden page:

By default, Heroku will launch an Apache web server together with PHP to serve applications from the root directory of the project.
However, our application’s document root is the public/ subdirectory, so we need to create a Procfile that configures the correct document root. A Procfile tells Heroku what command to use to launch the web server with the correct settings:
Creating the Procfile
Run the commands below to create a Procfile, set the web server and specify the directory from which our application should be served from:
touch Procfile
echo web: vendor/bin/heroku-php-apache2 public/ > Procfile
In case we want to use Nginx as our server, our Procfile needs to look as follows:
Procfile
web: vendor/bin/heroku-php-nginx public/
Let’s commit these new changes:
git add -A
git commit -m "Create Procfile"
git push origin master
After pushing to GitHub, the 403 Forbidden issue should now be fixed. Note, it might take a few minutes for the new changes to take effect in our production application since the build on Semaphore has to pass before the new changes are deployed to production. We can always head over to the Semaphore dashboard and inspect the build process and confirm the new build has been deployed. Upon reloading the homepage, we get a different error:
This is because we don’t have a Laravel Encryption Key on Heroku. This key is used by Laravel to encrypt user sessions and other information. Its value will be read from the APP_KEY environment variable. If you created a new application from scratch, the encryption key will be generated for you and set as the value for the APP_KEY environment variable. If one happens to clone a Laravel project, then they have to generate the key manually by running this command:
php artisan key:generate
To set environment variables on Heroku, we use the heroku config:set command. Let’s go ahead and set the Encryption Key on Heroku:
heroku config:set APP_KEY={app key value}
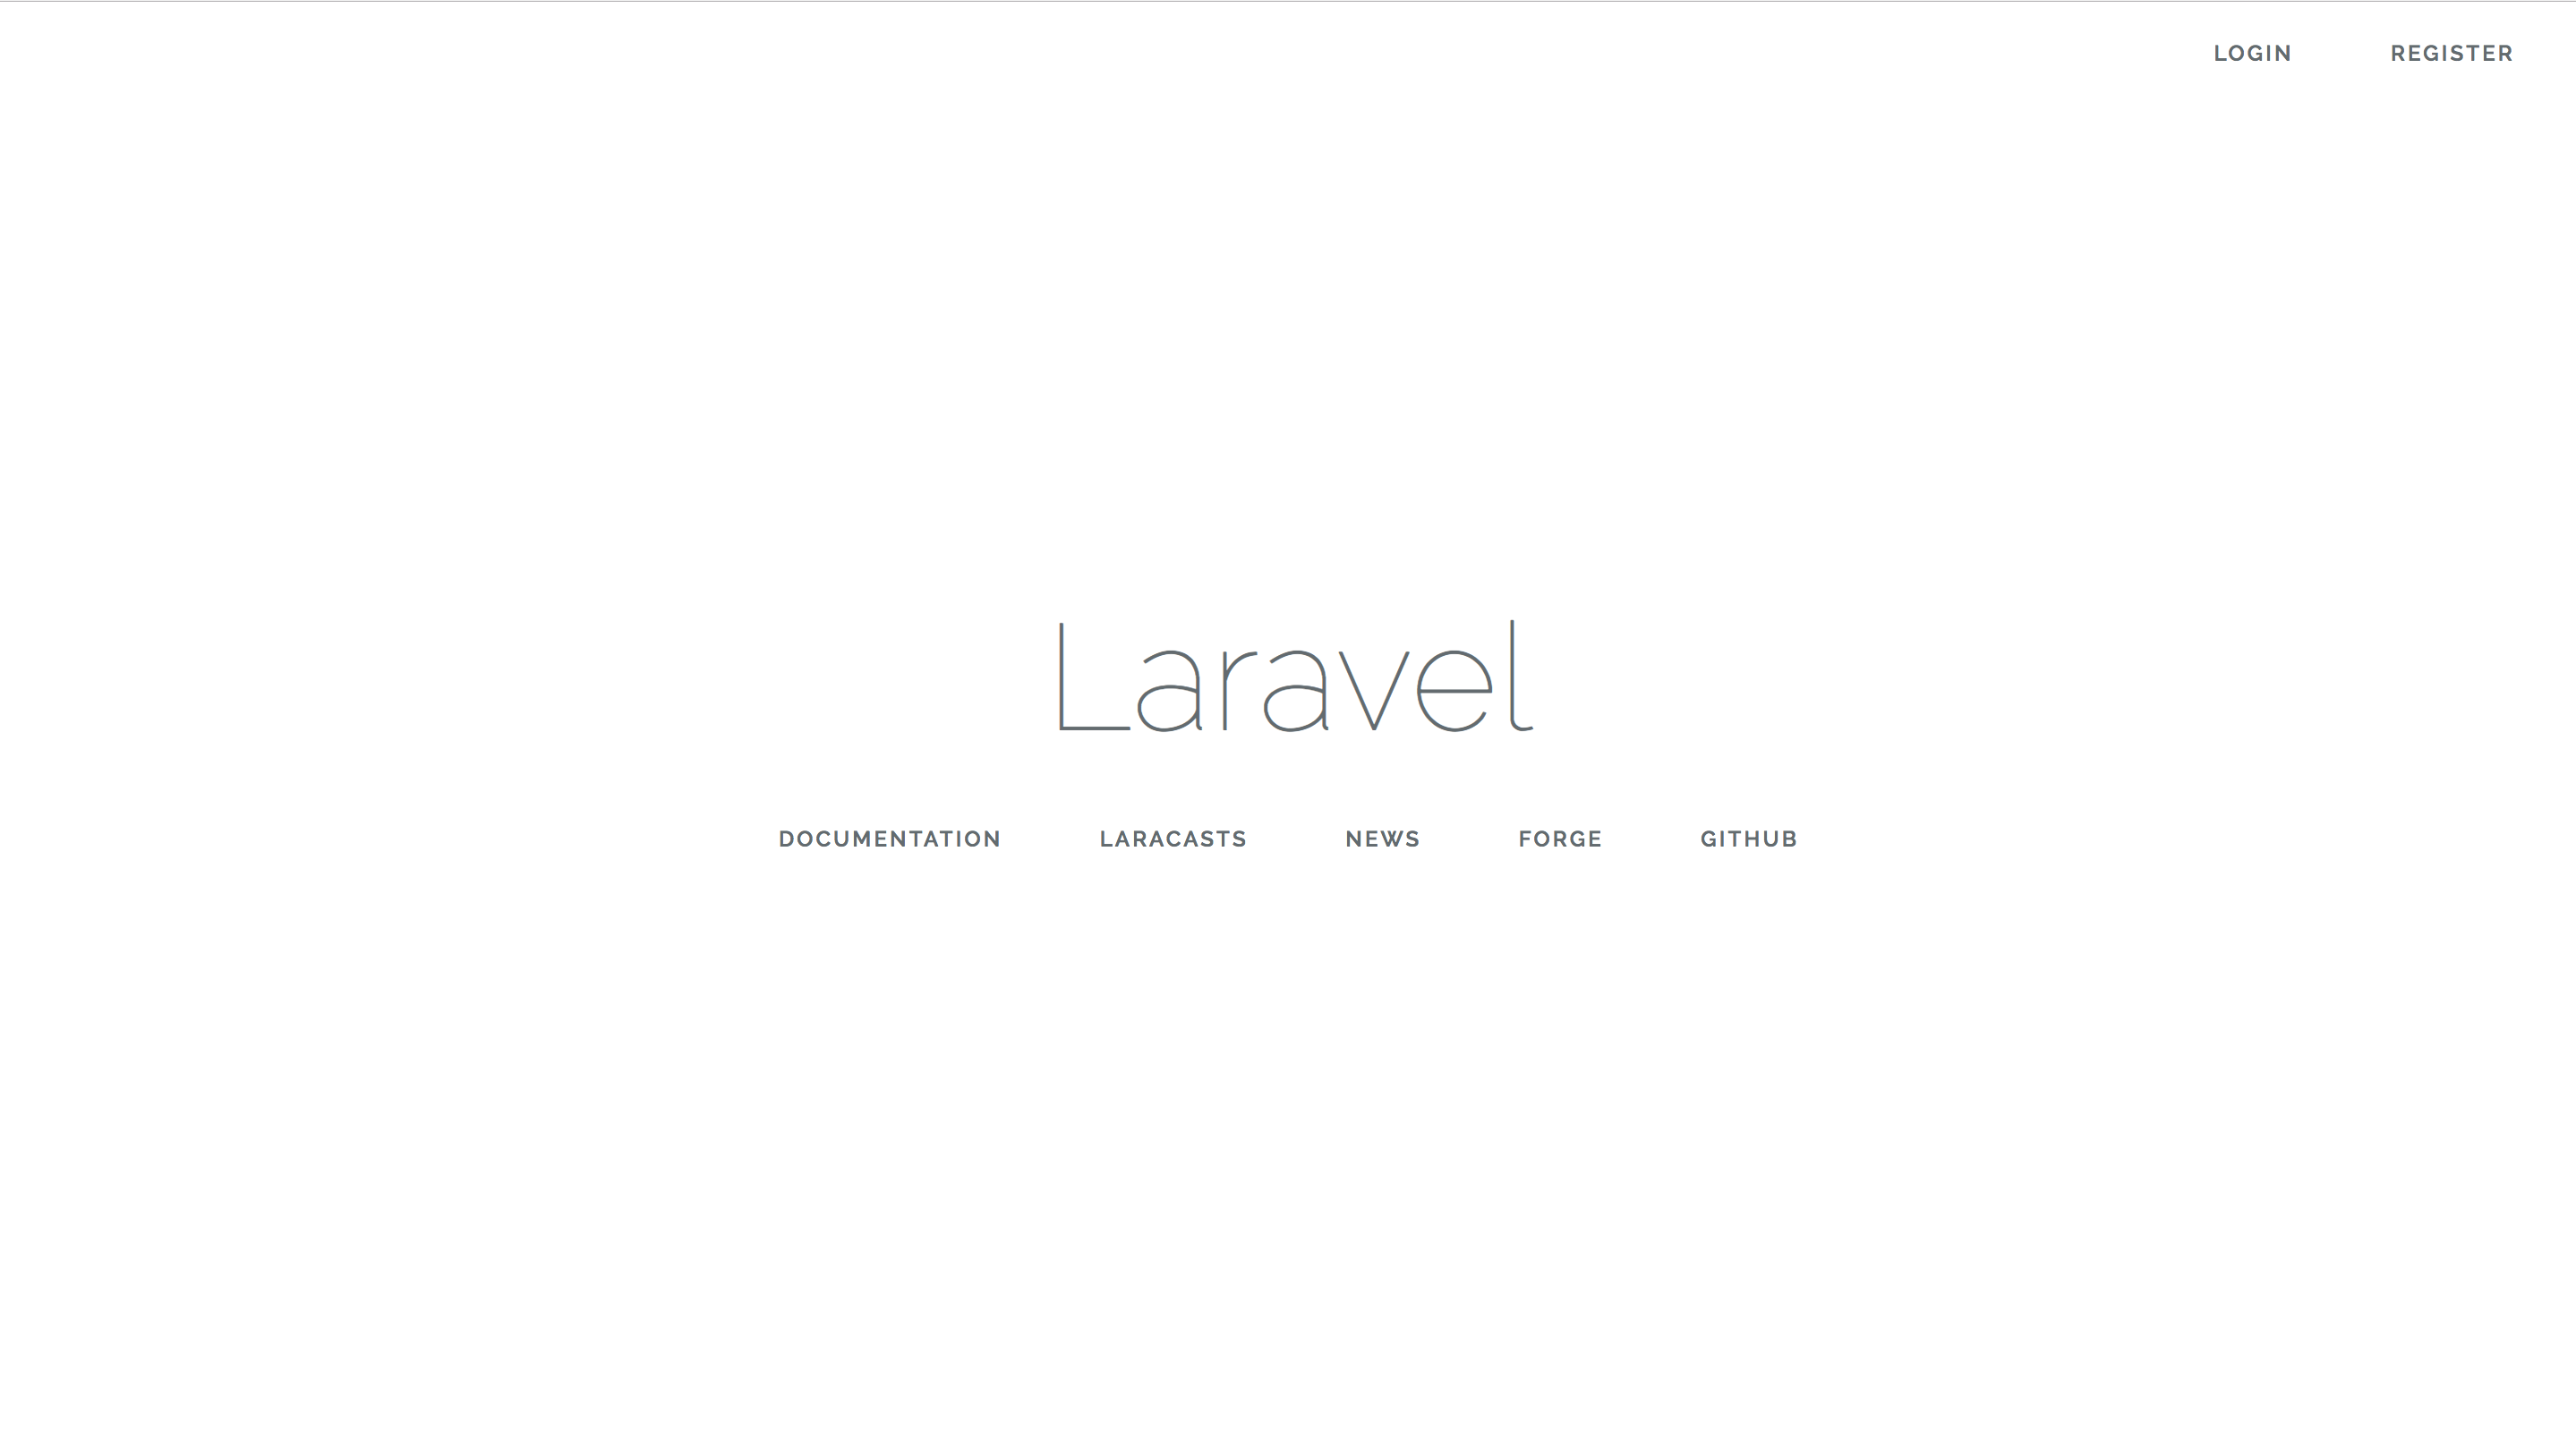
heroku open
This time round we’ll be greeted with Laravel’s welcome page. Links to Login and Register are also present in the navbar:
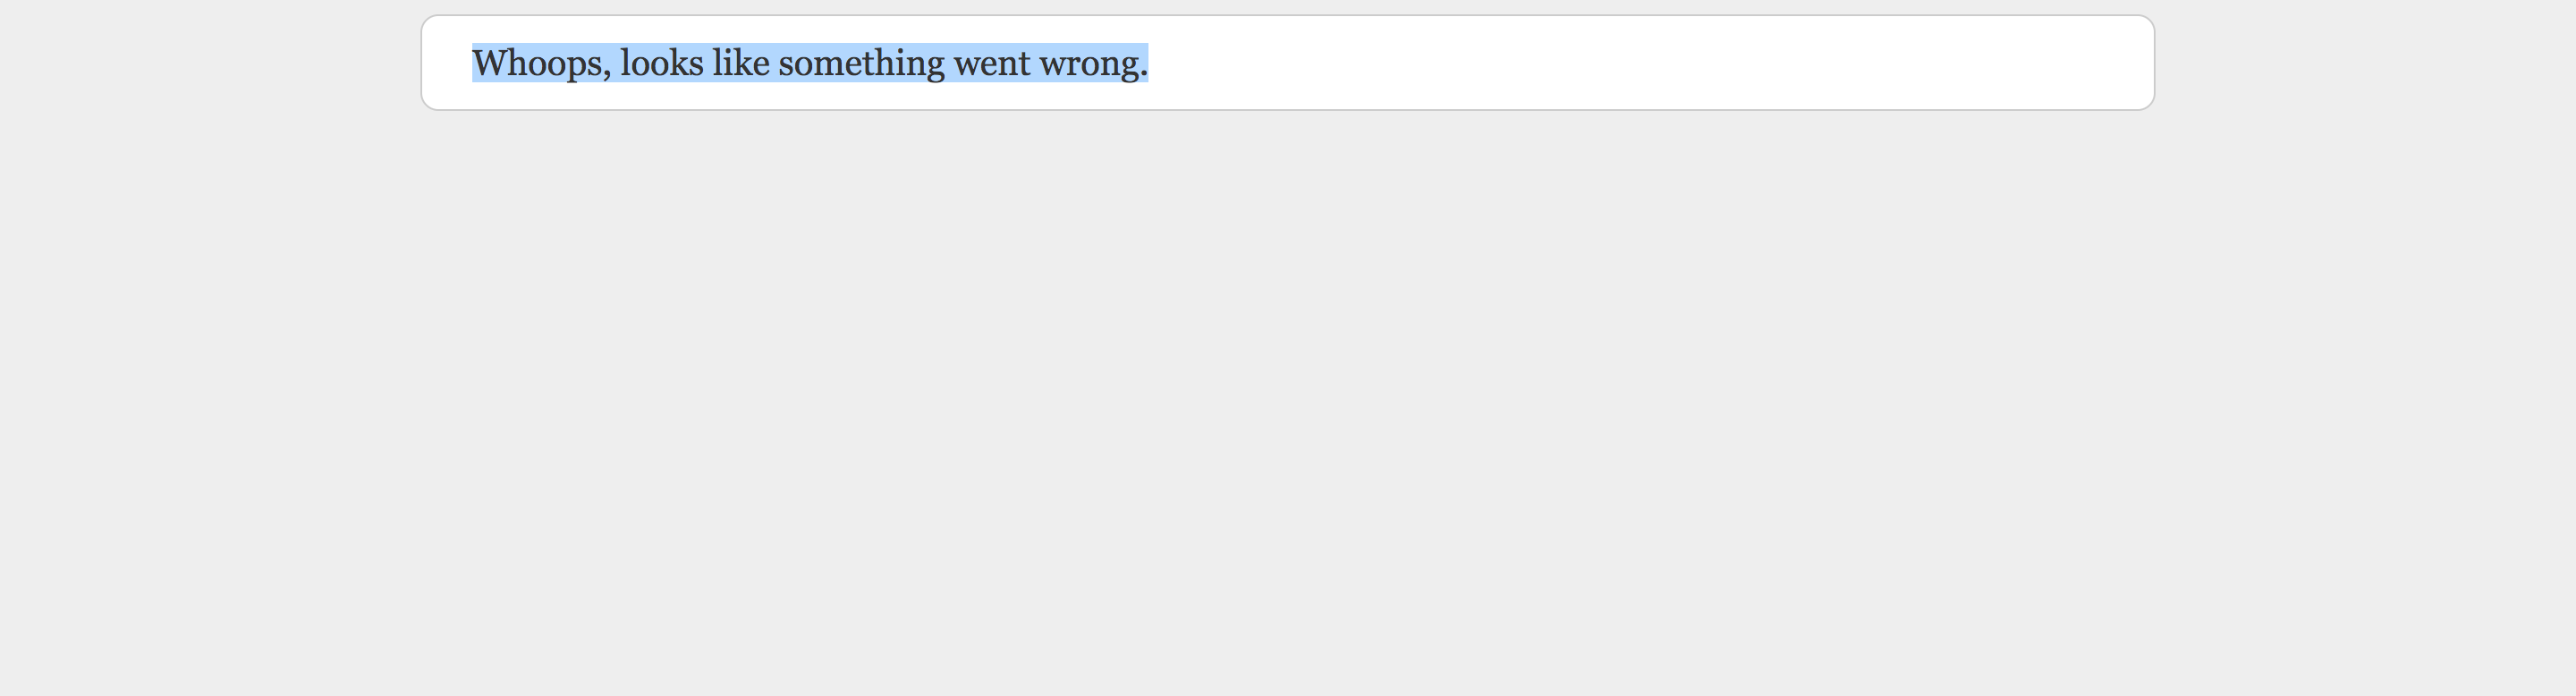
However, If we tried to register at this point, we’d get an error that something went wrong. This is because we don’t have any database setup and thus no means to store data.
Database Setup
By default, Heroku is best suited to work with Postgres. However, Laravel applications use MySql as the default database connection which leaves us with two options:
- Change the database connection to Postgres in our application.
- Look for a MySql add-on on Heroku.
We’ll visit both options and you can decide which path you want to take.
Use Postgres as the Default Driver
This is not as complicated as it sounds, all we have to do is navigate to config/database.php and change just one line:
config/database.php
'default' => env('DB_CONNECTION', 'pgsql'),
However, if you want to proceed with Postgres locally, you’ll have to create the Postgres database same way we created the MySql database and update our .env file with the new connection details (Database name, connection port and so on).
Let’s now head over to Heroku and require the Postgres add-on as illustrated by the gif below:
With the database in place, let’s proceed and set the configuration variables to connect to this database same way we did when setting the APP_KEY:
heroku config:set DB_DATABASE={database name}
heroku config:set DB_HOST={Host value}
heroku config:set DB_USERNAME={Username Provided}
heroku config:set DB_PASSWORD={Password}
Alternatively, we could have done this from Heroku’s dashboard by clicking on the “Settings” tab and then on the “reveal config variables” button:
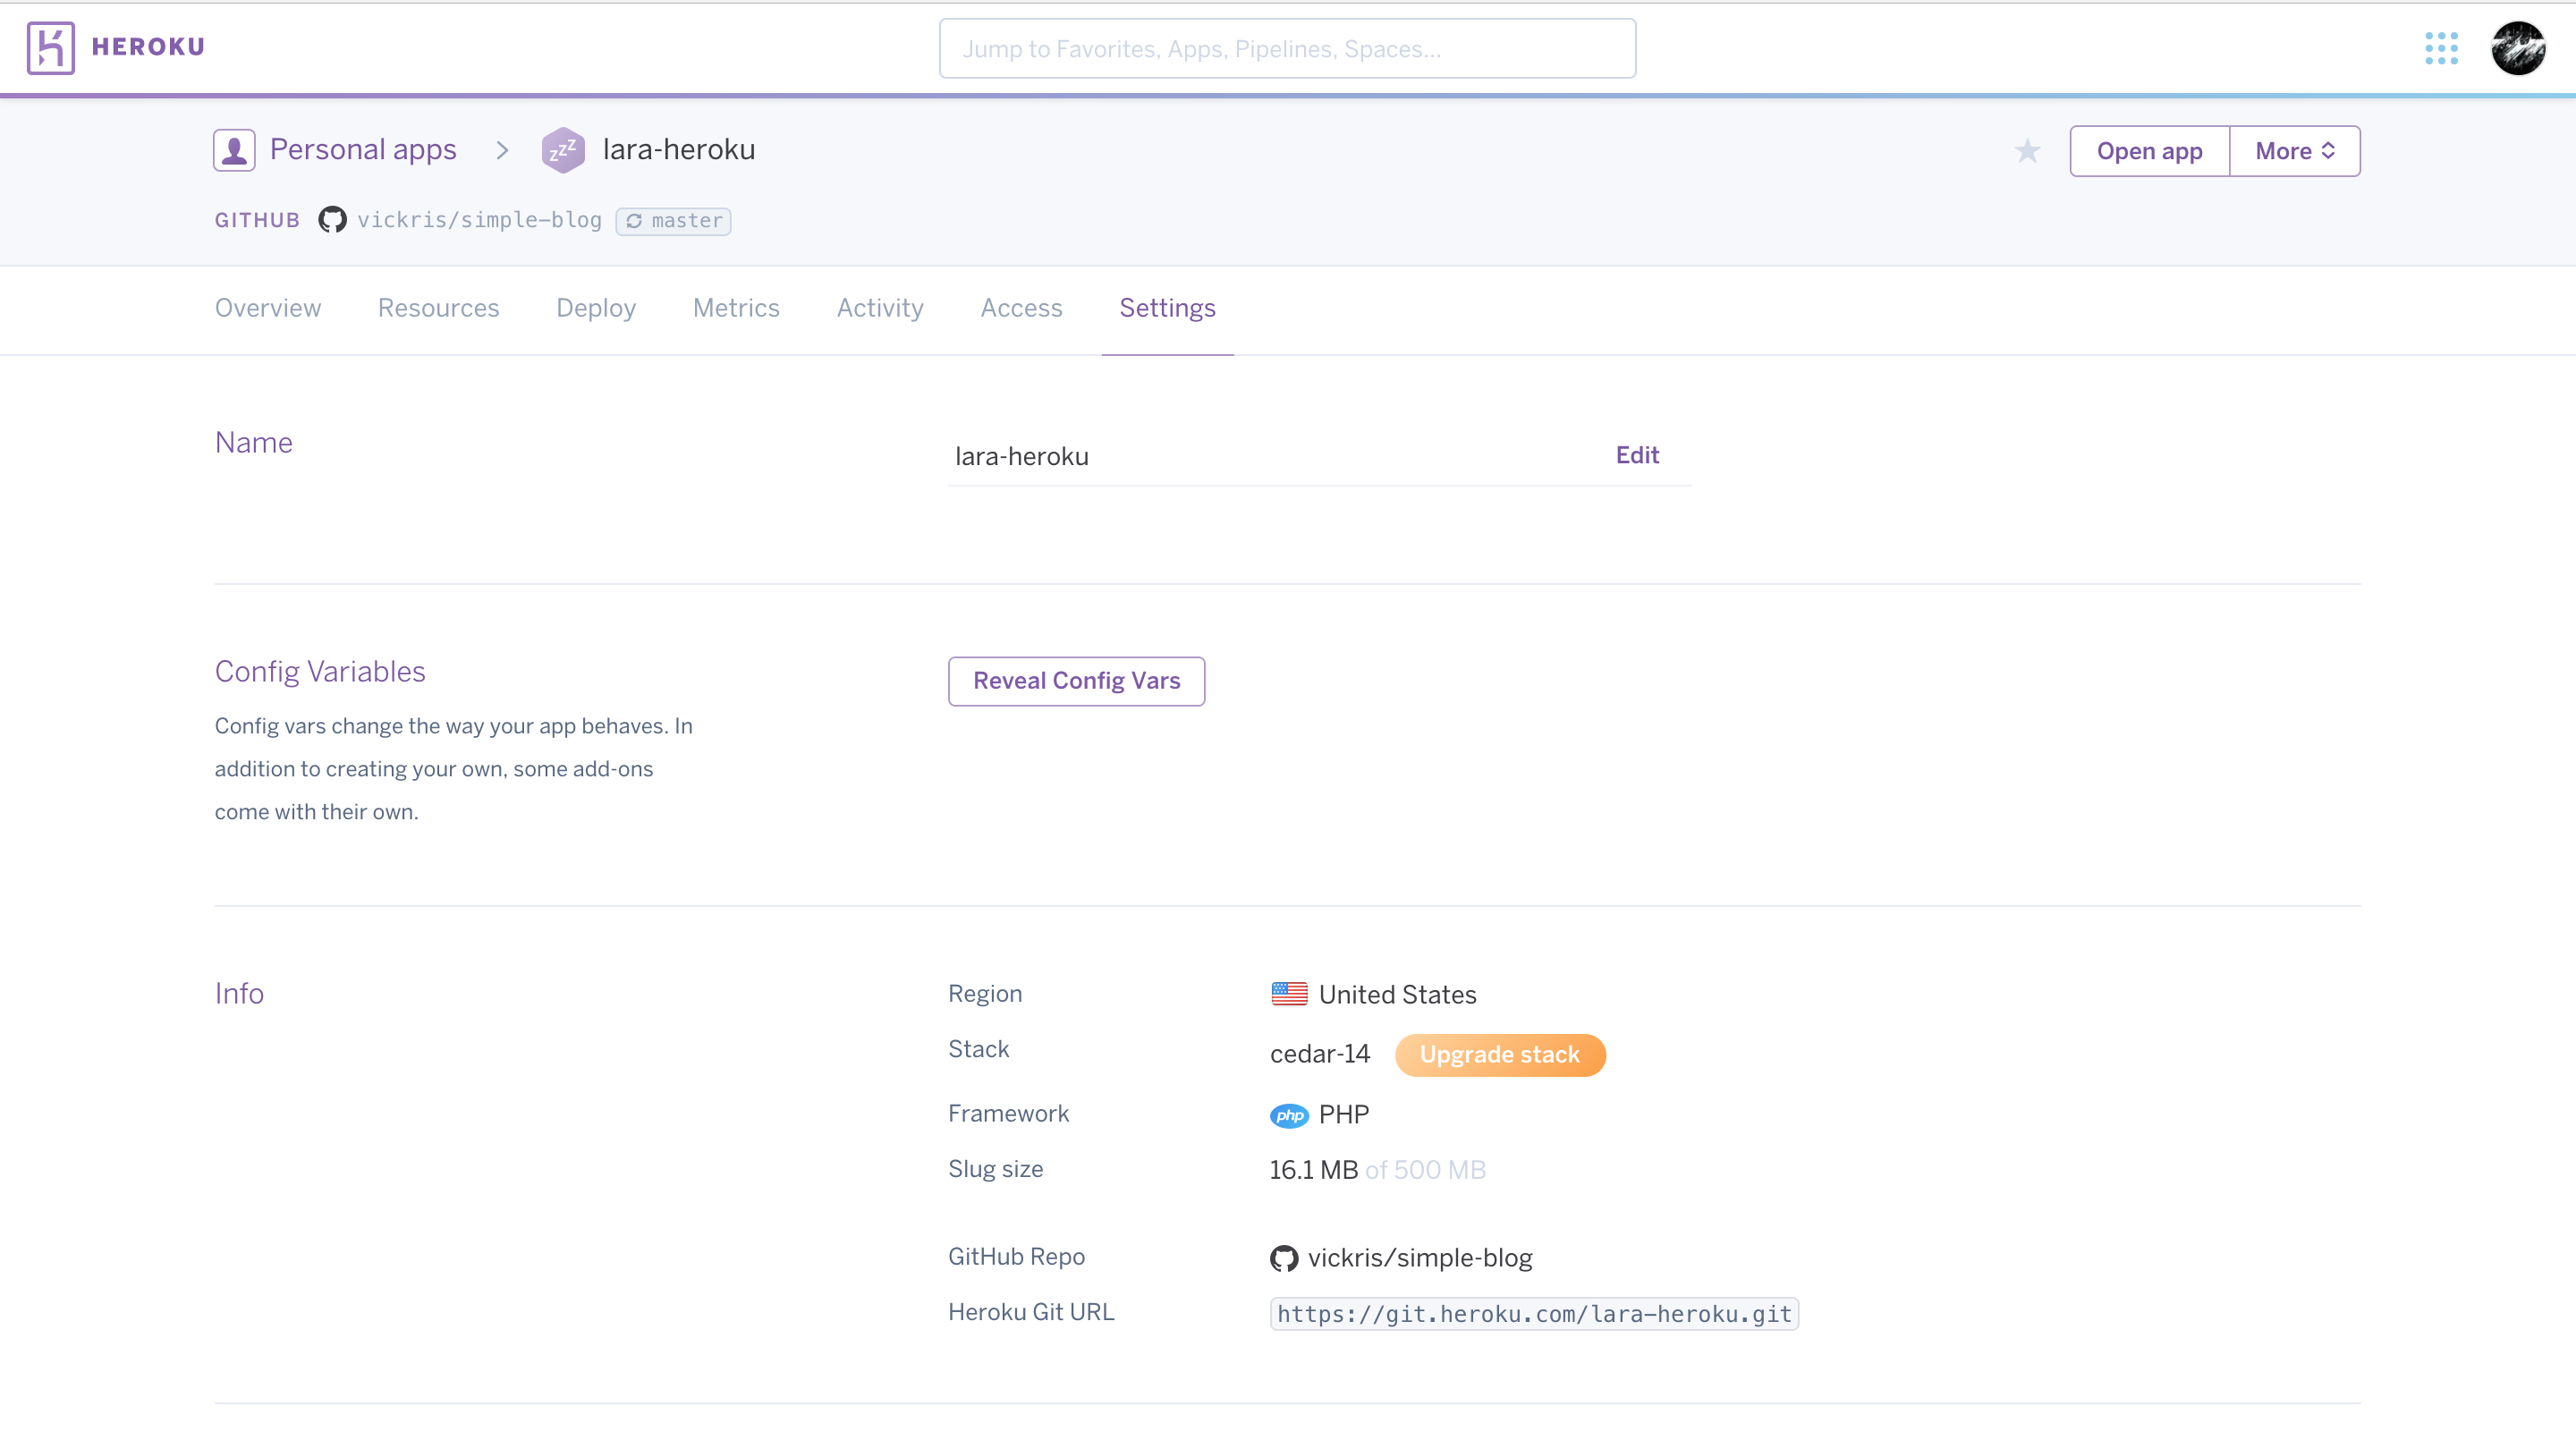
Using MySQL on Heroku
If we take this route, we won’t be changing anything in the config\database.php file, leaving mysql as the default driver for database connections.
This time round, however, we’ll require a MySQL add-on called ClearDB MySQL. We’ll follow the same procedure as before when installing this add-on. The only difference is how we get our connection variables.
Let’s head over to application settings page by clicking the “Settings” tab. From the settings page, click the “reveal config vars” button. The CLEARDB_DATABASE_URL has already been set for us. We are going to get the connection variables from this URL. Here’s our URL for demonstration purposes.
mysql://ba59b3acd93b64:621d3c62@us-cdbr-iron-east-03.cleardb.net/heroku_8c762fa90cf059f?reconnect=true
The string after the // until : is the DB_USERNAME, ba59b3acd93b64
The string between : and @ is the DB_PASSWORD, 621d3c62
Everything after / until ? is DB_DATABASE, heroku_8c762fa90cf059f
Everything after the @ symbol until the / is the DB_HOST, us-cdbr-iron-east-03.cleardb.net
A quicker way to get these values is by using the parse_url function which will return an associative array with the database connection credentials:
parse_url("mysql://ba59b3acd93b64:621d3c62@us-cdbr-iron-east-03.cleardb.net/heroku_8c762fa90cf059f?reconnect=true")
=> [
     "scheme" => "mysql",
     "host" => "us-cdbr-iron-east-03.cleardb.net",
     "user" => "ba59b3acd93b64",
     "pass" => "621d3c62",
     "path" => "/heroku_8c762fa90cf059f",
     "query" => "reconnect=true",
   ]
Since we now have the connection credentials, let’s add them to our config variables on Heroku using the heroku cofig:set command or from the dashboard; whichever works for you. When you’re finished, you’ll be in a position to run your migrations.
Running Laravel Commands on Heroku
If we are just running a single command, we’d have to prepend the command with heroku run. To run our migrations for example:
heroku run php artisan migrate
In the case where we want to run several Laravel commands without having to prepend each command with heroku run, we should run the heroku run bash command. This command will fire up the command line for our Heroku server. Once inside, we can run just any command as we would locally:
heroku run bash
$ php artisan migrate
However, with migrations, I recommend having a migrate command amongst the Server deploy commands on Semaphore so that new migrations are run after every successful deploy. It’s so easy to forget running migration for a new feature you just added or a collaborator added.
To run migrations from Semaphore, click on the application name. You should be redirected to a page where all the builds and deploys for your application are visible. Under the Servers section click on the server name. In my case, its production:
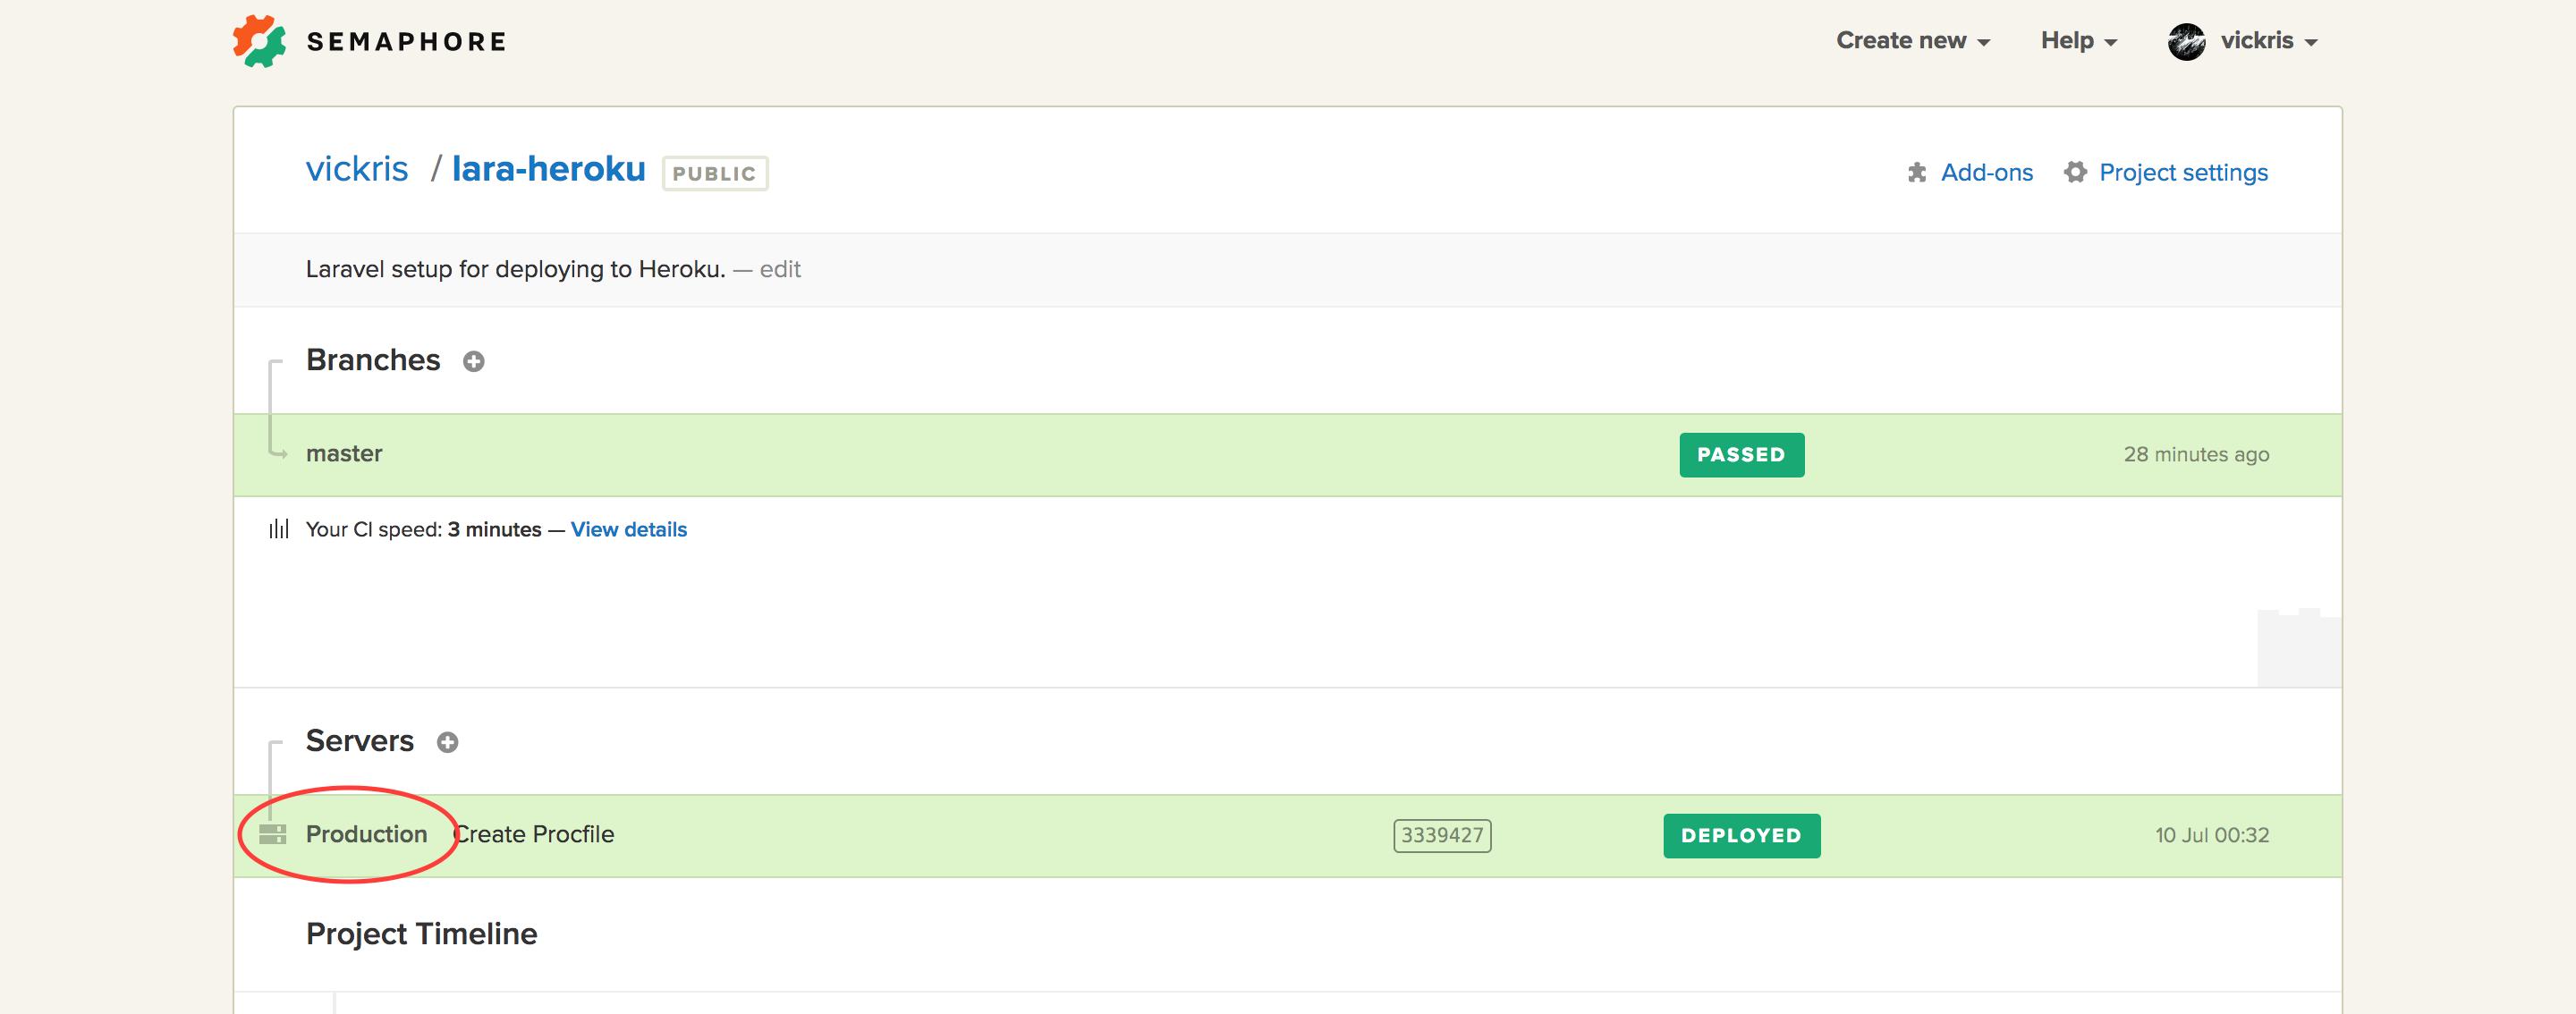
Then click on the Edit server button:

At the bottom of the settings page, you will see Deploy Commands. Add heroku run php artisan:migrate command to the list of available commands. If everything went well, the Deploy Commands section should now look like this:

That’s it. After every deploy, Heroku will run new migrations automatically.
Error Logging in Production
By default, Laravel will log errors and messages into a directory on disk, which isn’t ideal, because Heroku uses an ephemeral file system and treats logs as streams of events across all running dynos.
In order to ensure that errors are visible in heroku logs, we should set the APP_LOG value to errorlog on Heroku:
heroku set:config APP_LOG=errorlog
If you are not doing any caching in your application or running any background jobs, feel free to skip the next part.
Using Redis in Production
In case we use Redis for caching locally, all we have to do in production is require a Redis add-on. Heroku may require that we provide credit card details before proceeding but that’s fine, we won’t be charged.
Once the add-on has been installed (which might take a while), we can set the config variables for connecting to the Redis database. We can easily get the connection values by clicking on the add-on from the “Resources” tab. Let’s now update our config variables to give our application access to this database:
heroku set:config CACHE_DRIVER=redis
heroku set:config REDIS_HOST={host value}
heroku set:config REDIS_PASSWORD={password value}
heroku set:config REDIS_PORT={port value}
Heroku also supports other add-ons for caching, from memcached, to fastly , to ironcache, and others. More information on how to use Memcached on Heroku is available here.
Background Jobs and Queue Workers on Heroku
It is assumed that you already have background jobs set up locally. To make queues run and listen on Heroku, we need to update our Procfile with this line:
Procfile
worker: php artisan queue:work database --daemon
The above command creates a worker dyno, started with the command php artisan queue:work which is the command for starting the queue listener. In our case, we were using database as the QUEUE_DRIVER, if using redis as the driver for jobs then replace database with redis. Lastly, the --daemon flag forces the queue worker to continue processing jobs without ever rebooting the framework.
We can now commit the changes made to our Procfile and push to GitHub. The new changes should be picked up by Heroku. The last step is to activate the worker dyno from Heroku’s dashboard. See Gif below:
Once the worker dyno has been activated, jobs will run the same way as how they did locally.
Scheduling Jobs on Heroku
It’s also possible to schedule jobs with the Heroku Scheduler add-on. Scheduler works more like cron in a traditional server environment. Scheduler runs one-off dynos that will count towards your usage for the month. Dyno-hours from Scheduler tasks are counted just like those from heroku run or from scaled dynos. They will appear with a “scheduler” dyno type in your Heroku invoice.
To use the Heroku Scheduler, we first install the add-on:
heroku addons:create scheduler:standard
After the add-on has been installed, we can define the task we want to run at intervals. We can use the cloned blog as an example, and say that we want to send an email to the users every day at midnight which will contain the top 3 most read posts. For this, we first have to create a command to send the emails:
php artisan make:command SendEmails --command=emails:send
Don’t forget to register this command in the app/Console/Kernel.php file. The logic to handle the email sending functionality should go inside the handle method of this new command. If you are new to creating Laravel commands, visit this link to get a better understanding on how to go about it.
Once satisfied that the command works locally, the next step is to push these new changes online. But even before pushing to GitHub, let’s update our Procfile to include a scheduler service.
Procfile
scheduler: php -d memory_limit=512M artisan emails:send
Heroku’s scheduler will now run the command php artisan emails:send and the maximum memory that this process can take is 512MB.
We can now push our changes to GitHub. Don’t forget to activate the dyno tasked with running scheduled tasks from Heroku’s dashboard (Follow the same steps as when activating the worker dyno).
To schedule a job on Heroku, open the Scheduler dashboard with this command:
heroku addons:open scheduler
On the Scheduler Dashboard, click “Add Job…”, enter a task, select a frequency, dyno size, and next run time. Our setup looks as follows:
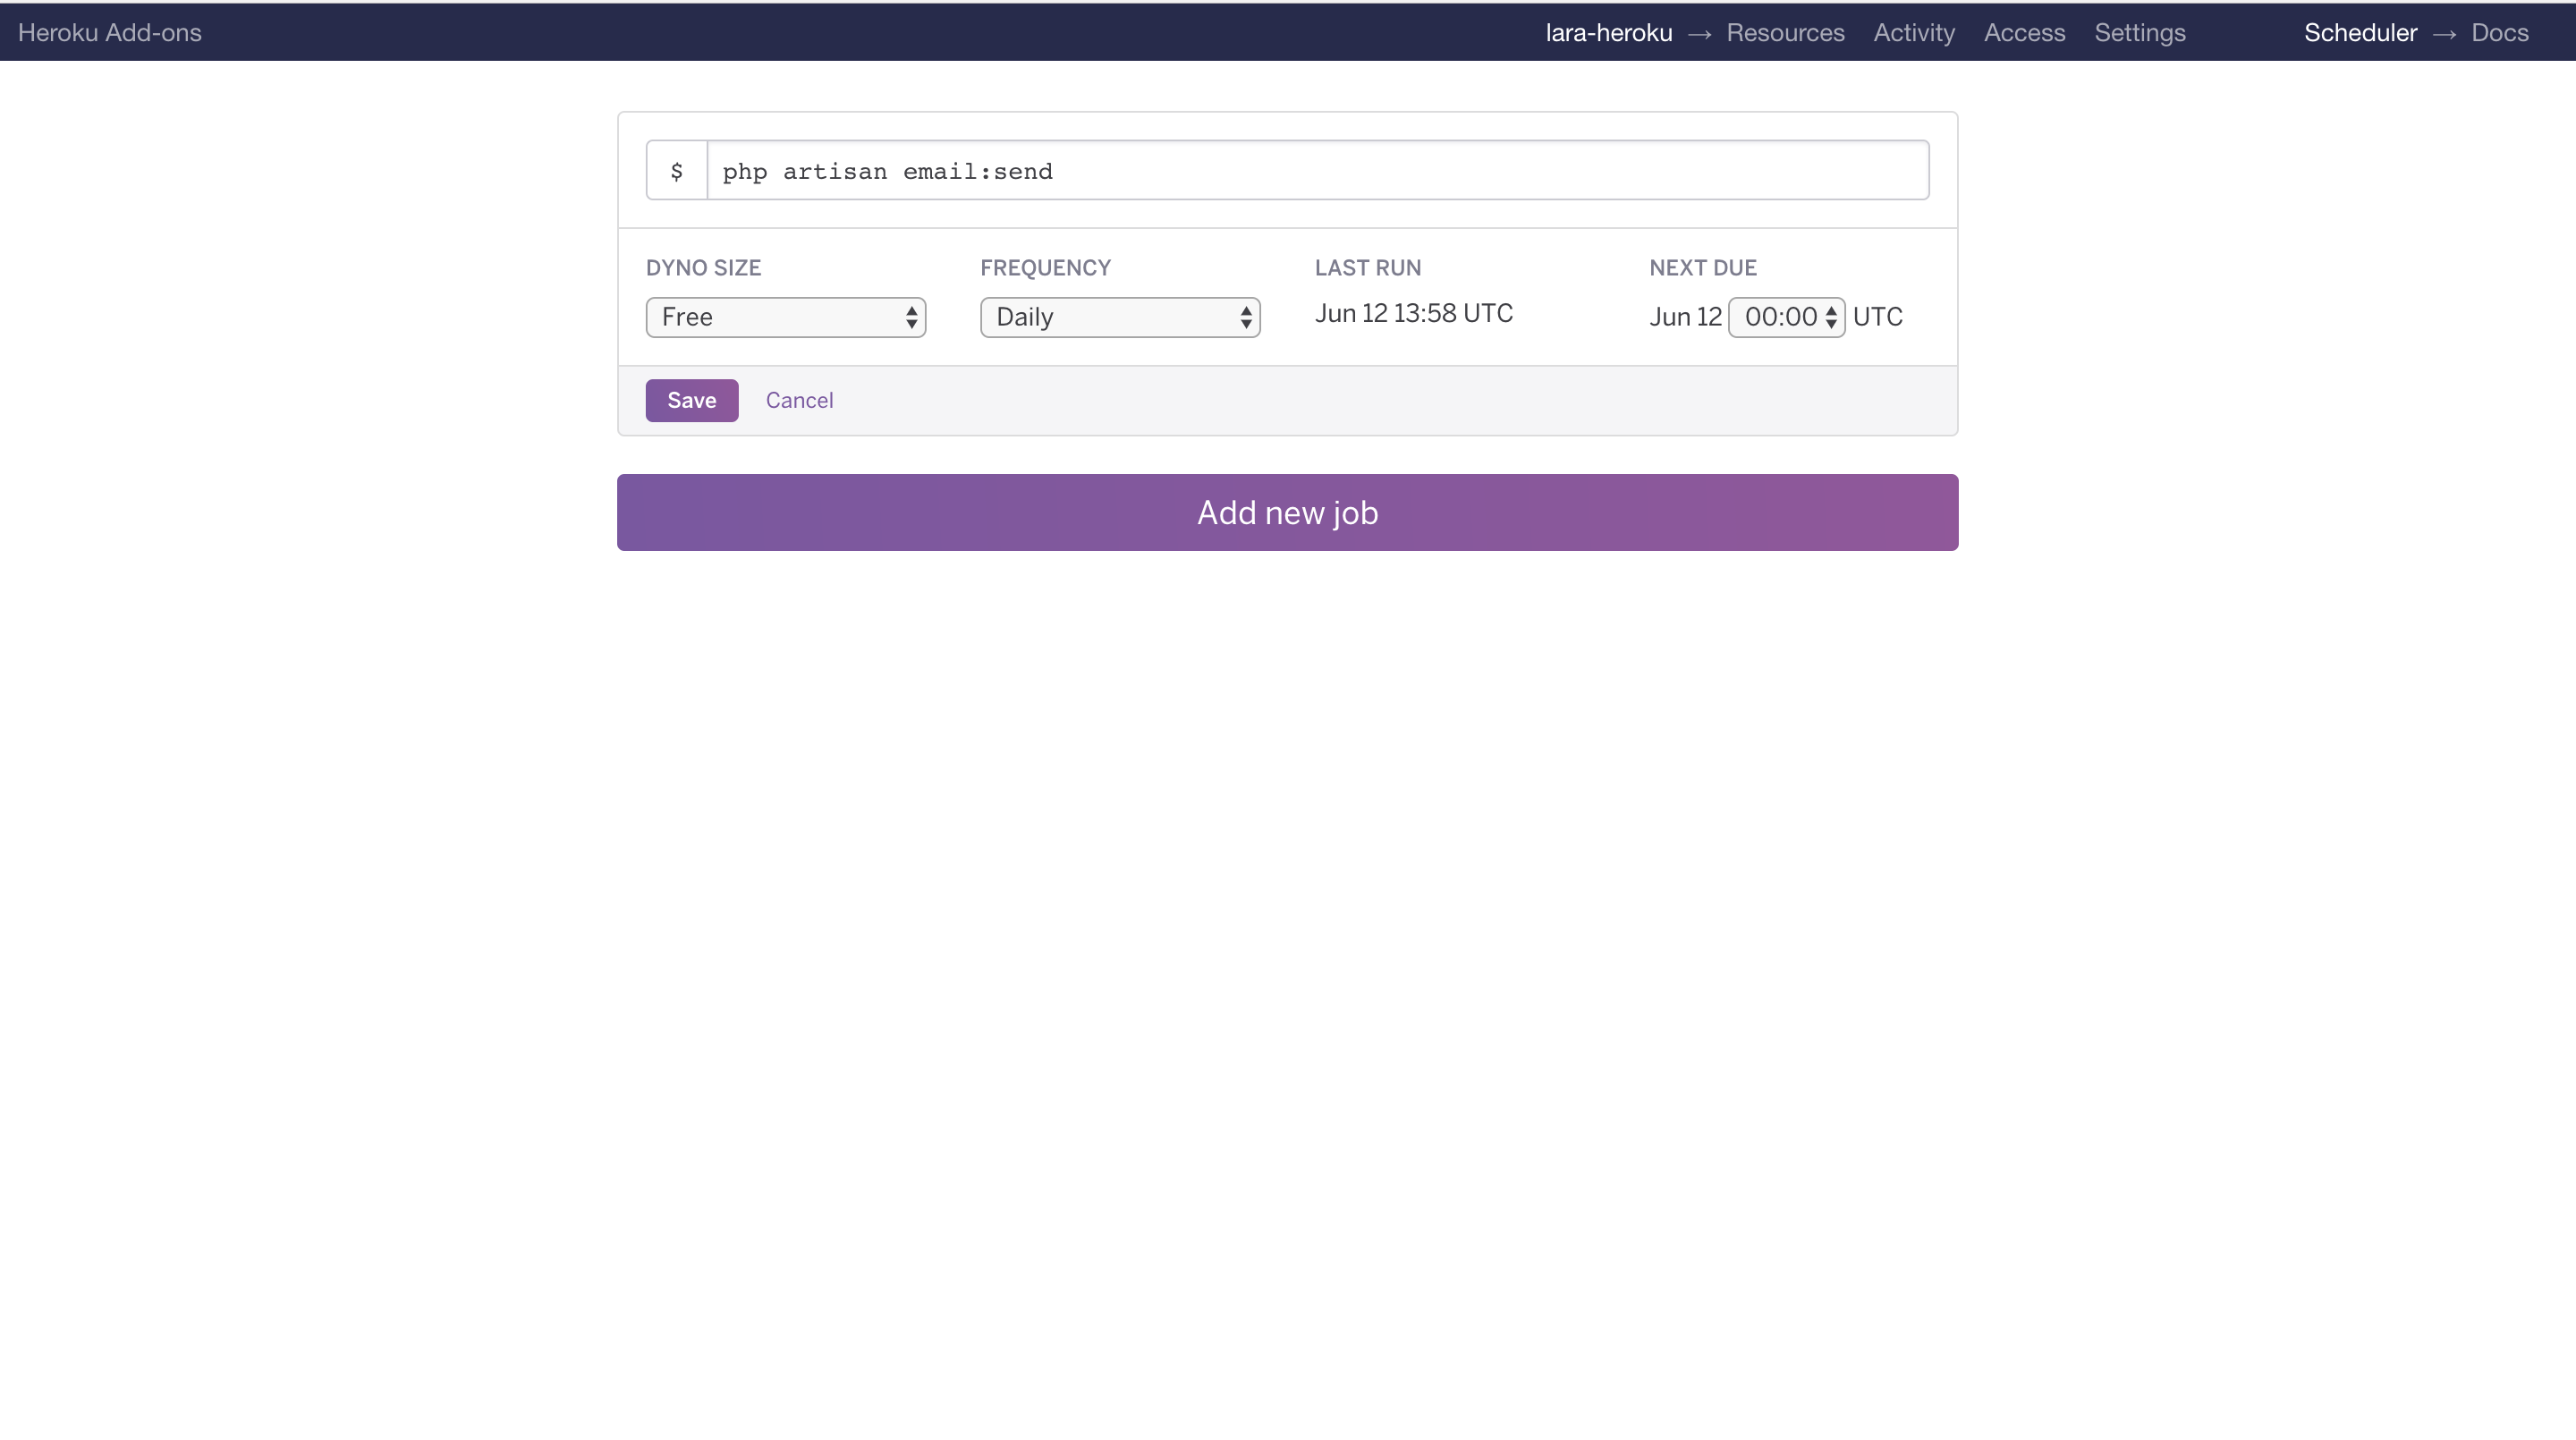
Instead of specifying the command, we can specify a process type. The command associated with the process type will then be executed, as well as any parameters we supplied. In this case, we could have passed scheduler as the task and things would still work the same way as before.
Lastly, to get the logs for the scheduled jobs we go into our logs as process scheduler.X:
heroku logs --ps scheduler.1
Application Maintenance Mode in Production
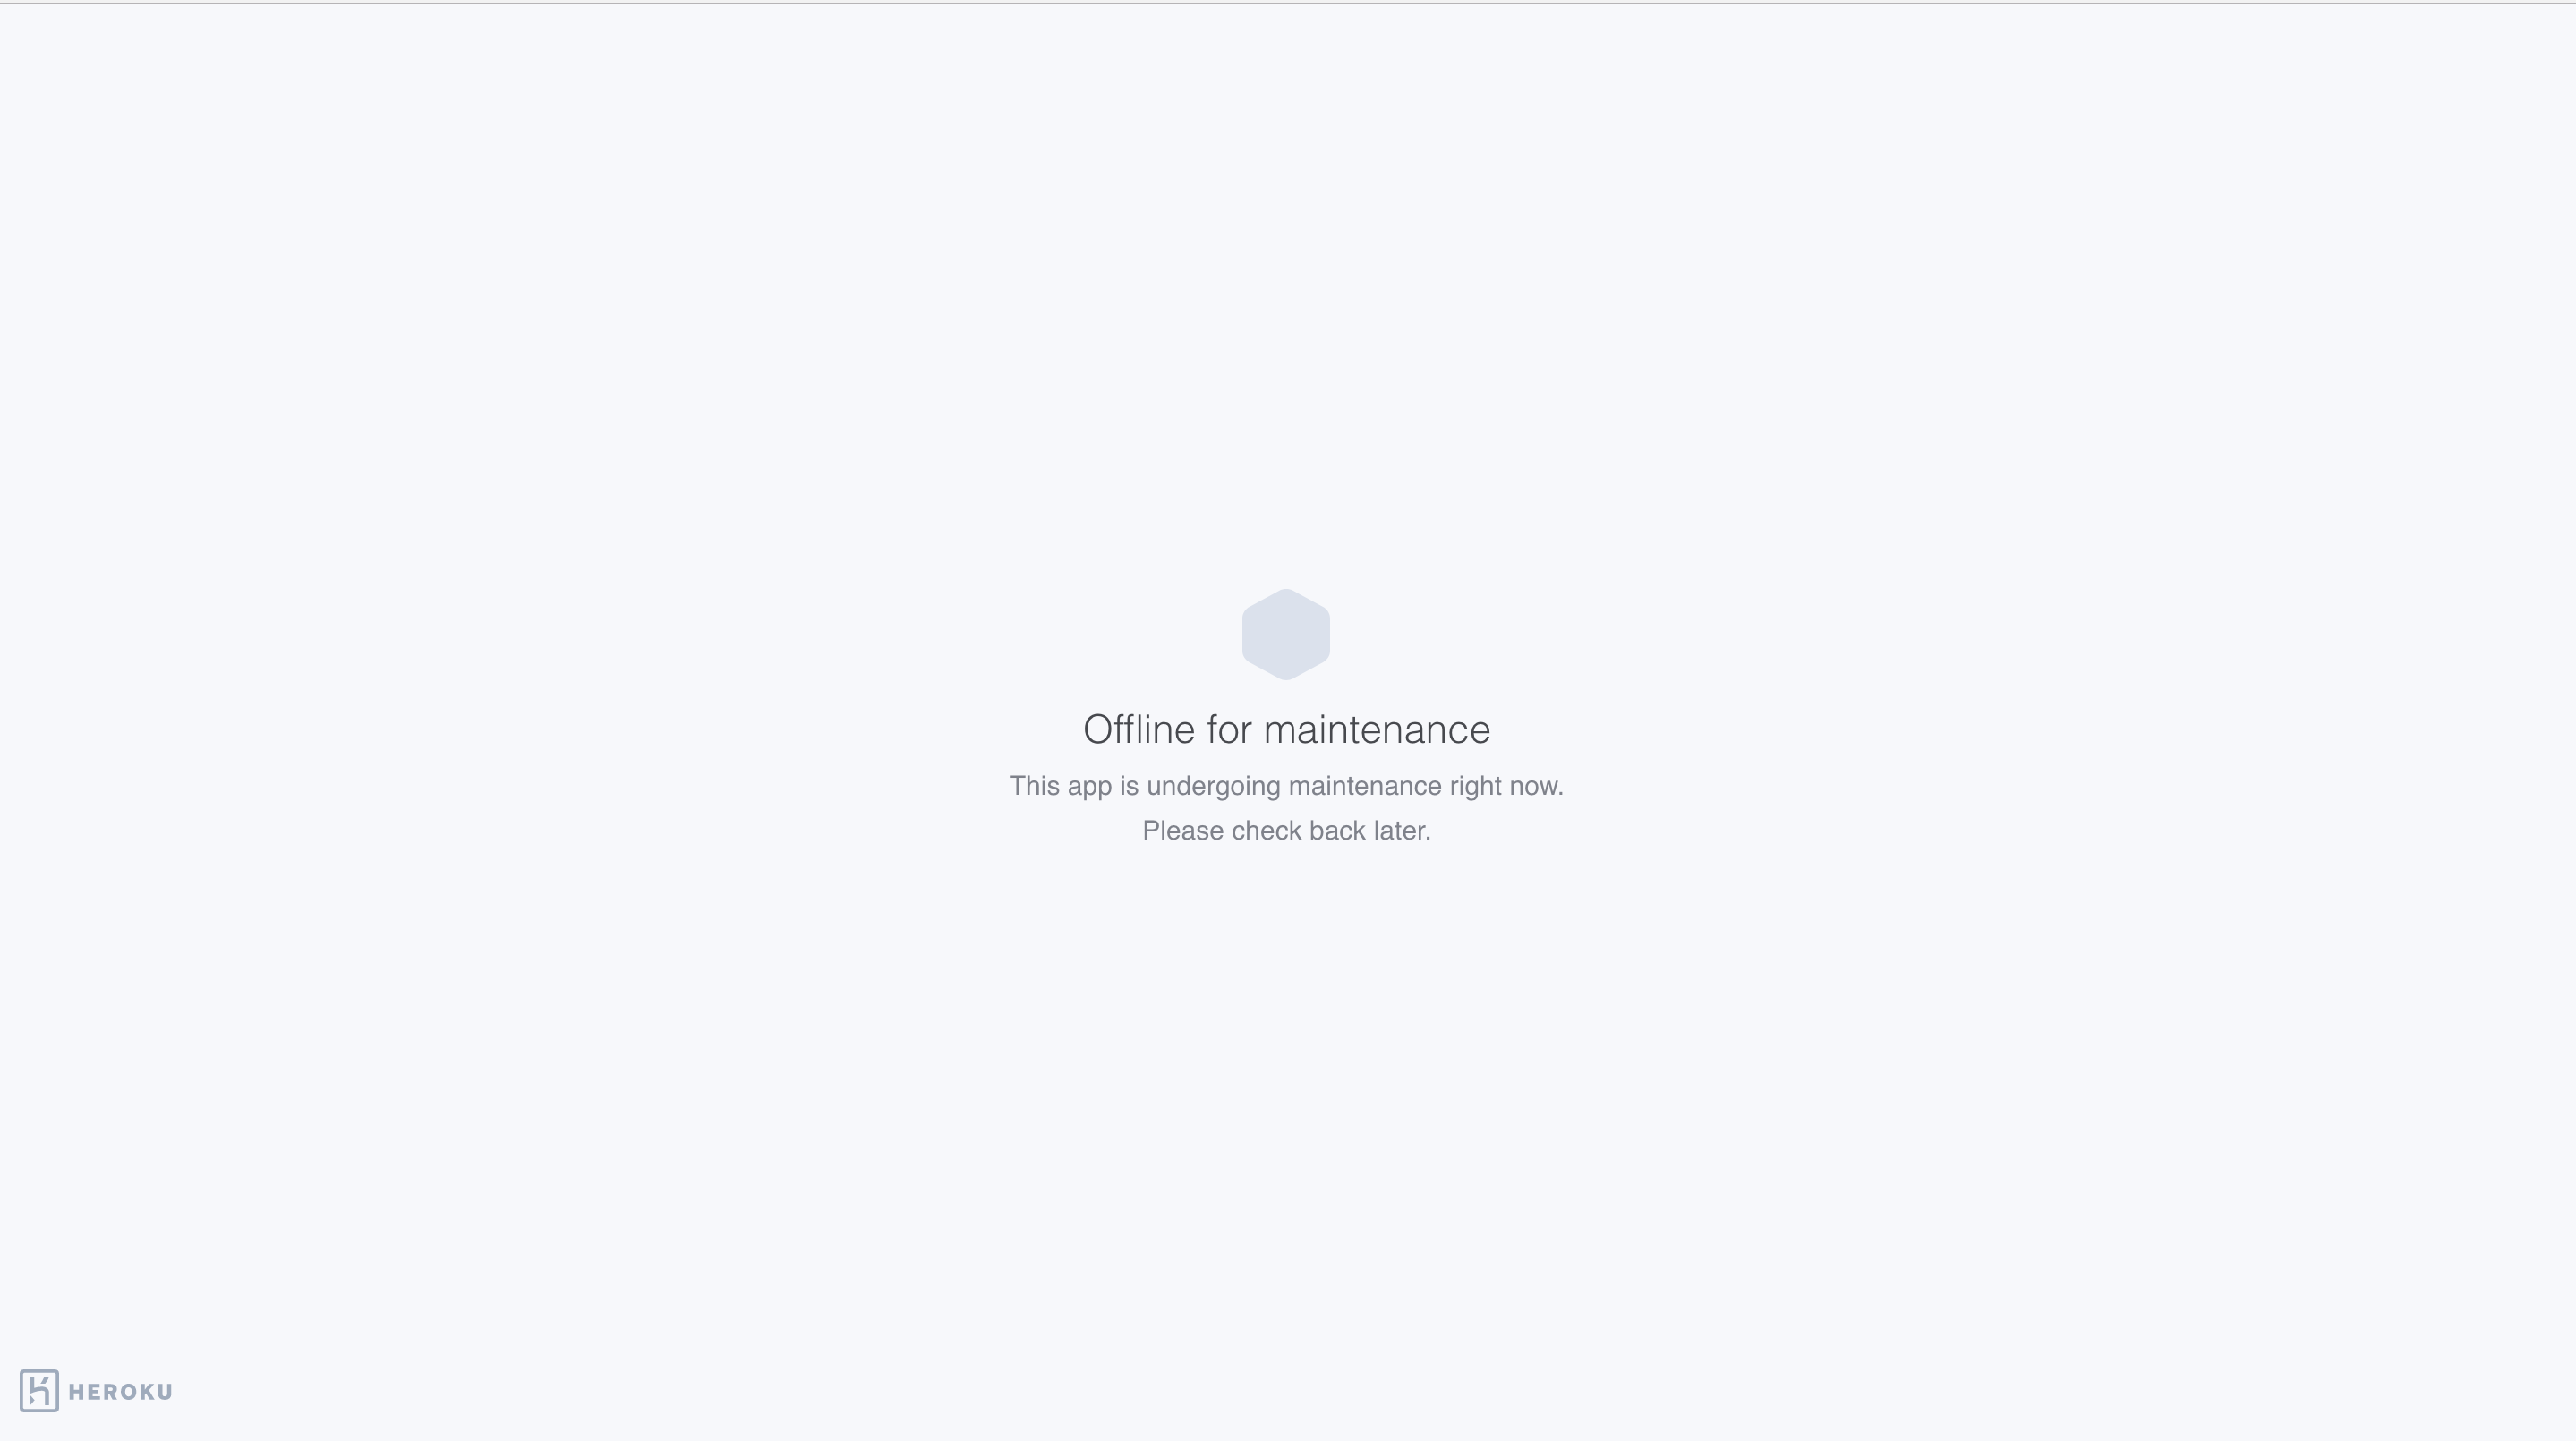
At times, we need to take our application offline making changes to some things such as switching to a new database. During this time, we don’t want users to continue using the application as we make the changes. To take an application offline for maintenance, we run the command:
heroku maintenance:on
If someone now tries to access our application while it’s in maintenance mode, they’ll be greeted with this page:
To get the application back up, we run:
heroku maintenance:off
Conclusion
In this tutorial, we covered most of the aspects you need to know when deploying a Laravel application to Heroku. The repo containing all the setup is available here. If you feel we left out some crucial bits, feel free to leave a comment below. Also, if you found the tutorial helpful hit the like button and don’t forget to share it with your friends. Cheers!
P.S. Check out our annual report of the PHP versions used in commercial projects on Semaphore.
Want to discuss this article? Join our Discord.