“The first rule of any technology used in a business is that automation applied to an efficient operation will magnify the efficiency.”
If Bill Gates said that, who am I to say differently?
When thinking about mobile apps, releases are quite different and a little more time-consuming than with other sorts of apps. We have to build for android and for iOS; we have certificates to manage, version numbers, code repositories, and have to release them to different stores. Automation in mobile development is essential for efficiency.
In this post, you’ll learn how to set up Semantic Release and Fastlane for releasing React Native apps on Semaphore efficiently.
Part 1: Setting up Semantic Release
Semantic Release is a tool for automating version management and package publishing. Semantic release uses Semantic Versioning specifications to automate the release workflow; these steps include: determining the next version number, generating release notes, and publishing packages. In a React Native project, it is responsible for:
- Analyzing commits
- Determining the next release version
- Publishing a release to the repository
Later on, we’ll insert Semantic Release into the CI/CD pipeline to completely automate and manage the versioning of our native iOS and Android applications.
Installing Semantic Release
yarn add --dev semantic-release conventional-changelog-conventionalcommits💡While `semantic-release` allows SSH authentication, the `@semantic-release/github` plugin relies on personal tokens to authenticate. Therefore, I recommend setting up a variable `GH_TOKEN` for the entire process.
Create a personal access token, and export it as GH_TOKEN:
export GH_TOKEN=ghp_your_tokenCreating a configuration file
Create a .releaserc file, to configure your project preferences, as shown below:
{
  "repository": {
    "type": "git",
    "url": "https://github.com/<org>/<repo>.git"
  },
  "publishConfig": {
    "access": "restricted"
  },
  "branches": [
    "main"
  ],
  "tagFormat": "${version}",
  "plugins": [
    [
      "@semantic-release/commit-analyzer",
      {
        "preset": "conventionalcommits"
      }
    ],
    [
      "@semantic-release/release-notes-generator",
      {
        "preset": "conventionalcommits"
      }
    ],
    [
      "@semantic-release/github",
      {
        "successComment": false
      }
    ]
  ]
}
By default, Semantic Release uses Angular Commit Message Conventions.
Personally, I prefer the Conventional Commits specification, and change the preset config of @semantic-release/commit-analyzer and @semantic-release/release-notes-generator to conventionalcommits.
I recommend including commitlint and husky to enforce commit message guidelines on commits. You can follow this guide to do the setup.
Updating your package.json
Add this script to your package.json:
"scripts": {
  "release": "semantic-release"
}
Testing the setup
Now, try to run the Semantic Release locally:
yarn semantic-releaseSince you are not in a CI environment, this command will generate a dry run of what you have so far. If everything is set up correctly, you will be able to see the next version and the release changelog.
If you want to see the real results (git tag, release and changelog), set --no-ci:
yarn semantic-release --no-ciThis will generate a new version and push a new release tag with the changelog.
Next, we’ll discuss setting up Fastlane and Semaphore and integrating them with theSemantic Release process.
Part 2: Setting up your deployment lanes with Fastlane
If you want to learn more about Fastlane and React Native, I recommend reading the following tutorials:
iOS configuration
Inside your iOS folder, run fastlane init. This command will do the initial Fastlane setup for your iOS project.
After that, let’s install a few plugins. First, run:
fastlane add_plugin semaphore latest_testflight_build_numberThe Semaphore plugin will add the setup_semaphore action. And latest_testflight_build_number will retrieve the latest Testflight build number of a given version.
To finish the plugins installation, run the following:
bundle installNavigate to your Fastfile directory and replace the default content with the following code:
default_platform(:ios)

before_all do
  setup_semaphore
end

platform :ios do
  desc "Build and Deploy iOS"

  lane :build do

    create_keychain(
      name: ENV["KEYCHAIN_NAME"],
      password: ENV["KEYCHAIN_PASSWORD"],
      default_keychain: is_ci,
      unlock: true,
      timeout: 3600,
      lock_when_sleeps: false
    )

    match(
      type: "appstore",
      readonly: is_ci,
      api_key_path: "#{ENV["RUNNER_TEMP_PATH"]}/apple-api-key.json",
      keychain_name: ENV["KEYCHAIN_NAME"],
      keychain_password: ENV["KEYCHAIN_PASSWORD"],
    )

    gym(
      workspace: "YourProject.xcworkspace",
      scheme: "YourProject",
      export_method: "app-store",
      configuration: "Release"
    )

  end

  lane :deploy do

    currentBuildNumber = latest_testflight_build_number(
      version: ENV["VERSION_NUMBER"],
      api_key_path: "#{ENV["RUNNER_TEMP_PATH"]}/apple-api-key.json"
    )

    nextBuildNumber = currentBuildNumber + 1

    increment_build_number(build_number: nextBuildNumber)
    increment_version_number(version_number: ENV["VERSION_NUMBER"])

	  build

    upload_to_testflight(api_key_path: "#{ENV["RUNNER_TEMP_PATH"]}/apple-api-key.json")

  end

end
Do not worry about ENV["VERSION_NUMBER"] for now, this variable will be acquired from the Semantic Release process in the pipeline.
Android configuration
Inside your android folder, run fastlane init to set up Fastlane for your android project.
After that, let’s install two plugins. Run the following:
fastlane add_plugin increment_version_code increment_version_name google_play_track_version_codesWhile the first two will update your app version name and the code in your project’s app/build.gradle. The last one will retrieve the version code in the Google Play Store track.
To finish the plugins installation, run the following:
bundle installNavigate to your Fastfile directory and replace the default content with the following code:
default_platform(:android)

platform :android do
  desc "Build"

  lane :build do

    gradle(
      task: "clean assembleRelease",
      properties: {
        "android.injected.signing.store.file" => "#{ENV["RUNNER_TEMP_PATH"]}/your.keystore",
        "android.injected.signing.store.password" => "#{ENV["KEYSTORE_STORE_PASSWORD"]}",
        "android.injected.signing.key.alias" => "#{ENV["KEYSTORE_ALIAS"]}",
        "android.injected.signing.key.password" => "#{ENV["KEYSTORE_KEY_PASSWORD"]}",
      }
    )

  end

  lane :deploy do

    currentBuildNumber = google_play_track_version_codes(
      track: "internal",
      json_key: "#{ENV["RUNNER_TEMP_PATH"]}/google-api-key.json",
    )
    nextBuildNumber = currentBuildNumber[0] + 1

    increment_version_code(version_code: nextBuildNumber)
    increment_version_name(
      gradle_file_path: "./app/build.gradle",
      version_name: ENV["VERSION_NUMBER"]
    )

    gradle(
      task: "clean bundleRelease",
      properties: {
        "android.injected.signing.store.file" => "#{ENV["RUNNER_TEMP_PATH"]}/your.keystore",
        "android.injected.signing.store.password" => "#{ENV["KEYSTORE_STORE_PASSWORD"]}",
        "android.injected.signing.key.alias" => "#{ENV["KEYSTORE_ALIAS"]}",
        "android.injected.signing.key.password" => "#{ENV["KEYSTORE_KEY_PASSWORD"]}",
      }
    )

    supply(
      json_key: "#{ENV["RUNNER_TEMP_PATH"]}/google-api-key.json",
      track: "internal"
    )


  end

end
You will use Semaphore Secrets to store your Keystore, Google API key, and Apple API key.
Now let’s make magic
The last step is to plug everything into the Semaphore pipeline.
Our pipeline will have the following steps:
- Install dependencies: these are responsible for checking out the repository, installing project dependencies, and caching for future tasks.
- Testing: this includes running lint, unit tests, and typescript checks (if applicable). All jobs can run in parallel. Running in parallel will improve the speed of this stage, and fail_fast guarantees that running tests will stop on the first failure.
- Run native builds: on every change, it is very important to check if we are still able to build our android and iOS builds successfully. At this stage, you can also add e2e tests, taking advantage of the build already created. This stage will use the
buildlane on both Fastlane projects.
💡 PS.: When the branch is main, we must skip the Build step. There is no need to re-run the android builds before release, that’s why we added the skip command.
This is how your semaphore.yaml file will appear. Copy and paste each step to your Workflow Builder.
version: v1.0
name: CI/CD
agent:
  machine:
    type: e1-standard-4
    os_image: ubuntu1804

fail_fast:
  stop:
    when: 'true'

auto_cancel:
  running:
    when: "branch != 'main'"

blocks:
  - name: Install dependencies
    dependencies: []
    task:
      jobs:
        - name: Yarn install and cache
          commands:
            - checkout
            - cache restore
            - yarn
            - cache store
  - name: Testing
    dependencies:
      - Install dependencies
    task:
      prologue:
        commands:
          - checkout
      jobs:
        - name: Run eslint
          commands:
            - cache restore
            - yarn lint
        - name: Run unit tests
          commands:
            - cache restore
            - yarn coverage
        - name: Run typescript check
          commands:
            - cache restore
            - yarn tsc
  - name: 'Dev: Build Android'
    skip:
      when: branch = 'main'
    dependencies:
      - Testing
    task:
      agent:
        machine:
          type: e1-standard-4
          os_image: ubuntu1804
        containers:
          - name: main
            image: 'registry.semaphore.io/android:30-node'
      env_vars:
        - name: LANG
          value: en_US.UTF-8
        - name: RUNNER_TEMP_PATH
          value: /Users/semaphore
      secrets:
        - name: your-secrets
      prologue:
        commands:
          - checkout
          - cache restore
          - cd android && bundle install --path vendor/bundle
      jobs:
        - name: Fastlane build
          commands:
            - cd android && bundle exec fastlane android build
  - name: 'Dev: Build iOS'
    skip:
      when: branch = 'main'
    dependencies:
      - Testing
    task:
      agent:
        machine:
          type: a1-standard-4
          os_image: macos-xcode13
      env_vars:
        - name: LANG
          value: en_US.UTF-8
        - name: RUNNER_TEMP_PATH
          value: /Users/semaphore
      secrets:
        - name: your-secrets
      prologue:
        commands:
          - checkout
          - yarn

          - bundle install --path vendor/bundle
          - cd ios && bundle install --path vendor/bundle
          - pod install

          # https://docs.semaphore.io/examples/code-signing-for-ios-projects/
          - chmod 0600 ~/.keys/*
          - ssh-add ~/.keys/*
      jobs:
        - name: Fastlane build
          commands:
            - cd ios && bundle exec fastlane ios deploy

promotions:
  - name: Release
    pipeline_file: deploy.yml
    auto_promote:
      when: result = 'passed' and branch = 'main'
After the pipeline passes successfully, and if the branch is main, the release promotion will be triggered.
Release Pipeline
Our Release pipeline will have the following steps:
- Run Semantic Release: this will generate the next version number, and export it as an Artifact. Fastlane will use the Artifact to update the native versions for the stores.
- Deploy iOS: generates the iOS build and uploads to Testflight
- Deploy Android: generates the android bundle and uploads to Google internal testing
This is how your deploy.yml pipeline will appear:
version: v1.0
name: 'Deploy'
agent:
machine:
type: e1-standard-4
os_image: ubuntu1804
blocks:
- name: Generate Release
dependencies: []
task:
secrets:
- name: your-secrets
jobs:
- name: Run Semantic Release
commands:
- checkout
- cache restore
# Run semantic release and export the next release version to workflow artifacts
- VERSION=$(npx semantic-release --dry-run | grep 'The next release version is' | sed -E 's/.* ([[:digit:].]+)$/\1/')
- echo $VERSION >> version.txt
- artifact push workflow version.txt
# Generate the next release
- npx semantic-release
- name: Deploy iOS
dependencies:
- Generate Release
task:
agent:
machine:
type: a1-standard-4
os_image: macos-xcode13
env_vars:
- name: LANG
value: en_US.UTF-8
- name: RUNNER_TEMP_PATH
value: '/Users/semaphore'
secrets:
- name: your-secrets
prologue:
commands:
- checkout
- yarn
- bundle install --path vendor/bundle
- cd ios && bundle install --path vendor/bundle
- pod install
jobs:
- name: Fastlane deploy
commands:
- artifact pull workflow version.txt
- VERSION=$(cat version.txt)
- export VERSION_NUMBER=$VERSION
- chmod 0600 ~/.keys/*
- ssh-add ~/.keys/*
- bundle exec fastlane ios deploy
- name: Deploy Android
dependencies:
- Generate Release
task:
agent:
machine:
type: e1-standard-4
containers:
- name: main
image: 'registry.semaphore.io/android:30-node'
env_vars:
- name: LANG
value: en_US.UTF-8
- name: RUNNER_TEMP_PATH
value: '/Users/semaphore'
- name: ROOT_PATH
value: '/root/YourProjectFolder'
secrets:
- name: your-secrets
prologue:
commands:
- checkout
- cache restore
- cd android && bundle install --path vendor/bundle
- cache store
jobs:
- name: Fastlane deploy
commands:
- artifact pull workflow version.txt
- VERSION=$(cat version.txt)
- export VERSION_NUMBER=$VERSION
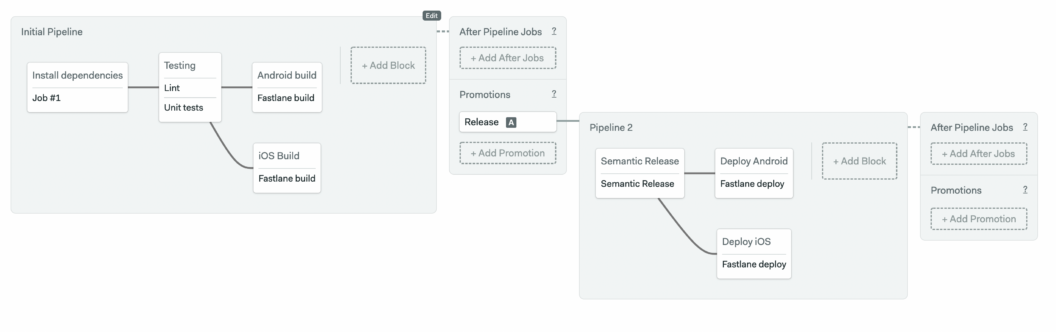
- bundle exec fastlane android deployThis is how your finished pipeline will appear:
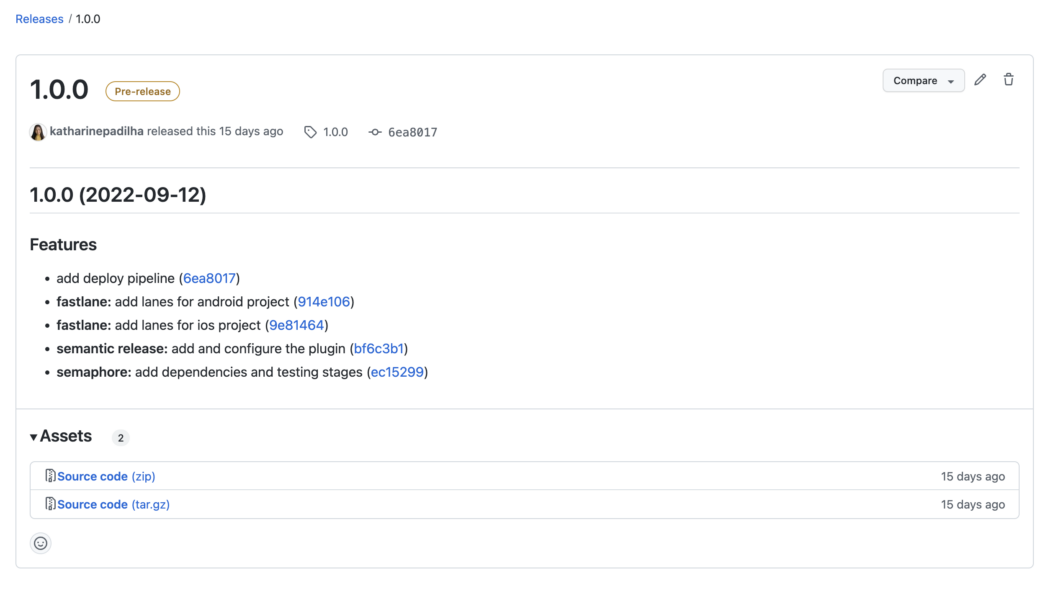
And this is how a release appears:
You can see a Github repository with part of the code live here.
What’s Next?
Semaphore is very powerful and you can add Slack notifications, release to firebase, upload apks to Google Drive, configure Code Push releases, and much more. I hope this CI/CD integration solution will help you release more efficiently. And please, feel free to explore Semaphore’s rich library of CI/CD content.
This article was written by Katharine Padilha, software engineer at Foxbox Digital.
Want to discuss this article? Join our Discord.