You’ve probably heard about MCP Servers. You might even be using quite a few of them with your AI Agents or IDEs. But have you ever built one? It takes surprisingly little code to implement a functional MCP Server. So, let’s build an MCP Server.
To learn more, listen to this Technical Tips podcast episode or watch the video below. Enjoy!
By the end of this post, you’ll understand:
- How MCP servers communicate with AI clients.
- How to connect an MCP server to Semaphore’s API.
- And how to integrate it with tools like OpenAI’s Codex to make your continuous integration setup conversational.
Wrapping an API with an MCP Server
We’ll need a real-world API to work with. For this post, I’ll use Semaphore’s public API, which exposes virtually every aspect of your CI/CD workflows. That means our MCP server can query real build data, list projects, or even diagnose failed runs, all through a few HTTP calls.
To interact with the Semaphore API, we need authentication. The easiest way is to create a Service Account with admin access to your projects.

Before building the MCP server, it’s a good idea to test that our API connection works. You can do that with a simple curl command.
curl -i -H "Authorization: Token ${SEMAPHORE_API_TOKEN}" \
  "https://${my_org}.semaphoreci.com/api/v1alpha/projects"
We’ll receive a JSON response like this:
[
  {
    "metadata": {
      "owner_id": "f5a943a2-6606-4b4e-848f-eb746d9bcf03",
      "org_id": "f580f012-1b80-437f-acaf-be038f827270",
      "name": "m01.devops.training-python",
      "id": "9e1cba05-6203-4398-bf0b-e22a78fd9b73",
      "description": ""
    },
    "kind": "Project",
    "apiVersion": "v1alpha"
    "spec": {
      "visibility": "private",
      "tasks": [],
      "schedulers": [],
      "repository": {
        "whitelist": {
          "tags": [],
          "branches": []
        },
        "url": "git@github.com:TomFern/m01.devops.training-python.git",
        "status": {
          "pipeline_files": [
            {
              "path": ".semaphore/semaphore.yml",
              "level": "pipeline"
            }
          ]
        },
        "run_on": [
          "tags",
          "branches",
          "draft_pull_requests"
        ],
        "pipeline_file": ".semaphore/semaphore.yml",
        "owner": "TomFern",
        "name": "m01.devops.training-python",
        "integration_type": "github_app",
        "forked_pull_requests": {
          "allowed_secrets": [],
          "allowed_contributors": []
        }
      }
    }
  },
To keep things simple, let’s focus only on the project name, which can be found under the key metadata.name for each item in the list.
Initializing the Project
Let’s start fresh by creating a new Python project.
We’ll call it semaphore-mcp:
uv init semaphore-mcpThis creates a basic Python project structure with a pyproject.toml file and a new directory for your code.
Next, navigate into the project folder: cd semaphore-mcp
To keep our dependencies isolated, we’ll create a virtual environment using uv:
uv venv
source .venv/bin/activate
Our MCP server will only need a couple of dependencies:
httpx: a fast, modern HTTP client for Python.mcp[cli]: a command-line and runtime toolkit for building MCP servers.
Install them both using uv:
uv add "mcp[cli]" httpx
That’s it. With this minimal setup, we’re ready to start writing the code for our MCP server.
Building the MCP Server
With our environment ready, it’s time to build the heart of the MCP Server. We’ll do everything in a single file: main.py
We’ll start by importing the dependencies we need:
import os
import httpx
from mcp.server.fastmcp import FastMCP
Next, we’ll instantiate the MCP server:
mcp = MCP("semaphore")Now comes the core functionality. Tools are the functions that the AI client can call. We’ll define one called list_projects, which returns the names of all projects in your Semaphore organization. Tools in FastMCP are decorated with @mcp.tool:
@mcp.tool()
def list_projects() -> list[dict[str, str]]:
    token = os.environ["SEMAPHORE_API_TOKEN"]
    org = os.environ["SEMAPHORE_ORG"]
    url = f"https://{org}.semaphoreci.com/api/v1alpha/projects"
    response = httpx.get(url, headers={"Authorization": f"Token {token}"}, timeout=10)
    return [{"name": item["metadata"]["name"]} for item in response.json()]
In this function:
- We fetch the
SEMAPHORE_API_TOKENandSEMAPHORE_ORGfrom the environment. - We make an authenticated GET request to Semaphore’s API.
- The function returns a list of dictionaries containing project names; a simple but structured format that the AI can easily interpret.
Finally, we’ll start the MCP server and use stdio (standard input/output) as the communication transport.
def main() -> None:
    mcp.run(transport="stdio")


if __name__ == "__main__":
    main()
Here’s the complete main.py:
import os

import httpx
from mcp.server.fastmcp import FastMCP

mcp = FastMCP("semaphore")

@mcp.tool()
def list_projects() -> list[dict[str, str]]:
    token = os.environ["SEMAPHORE_API_TOKEN"]
    org = os.environ["SEMAPHORE_ORG"]
    url = f"https://{org}.semaphoreci.com/api/v1alpha/projects"
    response = httpx.get(url, headers={"Authorization": f"Token {token}"}, timeout=10)
    return [{"name": item["metadata"]["name"]} for item in response.json()]


def main() -> None:
    mcp.run(transport="stdio")


if __name__ == "__main__":
    main()
Testing the MCP Server
Now that our MCP server is built and ready, it’s time to test it. The MCP Inspector is an interactive debugger and tester for MCP Servers. It allows us to call tools, view schemas, and inspect responses.
You can launch the inspector directly from your terminal using npx.
npx @modelcontextprotocol/inspector \
   uv \
   --directory $PWD \
   run main.py
Once launched, the Inspector will open in your browser with a dashboard for your MCP server.
Inside the Inspector:
- You’ll see your server listed under Connections.
- Go to the Tools tab — your
list_projectsfunction will appear there automatically. - Click on it, and you’ll see:
- The function’s name (
list_projects). - Its description, extracted from the docstring.
- The output schema, generated from the type hints in your code.
- The function’s name (
This auto-discovery is one of the best features of FastMCP, as you don’t have to manually define JSON schemas. Everything is inferred directly from your Python function.
To run the tool, ensure the SEMAPHORE_API_TOKEN and SEMAPHORE_ORG environment variables are defined on the left sidebar. Then press Connect. Go to the Tools tab and retrieve the list of tools.
Use Run Tool** to execute the list_projects function. If everything is configured correctly, the Inspector will display a JSON array containing all your Semaphore projects, like this:
[
  {"name": "hello-semaphore"},
  {"name": "dockerizing-ruby"},
  {"name": "golang-mathapp"},
  {"name": "addressbook-deno"}
]
Integrating with Codex
Now that our MCP server is running smoothly, let’s connect it to Codex.
Codex uses a simple command-line interface for managing MCP servers.
To register your Semaphore MCP server, ensure the SEMAPHORE_API_TOKEN and SEMAPHORE_ORG variables are set and run:
codex mcp add semaphore \
  --env SEMAPHORE_API_TOKEN=$SEMAPHORE_API_TOKEN \
  --env SEMAPHORE_ORG=$SEMAPHORE_ORG \
  -- uv --directory $PWD run main.py
To confirm that your MCP server has been registered, run:
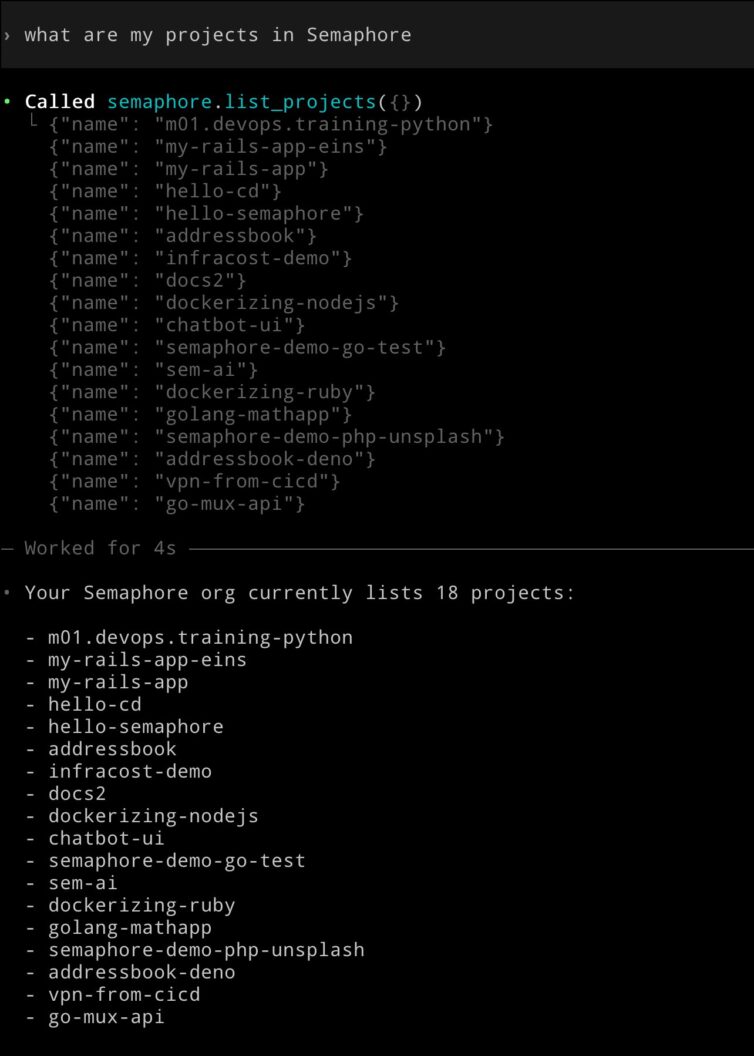
codex mcp listNow comes the fun part: open Codex and ask it something like: “List all my Semaphore projects”. You’ll see the same output as before, but this time it’s coming directly through Codex’s conversational interface.
This is a simple example, but imagine extending the MCP Server to fully control Semaphore. You would be able to ask things such as:
- “Why did my last build fail?”
- “Show me the logs for the deploy job.”
- “Add a test step to my pipeline and rerun it.”
Semaphore MCP Server Coming Soon
The good news is that we don’t have to extend this MCP Server because an official MCP server for Semaphore is currently in development and will soon be generally available. Initially, this version will be read-only and enabled for organizations expressing interest in trying out this new feature. And we expect to make it generally available to all organizations in a very short time.
Conclusion
With only a few lines of Python, you’ve built a bridge between your CI/CD system and an AI assistant. It is capable of understanding, retrieving, and acting on real project data. MCP and AI integrations are ushering in a new era where DevOps becomes conversational and testing is AI-driven.
Thank you for reading, and happy building!
Want to discuss this article? Join our Discord.