Continuous Integration (CI) is supposed to give developers fast and reliable feedback. The downside is that when builds fail, the workflow grinds to a halt. But what if your CI pipeline could fix itself?
Self-healing CI is a new pattern that uses AI to automatically diagnose failures, apply code changes, re-run the pipeline, and open a pull request. Instead of getting stuck in repetitive debugging cycles, developers simply review the change, merge it, and move on.
In this guide, we’ll walk through how to build self-healing pipelines using Semaphore, Semaphore’s MCP Server, and an AI code-fixing agent.
How Self-Healing Pipelines Work
At a high level, a self-healing CI setup adds an automated feedback loop on top of your existing pipelines. Instead of stopping at a failure, your CI hands the problem off to an AI agent that attempts to fix the issue, validate the fix, and prepare a pull request.
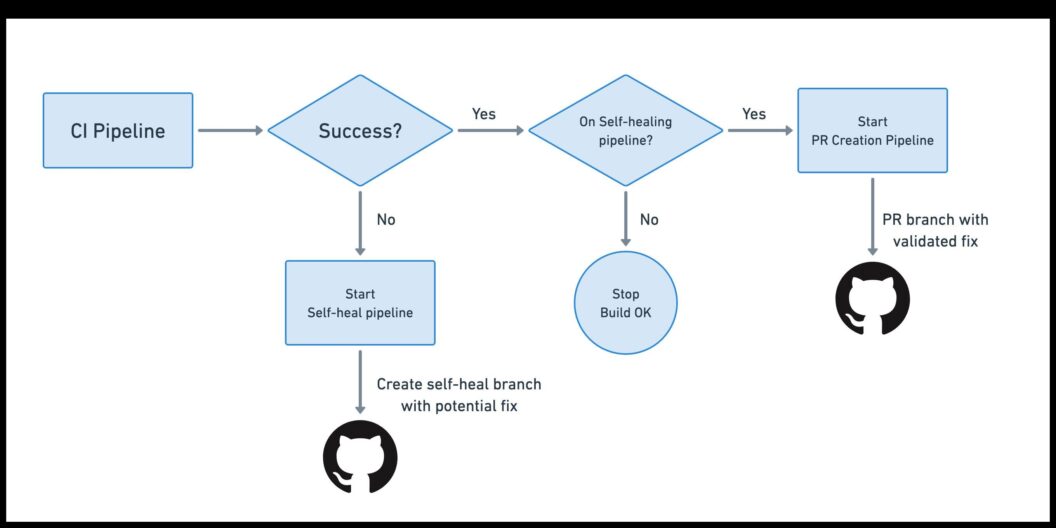
Here’s what the workflow looks like end-to-end:
- Your main CI pipeline runs as usual: you push code, CI starts, and your standard build-and-test pipeline executes. If everything passes, nothing special happens
- When the pipeline fails, a promotion triggers a new “self-heal” pipeline
- The self-heal pipeline spins up an AI agent: The AI agent needs access to your CI logs, job outputs, and workflow metadata through the MCP Server
- The agent applies a fix and pushes a new branch
- CI runs again on the self-heal branch: Since a new branch was pushed, your regular CI pipeline kicks in
- A second promotion opens an automatic pull request: If the rebuilt self-healed branch passes all jobs, a second promotion triggers a dedicated PR-creation pipeline.
- You review and merge the PR
Building a Self-Healing CI Pipeline
Setting up a self-healing CI pipeline in Semaphore involves four major components: enabling the MCP Server, configuring your AI agent, creating the self-healing pipeline, and finally automating pull-request creation.
Prepare the Environment and Tokens
Before implementing anything, you need to give both Semaphore and your AI agent secure access to the systems they’ll interact with.
Enable the Semaphore MCP Server
The MCP Server allows the AI agent to read CI logs, job details, and workflow metadata.
Create Required Tokens and Secrets
You’ll need three secrets:
- Semaphore API Token: stored as
semaphore-mcp → SEMAPHORE_API_TOKEN - GitHub Personal Access Token (Classic) with repository write and PR permissions. Stored as
github-pat → GITHUB_TOKEN - AI Agent API Key (e.g., OpenAI): Stored as
openai-api → OPENAI_API_KEY
Add AI Agent Configuration to Your Repository
Next, create a small configuration workspace in your repo that tells the AI agent how to behave.
Inside selfheal/codex/config.toml, specify:
- Full-auto mode
- Trusted workspace
- Connection details for Semaphore’s MCP Server
- The environment variable that holds the MCP server token
The complete config file is as follows:
full-auto = true
bypass-approvals = true
bypass-sandbox = true
trusted-workspace = true

[mcp_servers.semaphore]
url = "https://mcp.semaphoreci.com/mcp"
bearer_token_env_var = "SEMAPHORE_API_TOKEN"
startup_timeout_sec = 30
tool_timeout_sec = 300
Prompt Template
Create selfheal/prompt-template.txt with instructions for the agent:
- Analyze the failing pipeline
- Inspect all failed jobs
- Apply fixes
- Write a one-line summary in
commit-message.txt
This template becomes the core instruction set for the automated debugging workflow.
Find out why the Semaphore in the following pipeline has failed and implement a fix. Analyze all the jobs that have failed and fix all the errors one at a time.

Organization ID: $SEMAPHORE_ORGANIZATION_ID
Project ID: $SEMAPHORE_PROJECT_ID
Pipeline ID: $SEMAPHORE_PIPELINE_ID
Workflow ID: $SEMAPHORE_WORKFLOW_ID

When done, create a file called `commit-message.txt` with a one-line summary of changes suitable for a Git commit message.
Commit these files so they’re accessible to your CI environment.
Build the Self-Healing Pipeline
Now you can implement the pipeline that performs the automated repair. Add a promotion to your main CI pipeline with a rule such as:
result = 'failed' AND branch !~ '^selfheal-.*'This ensures the self-heal pipeline runs only when the main CI fails (and avoids loops by excluding previously generated selfheal branches).
Make the Repo Writable & Create the Branch
In the self-heal pipeline’s first block, configure Git:
- Check out the repo
- Set Git user/email
- Construct a branch like
selfheal-<git-sha> - Rewrite
originusing your GitHub token so CI can push commits
These steps can be accomplished with the following commands:
export SELFHEAL_BRANCH=selfheal-${SEMAPHORE_GIT_SHA}
checkout
git config --global user.email "ci@semaphore.io"
git config --global user.name "Semaphore CI"
git remote set-url origin https://$GITHUB_TOKEN:x-oauth-basic@github.com/${SEMAPHORE_GIT_REPO_SLUG}.git
git checkout -b "$SELFHEAL_BRANCH"
Run the AI Agent and Commit the Fix
The job steps:
- Copy the Codex config into the agent’s expected location
- Install the Codex CLI
- Authenticate using your AI key
- Run the agent with the prompt template (using
envsubstto insert pipeline IDs) - Cache the generated commit message
- Commit all changes
- Push the new branch to GitHub
Which can be done with these commands:
mkdir -p $HOME/.codex
cp selfheal/codex/config.toml $HOME/.codex
npm install -g @openai/codex
printenv OPENAI_API_KEY | codex login --with-api-key
codex exec --dangerously-bypass-approvals-and-sandbox "$(envsubst < selfheal/prompt-template.txt)"
mv commit-message.txt /tmp
cache store commit-message-$SELFHEAL_BRANCH /tmp/commit-message.txt
git add -A
git commit -m "selfheal CI: $(cat /tmp/commit-message.txt)"
git push origin "$SELFHEAL_BRANCH"
Pushing triggers a new CI run on the self-heal branch.
Create the Pull-Request Pipeline
Once the self-heal branch’s CI run passes, you want to automatically open a pull request. Add a Second Promotion and use a rule such as:
result = 'passed' AND branch =~ '^selfheal-.*'This ensures the PR pipeline only runs after a successful, AI-generated fix.
Restore State and Prepare for PR Creation
In the pipeline’s job:
- Check out the self-heal branch
- Restore the cached commit message
- Configure Git for write access
- Use GitHub CLI to open a PR
gh pr create \
  --base master \
  --title "Selfheal CI: $(cat /tmp/commit-message.txt)" \
  --body "PR created automatically by the self-healing pipeline."
After completing these steps, your CI system becomes self-healing. Developers only need to review and merge the resulting PR.
Conclusion
Self-healing CI pipelines aren’t about replacing developers. They eliminate the repetitive, low-value work that slows teams down. When your CI can diagnose failures, apply fixes, rerun tests, and open a pull request automatically, your team spends less time chasing flaky tests and environment quirks, and more time shipping meaningful features.
By offloading log-digging and routine debugging to an AI agent, you gain:
- Reduced CI toil: fewer manual retries and less context switching
- Higher developer productivity: more focus on product work
- Faster delivery: issues resolved automatically, sometimes before anyone notices
- Consistent fixes: the agent applies the same repeatable, reliable process every time
Self-healing CI is a powerful upgrade to any modern development workflow. And, once you experience it, you’ll never want to go back.
Thank you for reading, and happy building!
Want to discuss this article? Join our Discord.