Introduction
This tutorial will illustrate how you can use AWS CodeDeploy, a scalable deployment service offered by AWS that lets you automate your deployment process. We will package and continuously deploy a Go application to an EC2 instance. The tutorial will use a sample application and walk you through the process of updating your existing setup, to allow for the continuous deployment of your application.
Goals
By the end of this tutorial, you will:
- Modify an existing EC2 instance to get it ready for continuous deployment,
- Create users, roles and policies in AWS for use with CodeDeploy, and
- Set up Semaphore to continuously test and deploy your application.
Prerequisites
This tutorial assumes:
- Familiarity with Go,
- General familiarity with AWS, and
- That you have an application running on an EC2 instance.
The Sample Application
The application we will use in this tutorial is a very simple application that consists of four files:
main.go— Contains the main application,main_test.go— Contains the tests for the application,config.json— A config file used by the application, andindex.html— The template used by the application.
The contents of these files are as follows:
main.go
// main.go

package main

import (
	"encoding/json"
	"html/template"
	"time"

	"io/ioutil"
	"log"
	"net/http"
)

var t *template.Template
var c config

type data struct {
	Weekday  time.Weekday
	Greeting string
}

type config struct {
	Greeting string
}

func main() {
	loadConfig()
	initializeTemplates()
	http.HandleFunc("/", handler)
	log.Fatal(http.ListenAndServe(":8000", nil))
}

func loadConfig() {
	contentBytes, _ := ioutil.ReadFile("config.json")
	json.Unmarshal(contentBytes, &c)
}

func initializeTemplates() {
	t, _ = template.ParseFiles("index.html")
}
func handler(w http.ResponseWriter, r *http.Request) {
	data := &data{time.Now().Weekday(), c.Greeting}

	t.Execute(w, data)
}
The application is a simple web server that responds with the contents of index.html. It passes two values to the template – one from the configuration file and another one that’s the current day of the week.
main_test.go
// main_test.go

package main

import (
	"encoding/json"
	"io/ioutil"
	"testing"
)

func TestConfig(t *testing.T) {
	contentBytes, err := ioutil.ReadFile("config.json")
	if err != nil {
		t.Errorf("The config file missing")
	}

	var c config
	if err = json.Unmarshal(contentBytes, &c); err != nil {
		t.Errorf("Error while parsing the config file")
	}

	if c.Greeting == "" {
		t.Errorf("The config is missing the Greeting key")
	}
}
This test checks that:
- The
config.jsonfile is present, - The
config.jsonfile contains valid JSON, and - The
Greetingkey in theconfig.jsonfile is non empty
index.html
<!doctype html>
<html>

<head>
  <title>Sample App for AWS CodeDeploy </title>
  <meta name="viewport" content="width=device-width, initial-scale=1">
  <meta charset="UTF-8">
</head>

<body>
  <h4>{{.Greeting}} World</h4>
  <p>Day: {{.Weekday}}</p>
</body>

</html>
The template uses the Greeting and Weekday values passed in from the application to display some content.
config.json
{
  "Greeting": "Hello"
}
While this is an extremely simple application, it can be considered fairly representative of Go applications, which mostly consist of the main binary, configuration files, and templates.
Setting up Continuous Testing with Semaphore
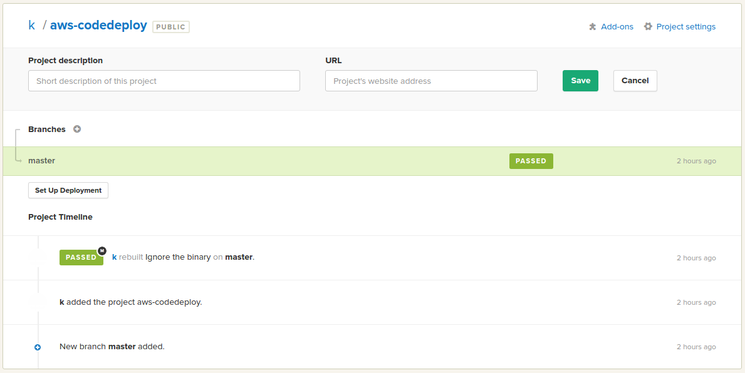
Before we modify our EC2 instance and set up CodeDeploy, let’s begin by setting up the project on Semaphore for continuous testing.
Note: This step is required because we want to avoid deploying the application if the tests are failing. After setting up testing, Semaphore will only deploy those versions which pass all tests.
If you haven’t already, sign up with Semaphore. Semaphore can use repositories hosted on Github or Bitbucket, so make sure that you push the application code to one of these hosts.
Once you have done this and signed into your Semaphore account, click on the button to add a new project:

Note: If this is your first project on Semaphore, you might see a different screen for adding a new project.
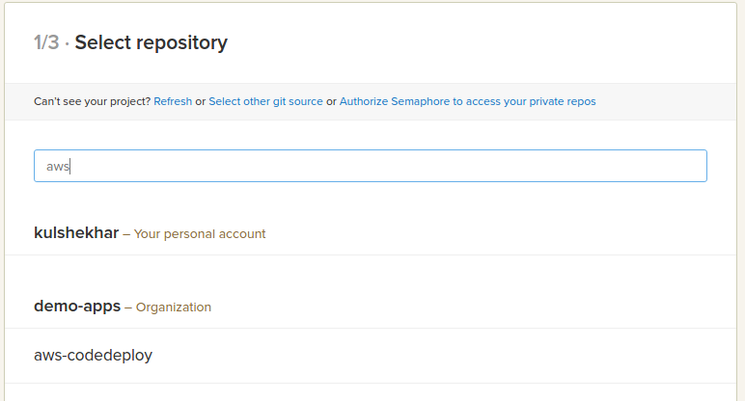
Now, select the repository from the list:
Next, select the branch of your repository that you want to run tests against:

At this point, Semaphore will analyze your project and it will set it up using the default settings applicable to a Go project. This is where you can customize the build and the testing process if you want to. You can also change these settings later in the project’s settings section. We’ll just change the version of Go used to the latest available version and click the Build With These Settings button at the bottom.

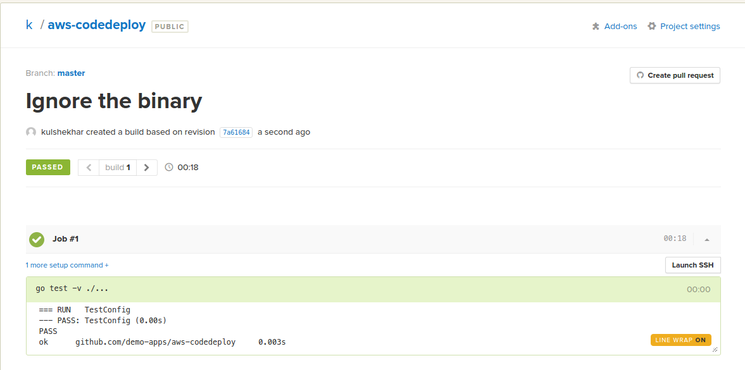
At this point, Semaphore will begin building and testing your project. From now on, whenever you push any changes to this project, Semaphore will automatically build and test your project.
Accessing the application in its current state should result in something like the following:
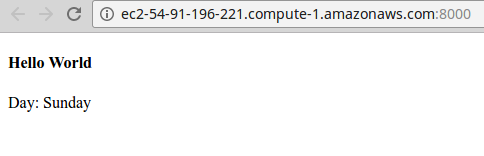
Note: The URL of your application will most likely be different and specific to your application and your EC2 setup.
Now that we have continuous testing set up, let’s move on and configure AWS to use CodeDeploy.
Setting Up AWS
As mentioned in the prerequisites section, this tutorial assumes that you have an application already running on an EC2 instance. With this setup, we need to make the following changes in our AWS account in order to be able to use CodeDeploy:
- Create a user,
- Create a deployment role for CodeDeploy,
- Create a policy and a role for the EC2 instance,
- Attach this role to the EC2 instance,
- Tag the EC2 instance,
- Install the CodeDeploy agent on the EC2 instance, and
- Set up CodeDeploy in the AWS console.
Let’s now go through each of these steps.
1. Create a User
We want to create a user whose credentials will be used from Semaphore to continuously deploy the application. This user needs to be able to do the following:
- Upload the latest version of the application to a bucket in S3, and
- Use CodeDeploy to deploy and activate the latest version from S3.
To do this, we need to attach the following policies to the user:
AmazonS3FullAccessandAWSCodeDeployDeployerAccess
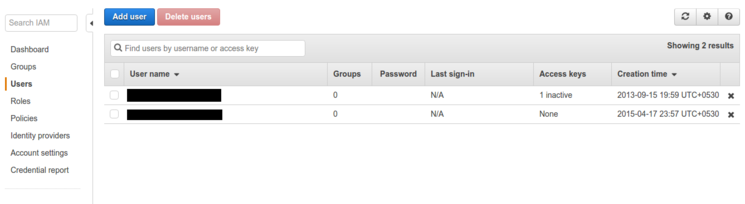
Begin by visiting the IAM > Users section in your AWS console:
Click on the Add user button.
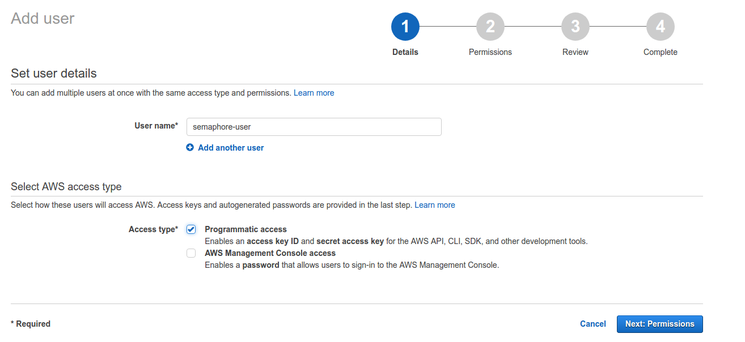
Enter the name of the user, select Programmatic access for access type and click the Next: Permissions button.
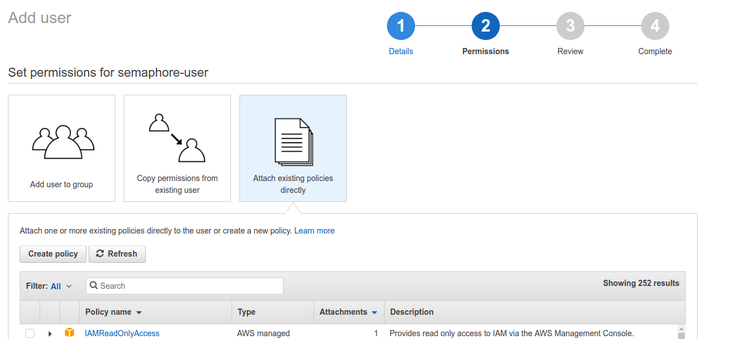
On this screen, select the option to Attach existing policies directly. From the list of the policies that appear at the bottom, select the AmazonS3FullAccess and AWSCodeDeployDeployerAccess policies, and click the button to continue.
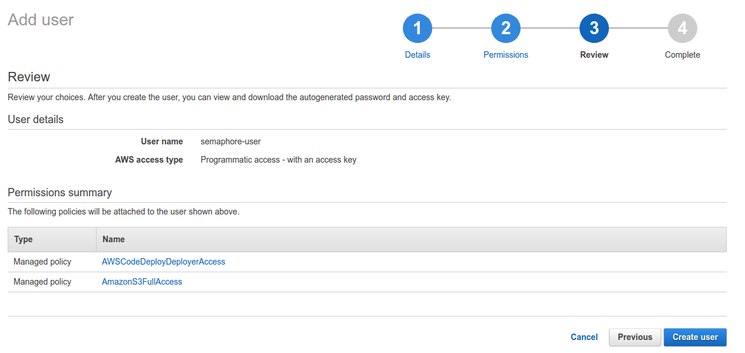
You should now see the review screen with the options you have selected. Click the Create user button to complete the process.
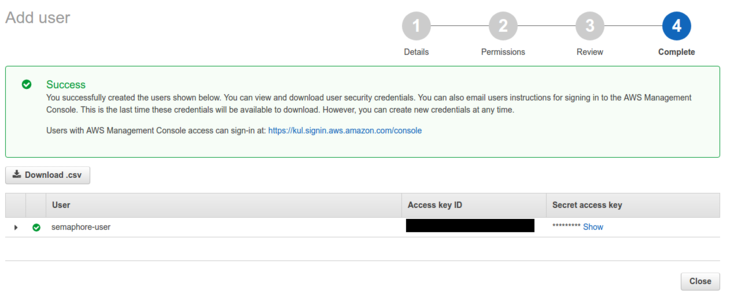
This screen shows the Access key ID and the Secret access key for this user. Make a note of these values, as we’ll need them when setting up continuous deployment on Semaphore.
2. Create a Deployment Role for CodeDeploy
When setting up CodeDeploy in a later step, we’ll need to attach a role to it that gives it the appropriate permissions. In this step, we will create the role with the following permissions:
AmazonS3FullAccess,AWSCodeDeployDeployerAccess, andAmazonEC2FullAccess.
To do this, go to the IAM > Roles section in your AWS console.

Click on the Create New Role button.
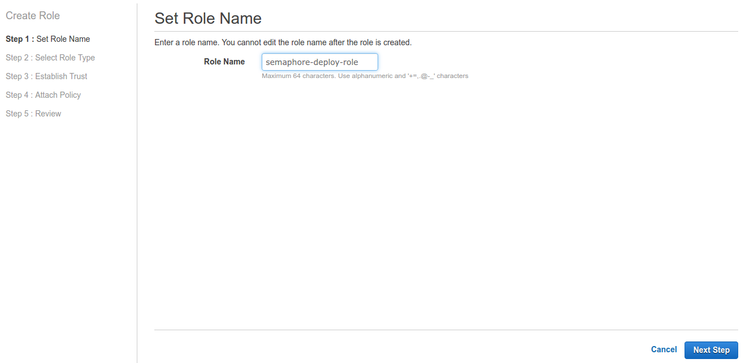
Enter the name of the role, and click the Next Step button.

On this screen, select Amazon EC2 from the AWS Service Roles section.
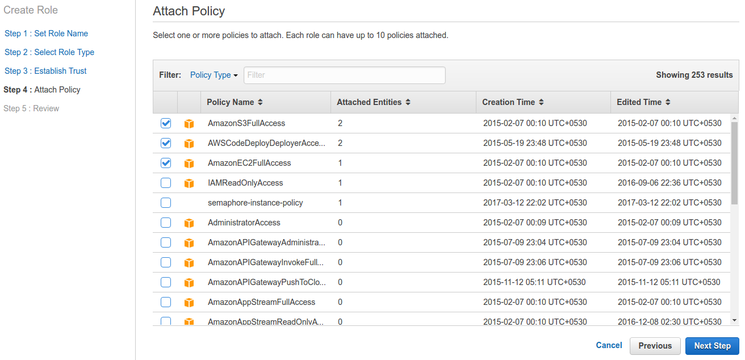
You should now see a screen with a list of policies. From these policies, select the following:
AmazonS3FullAccess,AWSCodeDeployDeployerAccess, andAmazonEC2FullAccess,
and click on the Next Step button.
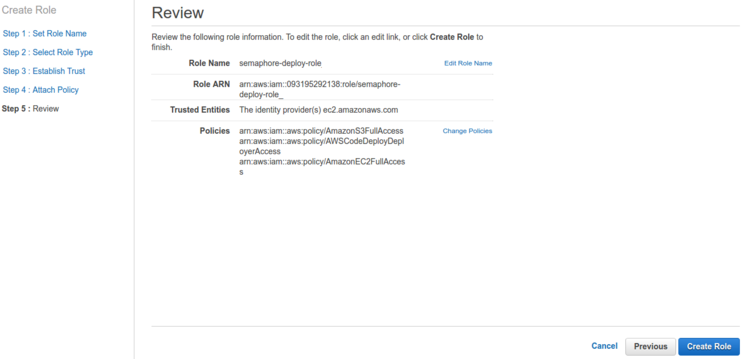
Next, you’ll see a review screen with the details of the role you are creating. Click on the Create Role button after you’ve ensured that the settings are correct.
We now need to modify this role to set the appropriate trust relationship. Click on the role name and select the Trust Relationship tab.
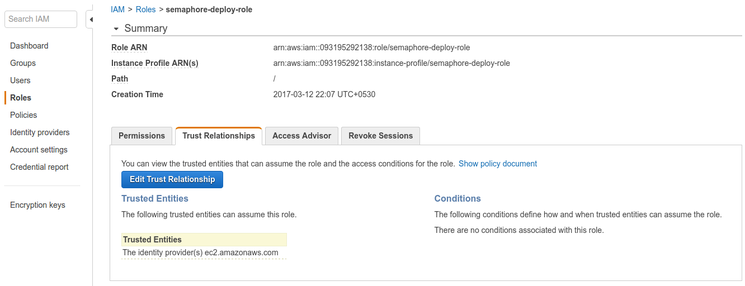
Click the Edit Trust Relationship button.
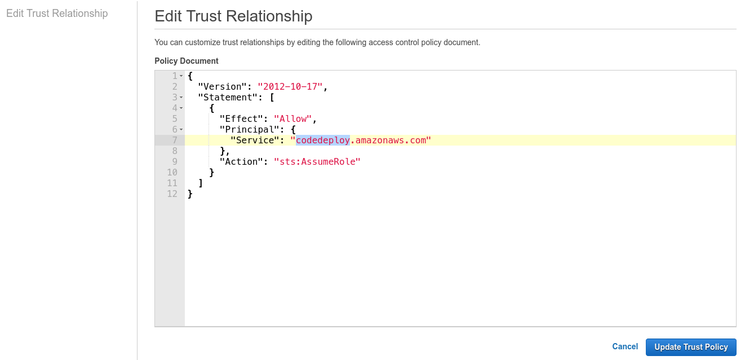
Modify the policy document so that the Statement > Principal > Service key is set to codedeploy.amazonaws.com.
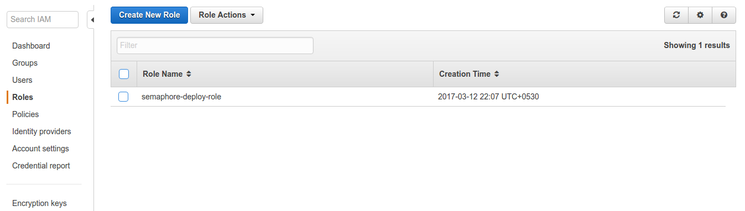
Click on the Update Trust Policy button to complete this process. We now have a role, in our case named semaphore-deploy-role, that we will attach to the CodeDeploy setup.
3. Create a Policy and a Role for the EC2 Instance
To get the existing EC2 instance to work with CodeDeploy, we need to create and attach a role with the appropriate permissions to the instance.
To begin, go to the IAM > Policies section in your AWS console.
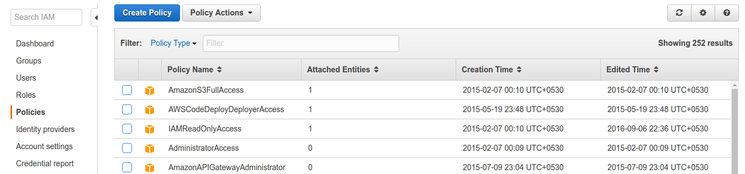
Click on the Create Policy button.
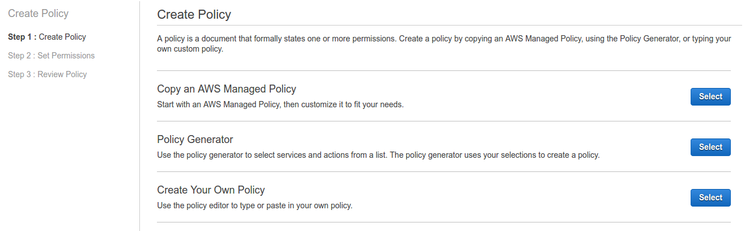
On this screen, select the option to Create Your Own Policy
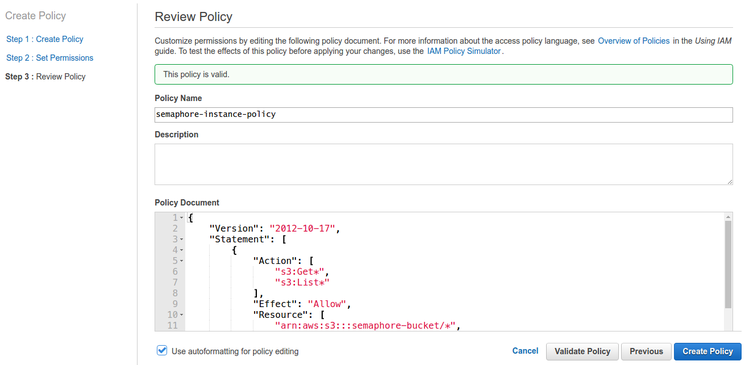
Enter the name of the policy, this tutorial uses the semaphore-instance-policy name, and enter the following in the policy document:
{
  "Version": "2012-10-17",
  "Statement": [
    {
      "Action": [
        "s3:Get*",
        "s3:List*"
      ],
      "Effect": "Allow",
      "Resource": [
        "arn:aws:s3:::semaphore-bucket/*",
        "arn:aws:s3:::aws-codedeploy-us-east-1/*"
      ]
    }
  ]
}
Note: This tutorial used an EC2 instance in the
us-east-1region. If your instance belongs to another region, you might want to modify the secondResourcevalue above accordingly.
Click on Create Policy to create the policy.
Now that you have this policy, create a new role as we did in the previous step. In this case, apply the newly created policy to this new role instead of the three policies applied in the previous step.
This tutorial uses semaphore-instance-policy as the name for this policy and semaphore-instance-role as the name for the role that uses this policy.
4. Attach Role to the EC2 Instance
Now that we have created the role for the existing EC2 instance, let’s attach it.
Open the EC2 > Instances section of your AWS console. Here, you should see a list of your instances.
Select the checkbox next to the instance that you’re interested in and click on Actions > Instance Settings > Attach/Replace IAM Role.
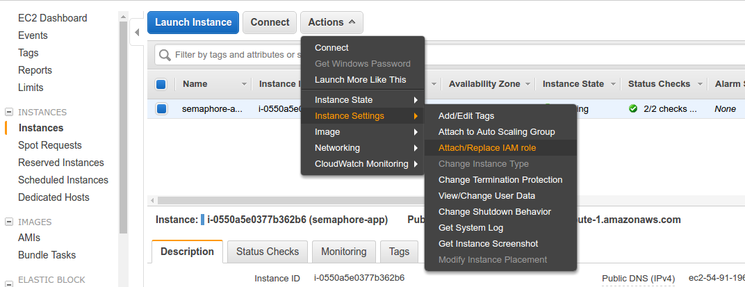
On this screen, choose the role that was created in the previous step.
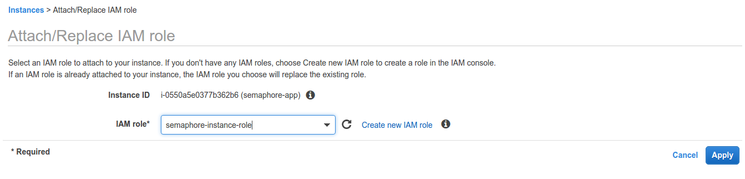
Click on the Apply button to attach the role to this EC2 instance.
5. Tag the EC2 Instance
When setting up CodeDeploy, we need to specify the machines a particular application should be deployed to. This is done by tagging the machines and specifying these tags in CodeDeploy.
While this might seem like an overkill for a single instance, it can be quite handy if you have multiple instances that you want to deploy to.
Open the EC2 > Instances section of your AWS console. Here, you should see a list of your instances.
Select the checkbox next to the instance that you’re interested in and click on Actions > Instance Settings > Add/Edit Tags.
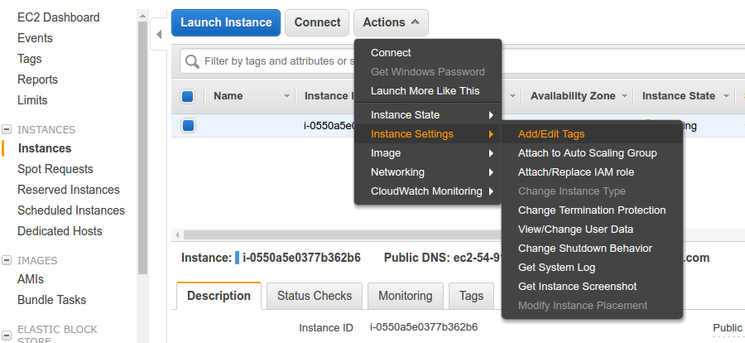
On this screen, enter some value in the Key and Value fields. These can be anything. In this case, we have set the key to Name and the value to semaphore-app.
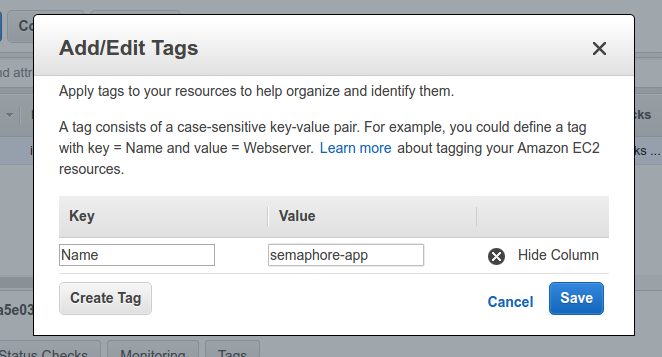
Click on the save button to apply the tag to this EC2 instance.
6. Install the CodeDeploy Agent on the EC2 Instance
To deploy applications, CodeDeploy requires its agent to be present on all the concerned machines. In this section, we will install this agent on our EC2 instance.
To begin, log in via SSH to your EC2 machine.
Note: This tutorial uses Ubuntu on the EC2 instance. The commands in this section are specific to Ubuntu. If your instance uses another operating system, you can find the respective instructions here on the AWS documentation page.
Refresh the package list and sources on your system:
sudo apt-get update
Install python-pip, ruby and wget:
sudo apt-get install python-pip ruby wget -y
Fetch the CodeDeploy agent installer:
wget https://aws-codedeploy-us-east-1.s3.amazonaws.com/latest/install
Note: This tutorial uses the
us-east-1region. If you use a different region, you can modify the above command accordingly.
Make the installer executable:
chmod +x ./install
Install the CodeDeploy agent:
sudo ./install auto
Start the CodeDeploy agent:
sudo service codedeploy-agent start
After carrying out these instructions, be sure to reboot your instance for the changes to take effect. With this, your instance is all set up to work with CodeDeploy.
7. Set up CodeDeploy in the AWS console
As the final part of setting up CodeDeploy, we need to create a CodeDeploy application and a deployment group.
In your AWS console, go to the CodeDeploy section and click on Get Started Now. You should see the following screen:
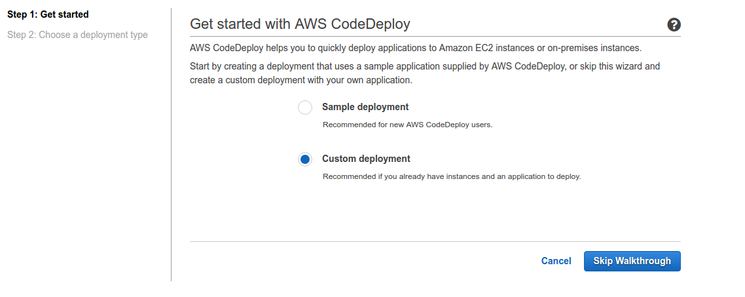
Choose Custom Deployment and click on Skip Walkthrough.
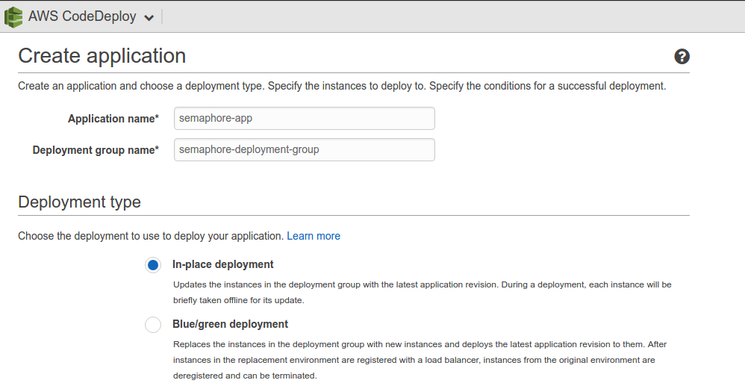
On this screen, enter the application name and the deployment group name. These can be set to any values of your choosing. We’ve set the application name to semaphore-app and the deployment group name to semaphore-deployment-group.
Choose In-place deployment as the deployment type. Note that in-place deployment incurs some downtime as your application is replaced with the new version. You can explore Blue/green deployment, which can deploy an application with zero downtime, but, we use in-place deployment in order to to keep things simple.
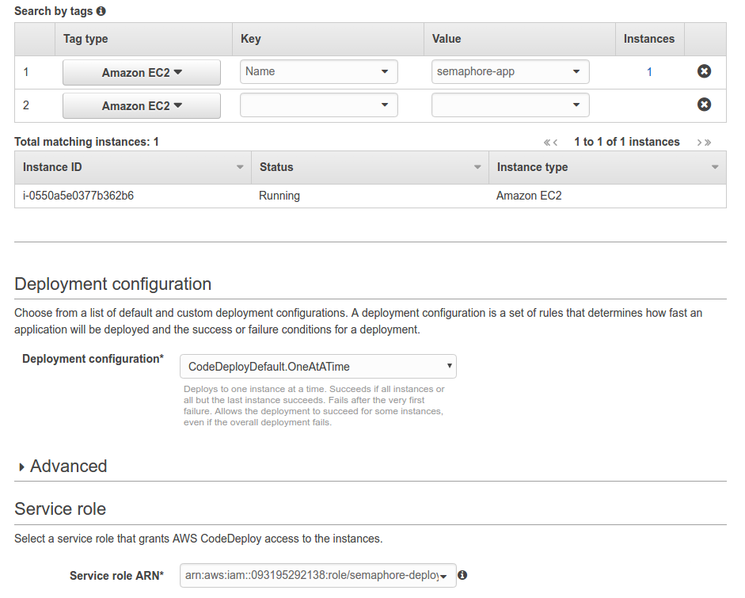
Scroll down a bit, and enter the tag of the EC2 instance, created in step 5 above. You should see your instance in the list of matching instances.
Choose CodeDeployDefault.OneAtATime as the deployment configuration.
Finally, choose the role we created in step 2 above, as the service role in the final section and click on the Create application button to complete the process.
With this, we have completed the setup required on the AWS end to use CodeDeploy. All that’s left for us to do is configure Semaphore for continuous deployment.
Setting Up Continuous Deployment on Semaphore
To configure Semaphore to continuously deploy the application, we need to do the following:
- Set up the environment variables with AWS credentials,
- Create scripts that will be used by CodeDeploy,
- Create an
appspec.ymlfile (required by CodeDeploy), and - Add instructions to deploy the application.
Technically, the files created in step 2 and 3 could be part of your project. However, because these won’t change often, we will create them right within Semaphore, instead of creating them in our project repository. This has the added advantage of preventing deployment details from being publicly available in case you have a publicly visible repository.
1. Configure the Environment Variables
When deploying from Semaphore, we will use the credentials of the user created in step 1 of the previous section. We can set these credentials up as encrypted environment variables to keep them secure and prevent them from appearing in logs.
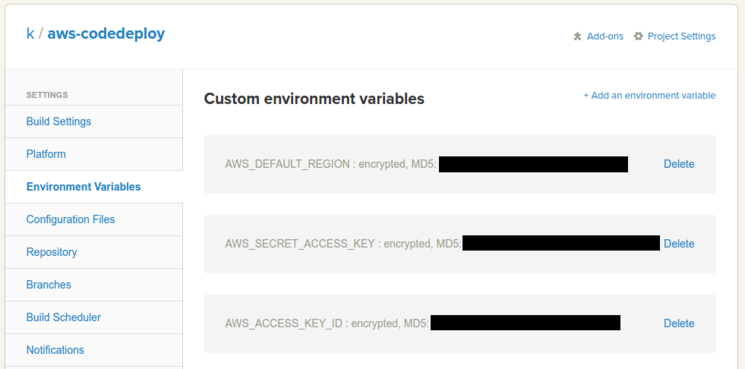
We want to set the following three environment variables:
AWS_ACCESS_KEY_ID,AWS_SECRET_ACCESS_KEY, andAWS_DEFAULT_REGION.
You should have values for the first two from step 1 of the previous section. We set the value of AWS_DEFAULT_REGION to us-east-1 for this tutorial, but you can change this to suit your setup.
Open the Project Settings > Environment Variables section of your project on Semaphore.
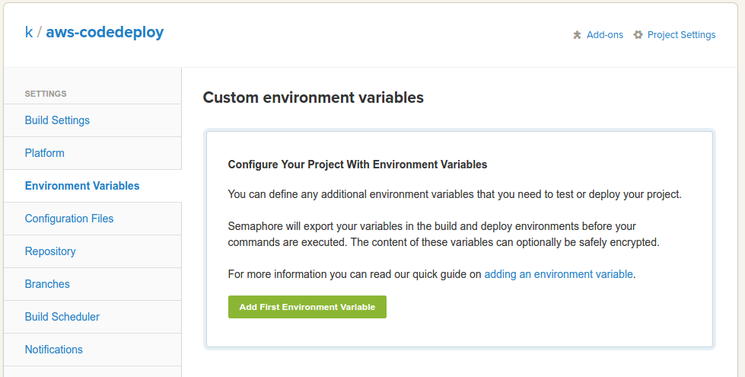
Click the button to add an environment variable.
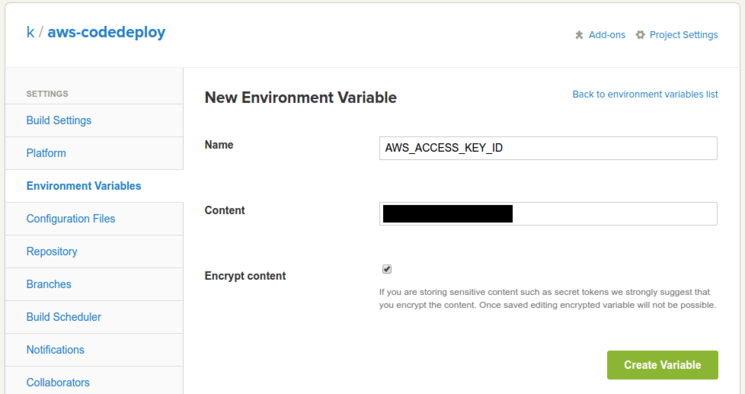
Enter AWS_ACCESS_KEY_ID as the Name, the actual access key as the Content and check the Encrypt content checkbox.
Click the Create Variable button to complete the step.
After creating the remaining two environment variables in a similar manner, you should see something like this:
2. Create CodeDeploy Scripts
For using CodeDeploy, we will need scripts for the following tasks:
- To start the application,
- To stop the application, and
- To clean up files from a previous deployment.
Note: This tutorial assumes the use of
supervisorto manage the application. Furthermore, this tutorial assumes that the application is installed in the/appdirectory of the instance. If your setup differs, you will need to modify these scripts accordingly.
To create these scripts in Semaphore, open the Project Settings > Configuration Files page for your project.
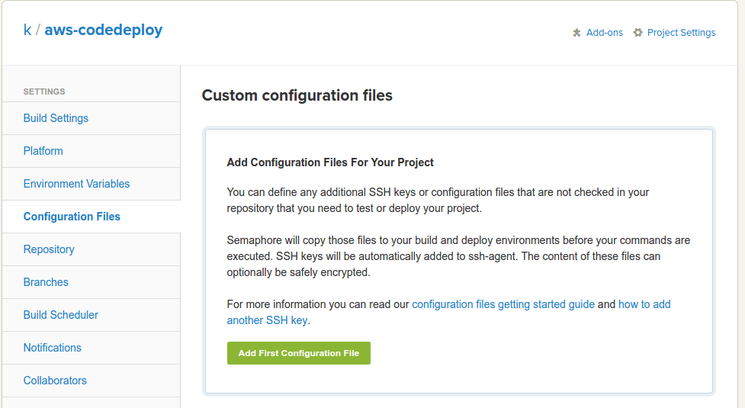
Click on the button to add a configuration file.
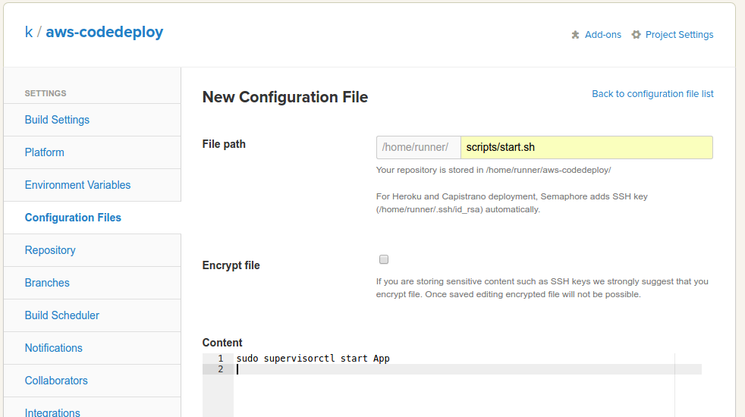
Enter scripts/start.sh as the File path (so that the complete path then becomes /home/runner/scripts/start.sh).
Enter the following in the Content section:
sudo supervisorctl start App
Note: The tutorial assumes that the supervisor configuration for this application uses the name
App.
Finally, save this file.
Similarly, create two additional files with the following values:
i. To stop the application:
File path: scripts/stop.sh
Content:
sudo supervisorctl stop App
ii. To clean up files:
File path: scripts/cleanup.sh
Content:
sudo rm /app -rf
sudo mkdir /app
sudo chown -R ubuntu:ubuntu /app
Note:
ubuntuis the default user if you choose the standard Ubuntu AMI on EC2. If your setup differs, modify this accordingly.
3. Create appspec.yml
The appspec.yml file is a specification file in the YAML format that lets you configure the deployment process. It allows you to copy files, manipulate file permissions, and execute scripts at various stages of the deployment process.
We can create this file just like we created the script files in the previous section. Use deploy/appspec.yml as the file path and the following as the content:
version: 0.0

os: linux

files:
  - source: /aws-codedeploy
    destination: /app/
  - source: /index.html
    destination: /app/
  - source: /config.json
    destination: /app/

hooks:
  ApplicationStop:
    - location: scripts/stop.sh
      timeout: 180
      runas: ubuntu
  BeforeInstall:
    - location: scripts/cleanup.sh
      timeout: 180
      runas: ubuntu
  ApplicationStart:
    - location: scripts/start.sh
      timeout: 180
      runas: ubuntu
If your setup differs, modify the values in this file accordingly.
The files section identifies the files to be copied from the deployment package to the instance. aws-codedeploy is the name of our application’s executable binary.
Note that for the source files, the package root acts as the root. So, for example, /index.html refers to the index.html file stored at the root of the package, not at the root of the file system.
The hooks section configures the scripts that should run at various stages of deployment. The content of this section in our case configure the deployment process to:
- Stop the application before the deployment,
- Clean up files from the previous deployment before the current deployment, and
- Start the application after the deployment.
4. Add Deployment Instructions
Based on the current configuration, on Semaphore:
- The
/home/runner/project_directorycontains the application source files, - The
/home/runner/scriptscontains the scripts, and - The
/home/runner/deploycontainsappspec.yml.
Note:
/home/runneris the home directory on the Semaphore machine running the build, test and deploy tasks.
With this in mind, let’s now configure Semaphore to start deploying our application on every successful build.
Go to the your project’s home page on Semaphore.
Click on the Set Up Deployment (just below the branch name) button to begin the configuration.
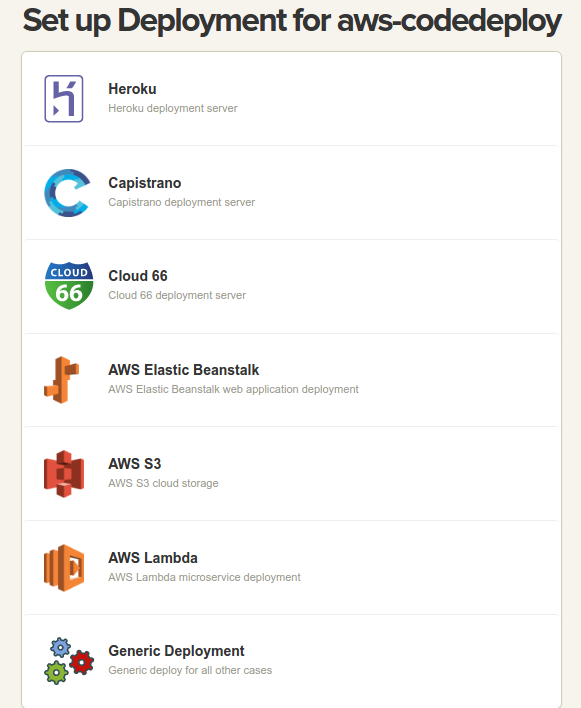
Choose Generic Deployment from the list of options.
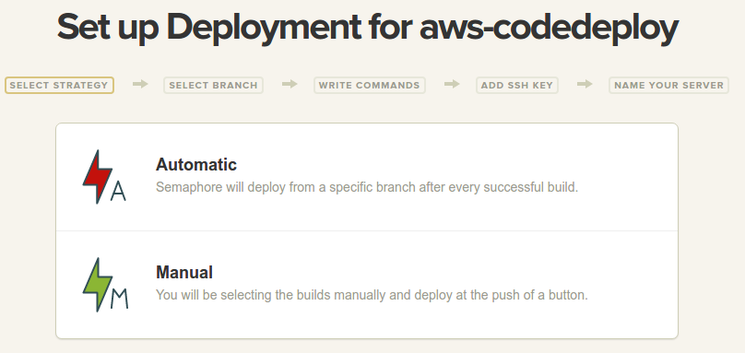
Choose Automatic as the deployment strategy.
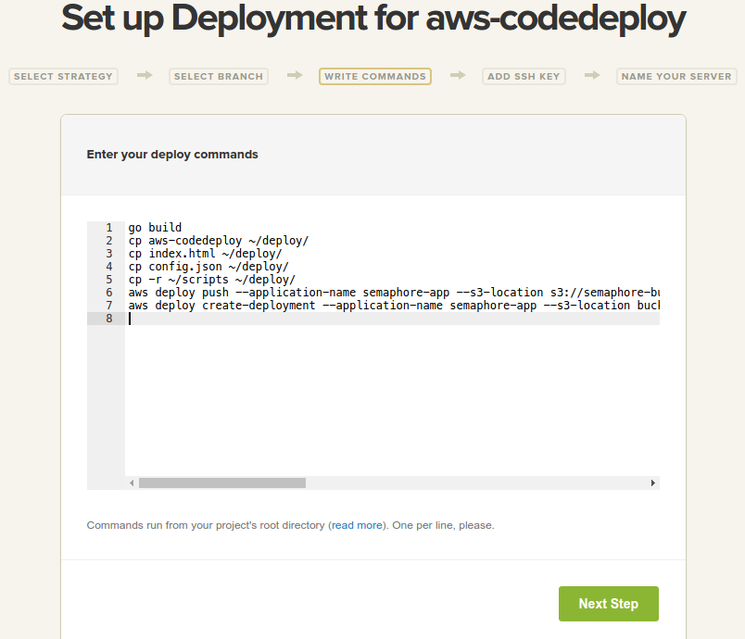
Enter the following as the deploy commands:
go build
cp aws-codedeploy ~/deploy/
cp index.html ~/deploy/
cp config.json ~/deploy/
cp -r ~/scripts ~/deploy/

aws deploy push --application-name semaphore-app --s3-location s3://semaphore-bucket/semaphore-app.zip --source ~/deploy

aws deploy create-deployment --application-name semaphore-app --s3-location bucket=semaphore-bucket,key=semaphore-app.zip,bundleType=zip --deployment-group-name semaphore-deployment-group --deployment-config-name CodeDeployDefault.OneAtATime
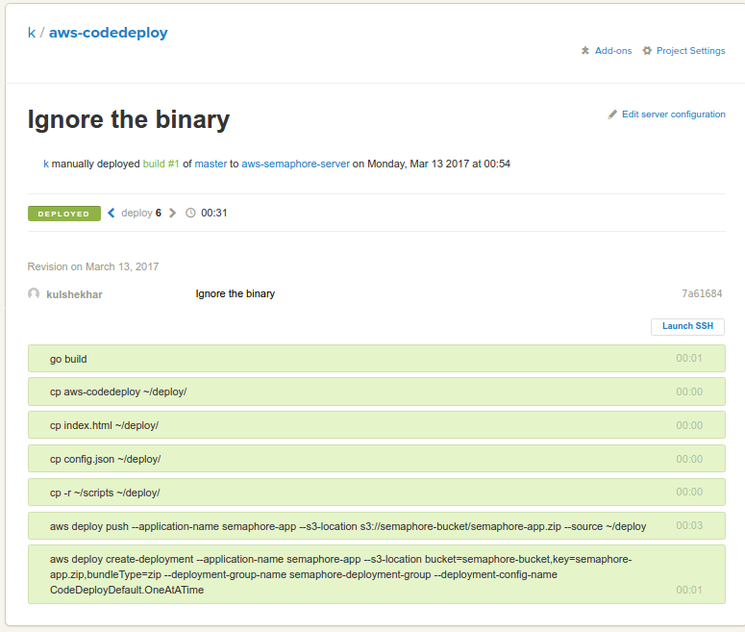
The first command, go build, builds your project and creates the executable binary.
The next three commands copy the binary, index.html and config.json to the deploy folder, which already contains the appspec.yml file.
The next command copies the entire scripts folder, which contains the scripts we created earlier, into the deploy folder.
At this stage, the deploy folder contains:
appspec.yml,- The project files, and
- The
scriptsfolder.
The next command is:
aws deploy push --application-name semaphore-app --s3-location s3://semaphore-bucket/semaphore-app.zip --source ~/deploy
This command uses AWS’s command line interface aws, which is pre-installed on Semaphore, to:
- Package the contents of the
deployfolder, and - Upload this package to S3.
In this case, we specify that we want to use the bucket named semaphore-bucket and name the package semaphore-app.zip. Be sure to modify these values according to your setup.
The final command is:
aws deploy create-deployment --application-name semaphore-app --s3-location bucket=semaphore-bucket,key=semaphore-app.zip,bundleType=zip --deployment-group-name semaphore-deployment-group --deployment-config-name CodeDeployDefault.OneAtATime
This command initiates the deployment of the latest version of your application. Note that:
- The values for
--application-nameand--deployment-group-namemust match the application name used when setting up CodeDeploy in step 7 of the previous section, and - The value for
--s3-locationmust match the values set in the previous command.
After entering these commands, click the Next Step button.
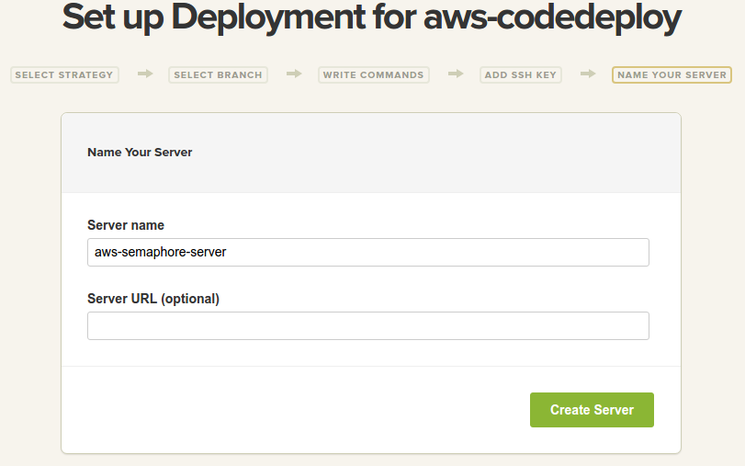
Enter the server name, this can be any value, and click the Create Server button.
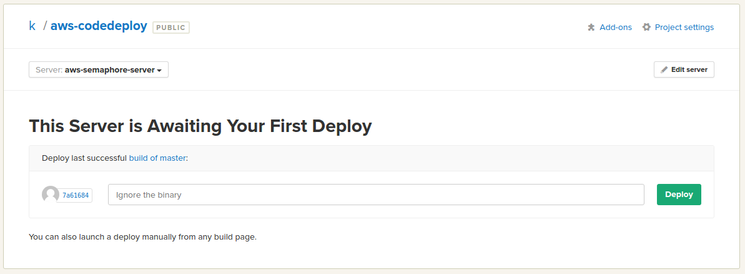
This should complete your setup for continuous deployment. If you want, you can click the Deploy button to manually initiate a deployment.
With this, you have now configured Semaphore to continuously test and deploy your application.
Testing the Setup
To test the setup, let’s begin by introducing a change that breaks one of the tests. Let’s modify the Greeting key in config.json to Greetings and push the change to our repository.
This will initiate a build on Semaphore, which will result in the following:
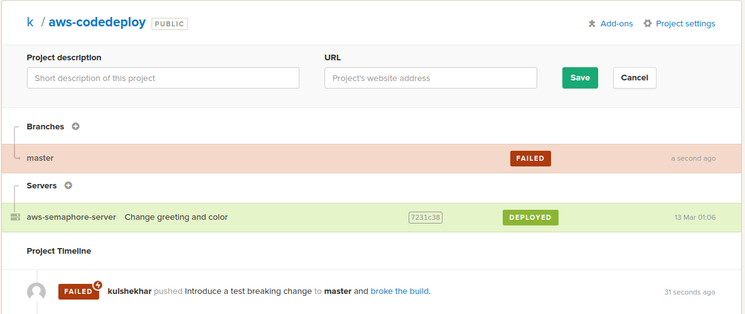
As you can see, Semaphore aborted the process because the build failed and didn’t deploy this version.
Let’s revert config.json to its original version. Additionally, we’ll also make a couple of other changes will help us use the advantages of continuous deployment.
Change the value of Greeting in config.json from Hello to Howdy.
{
  "Greeting": "Howdy"
}
In index.html, change
<p>Day: {{.Weekday}}</p>
to
<p style="font-weight: bold; color: red;">Day: {{.Weekday}}</p>
Now when you commit and push these changes, you should see something like the following on Semaphore:
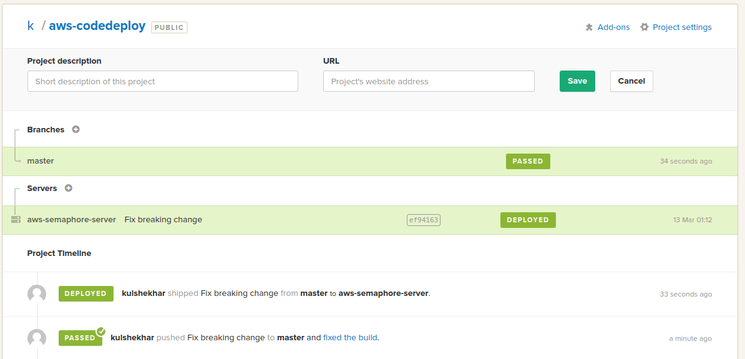
This shows that the project has passed all the tests and was successfully deployed. Visiting our application again shows us the following:
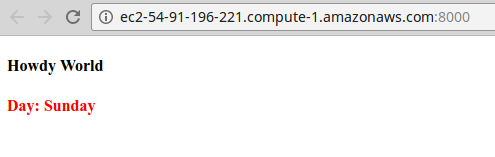
As you can see, our application is live with the latest changes and we didn’t have to spend any effort on manually deploying these changes.
Conclusion
Congratulations! You’ve successfully set up AWS and Semaphore to continuously deploy a Go application to an existing EC2 instance using AWS CodeDeploy.
If you have any questions and comments, feel free to leave them in the section below.