Crafting an impressive cover letter can impress potential employers, but it requires time and effort. Fortunately, Next.js and ChatGPT simplify the process, allowing you to create a robust cover letter-writing app. Next.js is a popular React framework that empowers developers to build fast, scalable, and SEO-friendly web applications. Features such as server-side rendering, automatic code splitting, and static site generation make building web apps straightforward.
Like InstructGPT, ChatGPT is an NLP model that uses natural language processing to understand prompts and generate detailed responses. By leveraging these two powerful technologies, you can create an app that saves time, generates personalized cover letters, and caters to each employer’s specific needs. This article illustrates how to build a compelling cover letter-writing app using Next.js and ChatGPT. The codebase for the completed tutorial can be found here.
This article illustrates how to build a compelling cover letter-writing app using NextJS and ChatGPT.
You can find the codebase of the completed tutorial here.
Project Demo
Check out the demo of the project by clicking here.
Prerequisites
To understand this tutorial, you need the following:
- Basic understanding of JavaScript and Next.js
- Basic understanding of TailwindCSS
- Node.js installed
Overview of ChatGPT
ChatGPT is an innovative language generation model developed by OpenAI. This advanced tool showcases OpenAI’s expertise in research and development, representing a significant advancement in AI technology. ChatGPT is built on the renowned GPT-3.5 architecture, delivering exceptional performance and functionality. While the free web version operates on an enhanced GPT-3 model, subscribers to ChatGPT Plus have access to the even more powerful GPT-4 upgrade. OpenAI has also announced plans for an upcoming version called “ChatGPT Business,” which will further expand the capabilities of this remarkable tool. Among ChatGPT’s features is its ability to generate grammatically correct and semantically meaningful text, making it the perfect tool for summarizing texts.
Different GPT Models Available on OpenAI
- GPT-4: Improves on GPT-3.5 and can understand and generate natural language or code
- GPT-3.5: Improves on GPT-3 and can understand and generate natural language or code
- DALL·E: Can generate and edit images given a natural language prompt
- Whisper: Can convert audio into text
- Embeddings: Can convert text into a numerical form
- Moderation: A fine-tuned model that can detect sensitive or unsafe text
- GPT-3 Legacy: Can understand and generate natural language
- Deprecated: A complete list of models that have been deprecated
For this tutorial, you’ll use GPT-3.5 for text completion, as it yields the best results.
Among ChatGPT’s capabilities is its ability to generate coherent and contextually appropriate text. Due to the wide variety of input styles and formats the model has learned, it can adapt and generate text that matches the context. Another important capability of ChatGPT is that it generates grammatically correct and semantically meaningful text, making it the perfect tool for summarizing texts.
Getting Started with ChatGPT
To get started with ChatGPT and obtain your OpenAI API key, follow these steps:
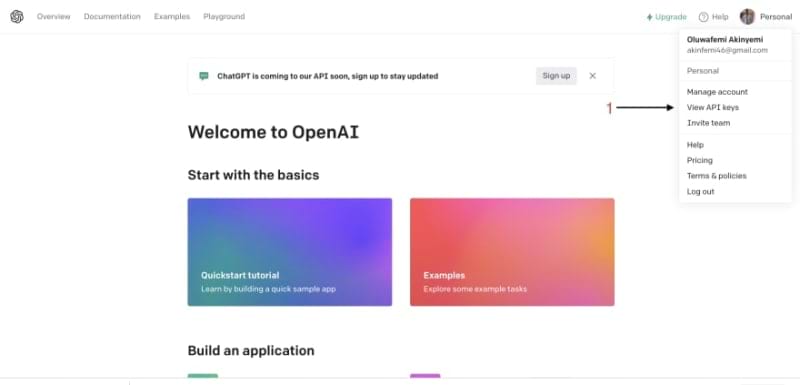
- Log in or create a new account on OpenAI for a free account. Follow the on-screen instructions to navigate to your dashboard.Click on your profile picture to view the menu bar, and then click “View API Keys” to proceed to the API Keys page.
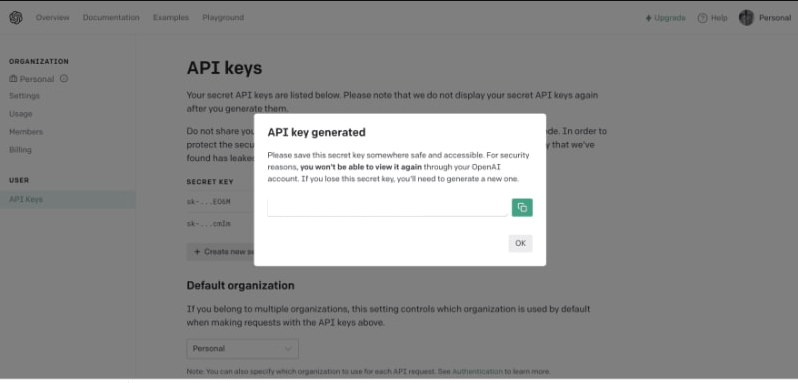
- Click on Create new secret key to create a new API Key.

- Copy the API Key and store it safely to use later in the tutorial.
Bootstrapping NextJS Application
To bootstrap a new Next project, run this command in the terminal
npx create-next-app@latest
On installation, you’ll see the following prompts:
What is your project named? nextgptcoverletter
Would you like to use TypeScript? No
Would you like to use ESLint? Yes
Would you like to use Tailwind CSS? Yes
Would you like to use src/ directory? No
Would you like to use App Router? (recommended) Yes
Would you like to customize the default import alias? @/* <press enter>
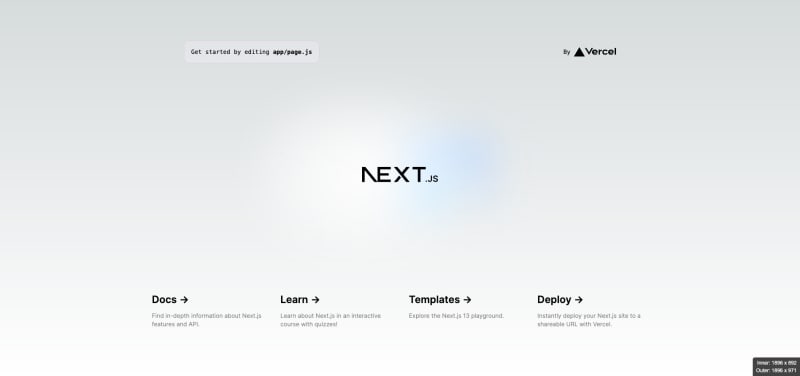
After the prompts, create-next-app will create a folder with your project name and install the required dependencies. Next, navigate to the project directory and start the development server, which should run on localhost:3000:
cd nextgptcoverletter && npm run dev
Installing Dependencies
To ensure the necessary dependencies are installed for this tutorial, navigate into the project you created above and run the following command:
npm install openai openai-api pdf-lib sweetalert2 file-saver
Executing this command will install the required dependencies, including openai, openai-api, pdf-lib, sweetalert2, and file-saver.
- openai: openai package is a library provided by OpenAI that allows you to interact with their language models and APIs.
- openai-api: The
openai-apipackage is a specific API client library provided by OpenAI. - pdf-lib: is a library that enables you to work with PDF files programmatically.
- sweetalert2: is a JavaScript library that provides beautiful and customizable popup dialogs, alerts, and modals.
- file-saver: is a library that helps in saving files from the web to the user’s device.
Building the Cover Letter Writing App
In the nextgptcoverletter/app/page.js replace its content with this:
"use client";
import { useState } from "react";
export default function Home() {
  const [loading, setLoading] = useState(false);
  const [name, setName] = useState("");
  const [company, setCompany] = useState("");
  const [degree, setDegree] = useState("");
  const [position, setPosition] = useState("");
  const [experience, setExperience] = useState("");
  const [specialtyOne, setSpecialtyOne] = useState("");
  const [specialtyTwo, setSpecialtyTwo] = useState("");
  const handleSubmit = async (e) => {
    e.preventDefault();
  };
  return (
    <main className="bg-gray-100 min-h-screen ">
      <div className="flex flex-col items-center justify-center mb-20">
        <h1 className="text-2xl sm:text-2xl md:text-3xl sm:text-2xl font-bold text-center">
          Cover Letter Generator
        </h1>
      </div>
      <div className="flex flex-col items-center justify-center h-screen">
        <div className="w-3/4 md:w-1/2">
          <form onSubmit={handleSubmit}>
            <div className="mb-4">
              <label
                className="block mb-2 font-bold text-gray-700"
                htmlFor="name"
              >
                Name
              </label>
              <input
                className="w-full px-3 py-2 border rounded-lg text-gray-700 focus:outline-none focus:border-blue-500"
                type="text"
                placeholder="Enter name"
                value={name}
                onChange={(e) => setName(e.target.value)}
                required
              />
            </div>
            <div className="mb-4">
              <label
                className="block mb-2 font-bold text-gray-700"
                htmlFor="company"
              >
                Name of Company applying to
              </label>
              <input
                className="w-full px-3 py-2 border rounded-lg text-gray-700 focus:outline-none focus:border-blue-500"
                type="text"
                placeholder="Enter company name"
                value={company}
                onChange={(e) => setCompany(e.target.value)}
                required
              />
            </div>
            <div className="mb-4">
              <label
                className="block mb-2 font-bold text-gray-700"
                htmlFor="degree"
              >
                Position applying for
              </label>
              <input
                className="w-full px-3 py-2 border rounded-lg text-gray-700 focus:outline-none focus:border-blue-500"
                type="text"
                placeholder="Frontend developer"
                value={position}
                onChange={(e) => setPosition(e.target.value)}
                required
              />
            </div>
            <div className="mb-4">
              <label
                className="block mb-2 font-bold text-gray-700"
                htmlFor="degree"
              >
                Degree
              </label>
              <input
                className="w-full px-3 py-2 border rounded-lg text-gray-700 focus:outline-none focus:border-blue-500"
                type="text"
                placeholder="Mathematics"
                value={degree}
                onChange={(e) => setDegree(e.target.value)}
                required
              />
            </div>
            <div className="mb-4">
              <label
                className="block mb-2 font-bold text-gray-700"
                htmlFor="experience"
              >
                Year of Experience(s)
              </label>
              <input
                className="w-full px-3 py-2 border rounded-lg text-gray-700 focus:outline-none focus:border-blue-500"
                type="number"
                placeholder="3"
                value={experience}
                onChange={(e) => setExperience(e.target.value)}
                required
              />
            </div>
            <div className="mb-4">
              <label
                className="block mb-2 font-bold text-gray-700"
                htmlFor="specialtyOne"
              >
                Skill
              </label>
              <input
                className="w-full px-3 py-2 border rounded-lg text-gray-700 focus:outline-none focus:border-blue-500"
                type="text"
                placeholder=" JavaScript"
                value={specialtyOne}
                onChange={(e) => setSpecialtyOne(e.target.value)}
                required
              />
            </div>
            <div className="mb-4">
              <label
                className="block mb-2 font-bold text-gray-700"
                htmlFor="specialtyTwo"
              >
                Additional skill
              </label>
              <input
                className="w-full px-3 py-2 border rounded-lg text-gray-700 focus:outline-none focus:border-blue-500"
                type="text"
                placeholder=" Figma"
                value={specialtyTwo}
                onChange={(e) => setSpecialtyTwo(e.target.value)}
                required
              />
            </div>
            <div className="flex justify-center mb-20">
              <button
                className="  bg-blue-500 hover:bg-blue-700 text-white font-bold py-2 px-4 rounded focus:outline-none focus:shadow-outline"
                type="submit"
              >
                {loading ? "loading..." : "Generate Cover Letter"}
              </button>
            </div>
          </form>
        </div>
      </div>
    </main>
  );
}
The code above renders a form for generating a cover letter. The first line, use client, is a directive that instructs Next.js to render this component on the client side. The subsequent line, import { useState } from 'react', imports the useState hook from React. This hook allows developers to create and manage the component’s state. The remainder of the code defines the Home component.
This component features a form that enables users to enter their name, the name of the company to which they are applying, the position for which they are applying, their degree, their years of experience, and their skills. When the user submits the form, the handleSubmit function is called. Although this function currently does nothing, it will eventually generate a cover letter based on the user’s input.
Creating Environment Variables
Environment variables safeguard secret keys and credentials from unauthorized access by storing them in the .env file. Taking this step is crucial to prevent the inadvertent committing and pushing of your secrets to GitHub.
In the nextgptcoverletter/.env.local, add your API KEY below
NEXT_PUBLIC_Seceret_Key_API=your_api_key
Creating util file
Create the NextGPTCoverLetter/app/util.js with the code below
const OpenAI = require('openai-api');
const OPENAI_API_KEY = process.env.NEXT_PUBLIC_Seceret_Key_API;
export const openai = new OpenAI(OPENAI_API_KEY);
Creating a cover letter generator function
To utilize the installed packages, Under the import { useState } from react in the nextgptcoverletter/app/page.js file, paste the following code:
import { saveAs } from "file-saver";
import { PDFDocument, StandardFonts, rgb } from "pdf-lib";
import Swal from "sweetalert2";
import { openai } from "./util";
The code imports the necessary modules and functions from the corresponding packages. saveAs allows you to save files using the file-saver package, while PDFDocument, StandardFonts, and rgb provide functionalities for working with PDF documents through the “pdf-lib” package. The Swal module from the sweetalert2 package enables you to display customizable alert dialogs, and the openaimodule imported from the ./util.js file contains utility configurations related to the OpenAI API.
To generate the function that generates the cover letter and download it as a PDF file using the OpenAI API and pdf-lib using the OpenAI API, paste the code below ahead of the handleSubmit function in the nextgptcoverletter/app/page.js
//....

 // Function to generate the cover letter using the OpenAI API
 const generateCoverLetter = async (
  position,
  company,
  degree,
  experience,
  specialty1,
  specialty2
) => {
  // Set the loading state to true
  setLoading(true);

  // Construct the prompt for the OpenAI API
  const prompt = `Please generate the body of a cover letter for a ${position} position at ${company}.
  I have a degree in ${degree} with ${experience} years of experience(s) with a specialty in ${specialty1} and ${specialty2}.
  Make it a maximum of three paragraphs. Make the words maximum of twenty words per line
  Add ${name} as the name after the Remarks`;

  // Send the prompt to the OpenAI API and retrieve the response

  openai
    .complete({
      engine: "text-davinci-003",
      prompt: prompt,
      maxTokens: 1000,
      temperature: 0.9,
    })
    .then(async (res) => {
      if (res.status === 200) {

        setLoading(false);
        // If the response status is 200, update the state variables, create a PDF document and save it
        if (res.status === 200) {
          const pdfDoc = await PDFDocument.create();
          const timesRomanFont = await pdfDoc.embedFont(
            StandardFonts.TimesRoman
          );
          const page = pdfDoc.addPage([595.28, 841.89]);

          const { width, height } = page.getSize();
          const fontSize = 10;
          const margin = 50;
          let y = height - margin;
          const words = res?.data?.choices[0]?.text.split(" ");
          const lines = [];
          let line = "";

          for (const word of words) {
            if ((line + word).length > 100) {
              lines.push(line);
              line = "";
            }

            line += `${word} `;
          }

          if (line.length > 0) {
            lines.push(line);
          }

          page.drawText(lines.join("\n"), {
            x: 50,
            y: height - 4 * fontSize,
            size: fontSize,
            font: timesRomanFont,
            color: rgb(0, 0.53, 0.71),
          });
          const pdfBytes = await pdfDoc.save();
          saveAs(new Blob([pdfBytes.buffer]), "My_cover_letter.pdf");
        }
      }
    })
    .catch((err) => {
      setLoading(false);

      Swal.fire({
        title: "Error!",
        text: `${err}`,
        icon: "error",
        confirmButtonText: "ok",
      });
    });
};

//...
The generateCoverLetter function is an asynchronous function that takes several parameters. These parameters represent the position, company, degree, experience, specialty1, and specialty2 for the cover letter. A prompt is constructed based on these parameters, along with additional information like the user’s name. This prompt is a string that outlines the desired content and structure of the cover letter. The function then invokes the openai.complete method to send the prompt to the OpenAI API for processing.
If the response status is 200, the function generates a PDF document using the PDFDocument.create method from the pdf-lib package. The cover letter text is divided into words and arranged into lines to fit within a specific character limit.
Using the drawText method from the pdf-lib package, the lines of text are rendered on the PDF page with specific formatting options, such as font size, position, and color. If any errors occur during this process, the loading state is set to false, and the state variables related to user inputs are cleared. An error message is also displayed to the user via the Swal.fire method from the sweetalert2 package.
The generateCoverLetter function is invoked when the user submits the form.
Result (Testing the App)
To test the project, navigate to the nextgptcoverletter directory and execute the following command:
npm run dev
Open your browser and visit localhost:3000 to view your Cover letter App. You should see an example of the screen content displayed below.
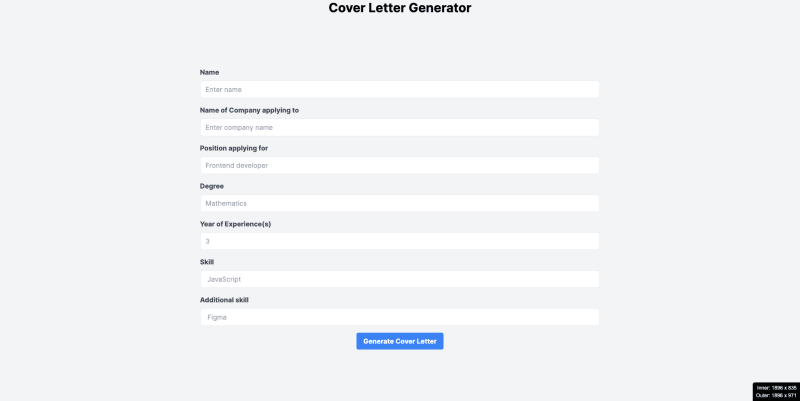
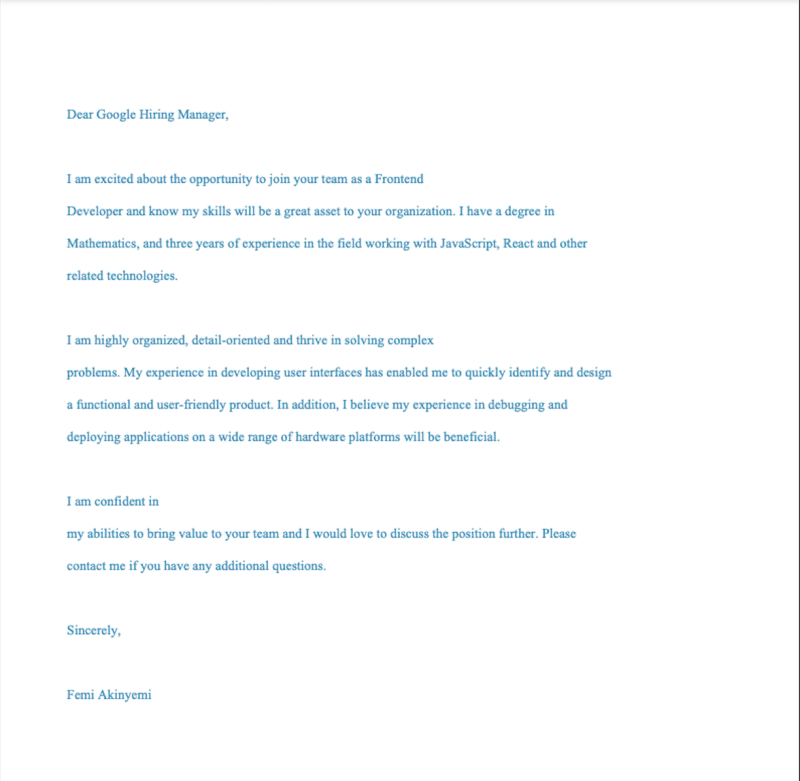
Enter your information and click “Generate Cover Letter” to download a high-quality PDF cover letter to your machine. The downloaded cover letter will resemble the image shown below.
Conclusion
Well done! You’ve mastered the art of building a cover letter generator app using Next.js and ChatGPT’s powerful model. ChatGPT opens up countless opportunities for innovation and the enhancement of existing businesses. By integrating ChatGPT into your Next.js apps, you can develop interactive chatbots, robust SaaS applications, and more. Fine-tuning the models allows you to optimize both performance and accuracy to meet your business needs. Armed with the knowledge from this article, you’re well-prepared to create your own personalized cover letter generator app, leveraging ChatGPT’s remarkable capabilities.
Want to discuss this article? Join our Discord.