No matter how good and reliable your coding skills are, you need to implement continuous integration and delivery (CI/CD) to detect and remedy errors quickly. When you have confidence in the accuracy of your code, you can ship updates faster and with fewer mistakes.
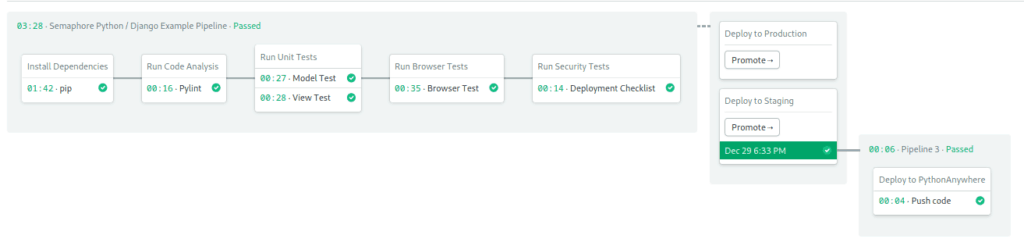
By the end of this hands-on guide, you’ll understand how to build, test and deploy a Python website. You’ll learn how to use a continuous integration and delivery platform, Semaphore, to automate the whole process. The final CI/CD pipeline will look like this:
Demo Application
In this section, we will play with a demo application: a task manager with add, edit and delete options. We also have a separate admin site to manage users and permissions. The website is built with Python and Django. The data will be stored on MySQL.
Django is a web application framework based on the MVC (Model-View-Controller) pattern. As such, it keeps a strict separation between the data model, the rendering of views, and the application logic, which is managed by the controller. An approach that encourages modularity and makes development easier.
Prerequisites
Before getting started you’ll need the following:
Get the code:
- Create an account on GitHub.
- Go to Semaphore Django demo and hit the Fork button on the top right.
- Click on the Clone or download button and copy the provided URL.
- Open a terminal on your computer and paste the URL:
$ git clone https://github.com/your_repository_urlWhat Do We Have Here?
Exploring our new project we find:
README.md: instructions for installing and running the app.requirements.txt: list of python packages required for the project.tasks: contains the main code for our app.pydjango_ci_integration:- settings.py: main Django config, includes DB connection parameters.
- urls.py: url route config.
- wsgi.py: webserver config.
.semaphore: directory with the continuous integration pipelines.
Examining the contents of requirements.txt reveals some interesting components:
- Unit tests: developers use unit tests to validate code. A unit tests run small pieces of the code and compares the results. The nose package runs the test cases. And coverage measures their effectiveness, it can figure out which parts are tested and which are not.
- Static code analysis: pylint scans the code for anomalies: bad coding practices, missing documentation, unused variables, among other dubious things. By following a standard, we get better readability and easier team collaboration.
- Browser testing: selenium is a browser automation tool primarily used to test websites. Tests done on the browser can cover parts that otherwise can’t be tested, such as javascript running on the client.
Run the Demo on Your Computer
We still have some work ahead of us to the see application in action.
Create a Database
Tasks are stored on a database called pydjango:
$ mysql -u root -ANe"CREATE DATABASE pydjango;"If you have a password on your MySQL: add -p or --password= to the last command.
Create a Virtualenv and Install Dependencies
A virtualenv is a special directory for storing Python libraries and settings. Create a virtualenv and activate it with:
$ python -m venv virtualenv
$ source ./virtualenv/bin/activate
Install the packages as usual:
$ pip install -r requirements.txtDjango should now be installed on your computer.
Django Setup
Our pydjango database is empty. Django will take care of that:
$ python manage.py migrateManage.py is Django’s main administration script. manage.py migrate creates all DB tables automatically. Each time we modify our data model, we need to repeat the migration.
We should also create an administrative user. It will allow us to manage users and permissions:
$ python manage.py createsuperuserFire it up
We’re all set. Start the application. With Python and Django we don’t need a web server such as Apache or Nginx.
$ python manage.py runserverOpen a browser and contemplate your shiny new website in all its glory. The main site is found at http://127.0.0.1:8000. The admin back office should be located at http://127.0.0.1:8000/admin.
Testing the App
Now that the application is up and running, we can take a few minutes to do a little bit of testing. We can start with the code analysis:
$ pylint --load-plugins=pylint_django tasks/*.py

************* Module tasks.views
tasks/views.py:11:0: R0901: Too many ancestors (8/7) (too-many-ancestors)
tasks/views.py:18:4: W0221: Parameters differ from overridden 'get_context_data' method (arguments-differ)
tasks/views.py:24:0: R0901: Too many ancestors (11/7) (too-many-ancestors)
tasks/views.py:38:0: R0901: Too many ancestors (8/7) (too-many-ancestors)
tasks/views.py:46:0: R0901: Too many ancestors (11/7) (too-many-ancestors)
tasks/views.py:60:0: R0901: Too many ancestors (10/7) (too-many-ancestors)

------------------------------------------------------------------
Your code has been rated at 8.97/10 (previous run: 8.38/10, +0.59)
Pylint gives us some warnings and an overall rating. We got some “you should refactor” (R) and style warnings (W) messages. Not too bad, although we may want to look into that at some point in the future.
The testing code is located in tasks/tests:
- test_browser.py: checks that the site is up and its title contains “Semaphore”.
- test_models.py: creates a single sample task and verifies its values.
- test_views.py: creates 20 sample tasks and checks the templates and views.
All tests run on a separate, test-only database, so it doesn’t conflict with any real user’s data.
If you have google chrome or chromium installed, you can run the browser test suite. During the test, the Chrome window may briefly flash on your screen:
$ python manage.py test tasks.tests.test_browser
nosetests tasks.tests.test_browser --with-coverage --cover-package=tasks --verbosity=1
Creating test database for alias 'default'...
[07/May/2019 13:48:01] "GET / HTTP/1.1" 200 2641
[07/May/2019 13:48:03] "GET /favicon.ico HTTP/1.1" 200 2763
.
Name                                          Stmts   Miss  Cover
-----------------------------------------------------------------
tasks/__init__.py                                 0      0   100%
tasks/apps.py                                     3      3     0%
tasks/migrations/0001_initial.py                  5      0   100%
tasks/migrations/0002_auto_20190214_0647.py       4      0   100%
tasks/migrations/0003_auto_20190217_1140.py       4      0   100%
tasks/migrations/__init__.py                      0      0   100%
tasks/models.py                                  14     14     0%
-----------------------------------------------------------------
TOTAL                                            30     17    43%
----------------------------------------------------------------------
Ran 1 test in 4.338s

OK
Destroying test database for alias 'default'...
We can also run the unit test suites, one at a time:
$ python manage.py test test tasks.tests.test_models
$ python manage.py test test tasks.tests.test_views
Finally, we have the Django checklist to look for security issues:
$ python manage.py check --deploy

System check identified some issues:

WARNINGS:
?: (security.W004) You have not set a value for the SECURE_HSTS_SECONDS setting. If your entire site is served only over SSL, you may want to consider setting a value and enabling HTTP Strict Transport Security. Be sure to read the documentation first; enabling HSTS carelessly can cause serious, irreversible problems.
?: (security.W006) Your SECURE_CONTENT_TYPE_NOSNIFF setting is not set to True, so your pages will not be served with an 'x-content-type-options: nosniff' header. You should consider enabling this header to prevent the browser from identifying content types incorrectly.
?: (security.W007) Your SECURE_BROWSER_XSS_FILTER setting is not set to True, so your pages will not be served with an 'x-xss-protection: 1; mode=block' header. You should consider enabling this header to activate the browser's XSS filtering and help prevent XSS attacks.
?: (security.W008) Your SECURE_SSL_REDIRECT setting is not set to True. Unless your site should be available over both SSL and non-SSL connections, you may want to either set this setting True or configure a load balancer or reverse-proxy server to redirect all connections to HTTPS.
?: (security.W012) SESSION_COOKIE_SECURE is not set to True. Using a secure-only session cookie makes it more difficult for network traffic sniffers to hijack user sessions.
?: (security.W016) You have 'django.middleware.csrf.CsrfViewMiddleware' in your MIDDLEWARE, but you have not set CSRF_COOKIE_SECURE to True. Using a secure-only CSRF cookie makes it more difficult for network traffic sniffers to steal the CSRF token.
?: (security.W019) You have 'django.middleware.clickjacking.XFrameOptionsMiddleware' in your MIDDLEWARE, but X_FRAME_OPTIONS is not set to 'DENY'. The default is 'SAMEORIGIN', but unless there is a good reason for your site to serve other parts of itself in a frame, you should change it to 'DENY'.

System check identified 7 issues (0 silenced).
We got some warnings, but no showstoppers, we’re good to go.
Deploy to PythonAnywhere
Websites are meant to run on the internet. In this section, we’ll see how we can publish our app for the world to enjoy. PythonAnywhere is a hosting provider that, as the name suggests, specializes in Python. In this section, we’ll learn how to use it.
Sign Up With PythonAnywhere
Head to PythonAnywhere and create an account. The free tier allows one web application and MySQL databases, plenty for our immediate needs.
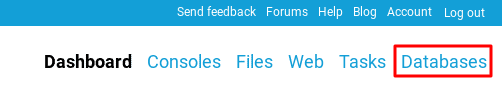
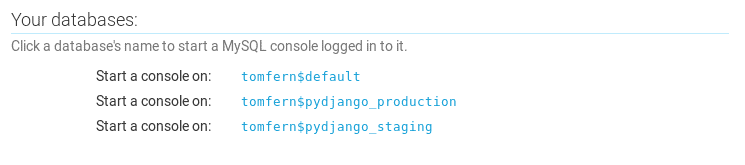
Create Database
Go to Databases
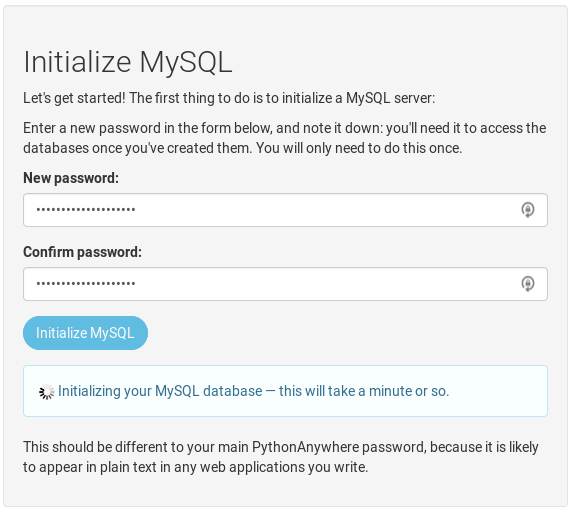
Set up a database password. Avoid using the same password as the login:
Take note of the database host address.
Create a database called “pydjango_production”:
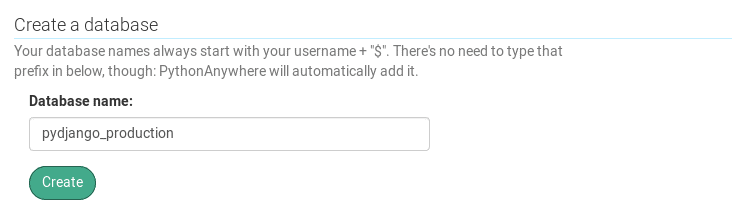
You’ll notice your username has been automatically prefixed to the database, that’s just how PythonAnywhere works.
Create an API Token
An API Token is required for the next automation step. To request one:
- Go to Account.
- Click API Token tab.
- Hit the Create button.
- Take note of the API Token shown.
Create the Website
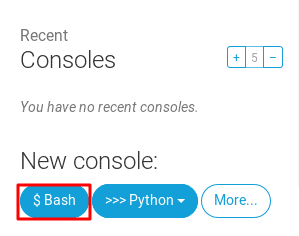
There are a couple of alternatives for editing files in PythonAnywhere. From the Dashboard you can:
- Under Files: use Browse files to edit and Open another file to create.
- Or click on Bash button under New console. There we can use the Vim editor in the terminal.
Create a file called .env-production:
# ~/.env-production

# This value is found on PythonAnywhere Accounts->API Token.
export API_TOKEN=<PYTHON_ANYWHERE_API_TOKEN>

# Django Secret Key - Use a long random string for security.
export SECRET_KEY=<DJANGO_SECRET_KEY>

# These values can be located on PythonAnywhere Databases tab.
export DB_HOST=<DATABASE_HOST_ADDRESS>
export DB_USER=<USERNAME>
export DB_PASSWORD=<DATABASE_PASSWORD>
# The name of the DB is prefixed with USERNAME$
export DB_NAME='<USERNAME>$pydjango_production'
export DB_PORT=3306
Source the environment variables to make them available in your session:
$ source ~/.env-productionNow we’re ready to create the website. Luckily for us, there is an official helper script. If you own a domain and wish to use it for your site, use the following command:
$ pa_autoconfigure_django.py --python=3.7 --domain=<YOUR_WEBSITE_ADDRESS> https://github.com/your_repository_addressIf you don’t have a domain, just skip the --domain option to use the default: USERNAME.pythonanywhere.com.
$ pa_autoconfigure_django.py --python=3.7 https://github.com/your_repository_addressThe script should take a few minutes to complete. Take a cup of coffee and don’t forget to stretch.
Create a CNAME
This step is only required if you’re using your own domain. Go to Web, copy the value under DNS Setup.
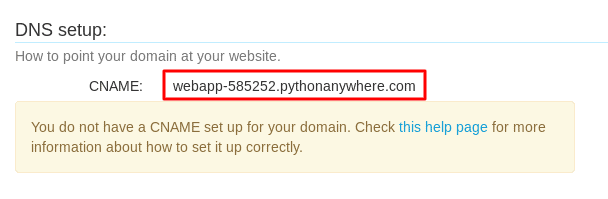
Now, head to your domain’s DNS Provider to create a CNAME record pointing that address. As a bonus, you can create an SPF record. They prevent other parties from sending emails on your behalf by controlling who uses your domain. Make sure you add an SPF record to avoid fraudulent and email phishing.
Edit WSGI
WSGI is the interface Python uses to talk to the webserver. We need to modify it to make the environment variables available inside the application.
Go to Web and open the WSGI configuration file link.
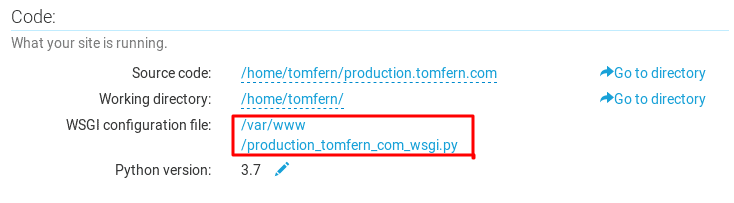
We need three lines added near the end of the file:
. . .
os.environ['DJANGO_SETTINGS_MODULE'] = 'pydjango_ci_integration.settings'
# -------> ADD THESE NEXT THREE LINES <-------
from dotenv import load_dotenv
env_file = os.path.expanduser('~/.env-production')
load_dotenv(env_file)
# --------------------------------------------
. . .
Go Live!
Time for all the hard work to pay off. Go back to Web and click on the Reload button. Welcome to your new website.
The Importance of Continuous Integration
Testing is the bread and butter of developing, that’s just how it is. When done badly, it is tedious, ineffective and counter-productive. But proper testing brings a ton of benefits: stability, quality, fewer conflicts and errors, plus confidence in the correctness of the code.
Continuous integration (CI) is a programming discipline in which the application is built and tested each time code is modified. By making multiple small changes instead of a big one, problems are detected earlier and corrected faster. Such a paradigm, clearly, calls for an automated system to carry out all the steps. In such systems, code travels over a path, a pipeline, and it must pass an ever-growing number of tests before it can reach the users.
In the past, developers had to buy servers and manage infrastructure in order to do CI, which obviously increased costs beyond the reach of small teams. Fortunately, in this cloud-enabled world, everyone can enjoy the benefits of CI.
Continuous Integration on Semaphore
Semaphore adds value to our project sans the hassle of managing a CI infrastructure.
The demo project already includes a Semaphore config. So we can get started in a couple of minutes:
Sign Up with Semaphore
Go to semaphore.io and click on the Sign up with GitHub button.
Connect Your Repository
Under Projects, click on New. You’ll see a list of your repositories:

Push to GitHub
To start the pipeline, edit or create any file and push to GitHub:
$ touch test_pipeline.md
$ git add test_pipeline.md
$ git commit -m "added semaphore"
$ git push origin master
That’s it! Go back to your Semaphore dashboard and there’s the pipeline:

The Continuous Integration Pipeline
This is a good chance to review how the CI pipeline works. Click on the Edit Workflow button on the top right corner.
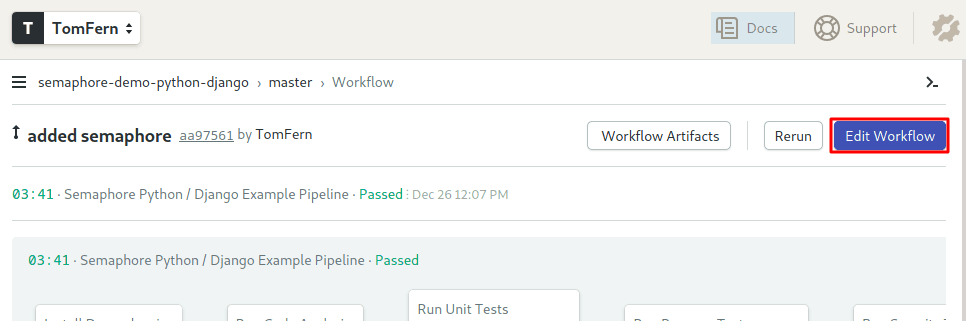
Once the Workflow Builder opens, you’ll be able to examine and modify the pipeline.
There’s a lot to unpack here. I’ll go step by step. Click on the pipeline to view its main properties:

The pipeline runs on a agent, which is a virtual machine paired with an operating system. The machine is automatically managed by Semaphore. We’re using e1-standard-2 machine (2 vCPUs, 4GB, 25GB disk) with an Ubuntu 18.04 LTS image.
Blocks define the pipeline actions. Each block has one or more jobs. All jobs within a block run concurrently. Blocks, on the other hand, run sequentially. Once all jobs on a block are completed, the next block starts.
The first block is called “Install Dependencies”. Under the prologue section, you will find the commands that install the required Linux packages.
sem-version python 3.7
sudo apt-get update && \
     sudo apt-get install -y python3-dev && \
     sudo apt-get install default-libmysqlclient-dev
The prologue is executed before each job in the block and is conventionally reserved for common setup commands.
The “pip” job installs the Python packages with the following commands:
checkout
cache restore
pip download --cache-dir .pip_cache -r requirements.txt
cache store
The job uses the following tools:
- sem-version is used to set the active python version.
- checkout clones the code from GitHub.
- cache is used to store and retrieve files between jobs, here it’s used for the python packages.
Since each job runs in an isolated environment, files changed in one job are not seen on the rest. The “Run Code Analysis” block uses its prologue to install the Python packages downloaded in the first block:
sem-version python 3.7
checkout
cache restore
pip install -r requirements.txt --cache-dir .pip_cache
The “Pylint” job reviews the code in one command:
git ls-files | \
   grep -v 'migrations' | \
   grep -v 'settings.py' | \
   grep -v 'manage.py' | \
   grep -E '.py$' | \
   xargs pylint -E --load-plugins=pylint_django
The next block runs the Django models and views unit tests. The tests run in parallel, each with its own separate MySQL database, started with sem-service.
python manage.py test tasks.tests.test_modelspython manage.py test tasks.tests.test_viewsIn order to run browser tests, the application and a database need to be started. The prologue takes care of that:
sem-version python 3.7
sem-service start mysql
sudo apt-get update && sudo apt-get install -y -qq mysql-client
mysql --host=0.0.0.0 -uroot -e "create database $DB_NAME"
checkout
cache restore
pip install -r requirements.txt --cache-dir .pip_cache
nohup python manage.py runserver 127.0.0.1:8732 &
Once started, a selenium test is executed on a Google Chrome instance.
python manage.py test tasks.tests.test_browserThe last block does the security checklist. It will tell us if the app is ready for deployment.
checkout
sem-version python 3.7
cache restore
pip install -r requirements.txt --cache-dir .pip_cache
python manage.py check --deploy --fail-level ERROR
Continuous Deployment for Python
Deployment is a complex process with a lot of moving parts. It would be a shame if, after painstakingly writing tests for everything, the application crashes due to a faulty deployment.
Continuous Deployment (CD) is an extension of the CI concept, in fact, most integration tools don’t make a great distinction between CI and CD. A CD pipeline performs all the deployment steps as a repeatable, battle-hardened process.
Even the best test in the world can’t catch all errors. Moreover, there are some problems that may only be found when the app is live. Think, for example, a website that perfectly passes all tests but crashes on production because the hosting provider has the wrong database version.
To avoid these kinds of problems, it is a good strategy to have at least two copies of the app: production for our users and staging as a guinea pig for developers.
Staging and production ought to be identical, this includes all the infrastructure, operating system, database, and package versions.
Automating Deployment With Semaphore
We’re going to write two new pipelines:
- Production: deploys manually at our convenience.
- Staging: deploys to the staging site every time all the tests pass.
Pipelines are connected with promotions. Promotions allow us to start other pipelines, either manually or automatically on user-defined conditions. Both deployments will branch out of the CI pipeline.
SSH Access
From here on, we need a paid account on PythonAnywhere, no way around it. We need direct SSH access. If you are subscribing, consider buying two websites, the second is going to be staging. You can easily upgrade your plan from your account page: switch to the “hacker” plan and bump the number of websites from 1 to 2.
If you don’t have a SSH key already on your machine, generating a new one is just a matter of seconds. Just leave blank the passphrase when asked:
$ ssh-keygen
Generating public/private rsa key pair.
Enter file in which to save the key (/home/tom/.ssh/id_rsa):
Created directory '/home/tom/.ssh'.
Enter passphrase (empty for no passphrase):
Enter same passphrase again:
Your identification has been saved in /home/tom/.ssh/id_rsa.
Your public key has been saved in /home/tom/.ssh/id_rsa.pub.
The key fingerprint is:
SHA256:c1zTZkOtF79WD+2Vrs5RiU4oWNImt96JkQWGiHAnA38 tom@ix
The key's randomart image is:
+---[RSA 2048]----+
| oo+... .o    .. |
|  o.+. .o .  o ..|
|   . E o = .o =o+|
|    .   B.+..++oB|
|       .S=o. o.*=|
|        .o= + .+o|
|         o o oo  |
|            ...  |
|            .o   |
+----[SHA256]-----+
Now we just need to let the server know about our key. Use your PythonAnywhere username and password:
$ ssh-copy-id <USERNAME>@ssh.pythonanywhere.comTry logging in now, no password should be required:
$ ssh <USERNAME>@ssh.pythonanywhere.com
<<<<<<:>~ PythonAnywhere SSH. Help @ https://help.pythonanywhere.com/pages/SSHAccess
Storing Credentials With Secrets
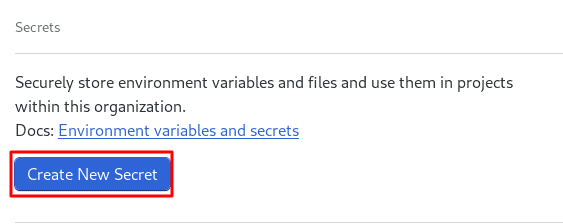
The deployment process needs some secret data, for example, the SSH key to connect to PythonAnywhere. The environment file also has sensitive information, so we need to protect it.
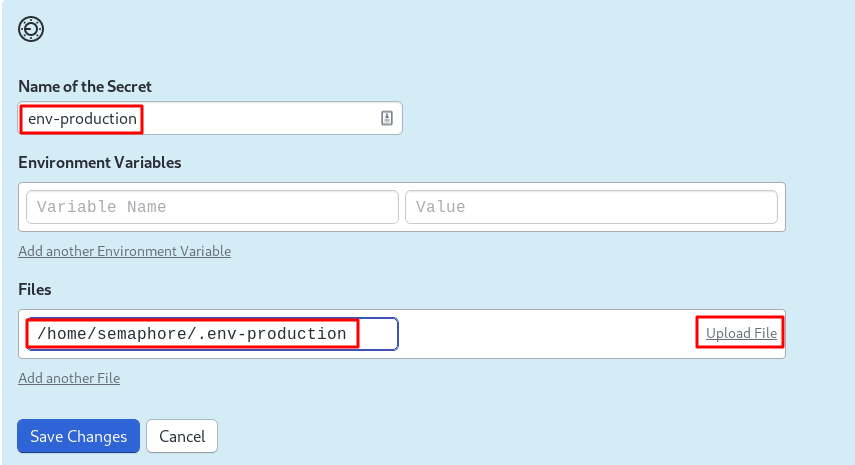
Semaphore provides a secure mechanism to store sensitive information. We can easily create secrets from Semaphore’s dashboard. Go to Secrets under Configuration and use the Create New Secret button.
Add the SSH key and upload your .ssh/id_rsa key to Semaphore.

Now we need a copy of the environment file. It’s the same file created when we were publishing the website:
# ~/.env-production
# This value is found on PythonAnywhere Accounts->API Token.
export API_TOKEN=<PYTHON_ANYWHERE_API_TOKEN>
# Django Secret Key - Use a long random string for security.
export SECRET_KEY=<DJANGO_SECRET_KEY>
# These values can be located on PythonAnywhere Databases tab.
export DB_HOST=<DATABASE_HOST_ADDRESS>
export DB_USER=<USERNAME>
export DB_PASSWORD=<DATABASE_PASSWORD>
# The name of the DB is prefixed with USERNAME$
export DB_NAME='<USERNAME>$pydjango_production'
export DB_PORT=3306
Upload the production environment file:
Add a Deployment Script
To update the application in PythonAnywhere we have to:
- Pull the latest version from Git.
- Execute manage.py migrate to update the database tables.
- Restart the application.
Create a new file called “deploy.sh” in your machine and add the following lines:
# deploy.sh
# pull updated version of branch from repo
cd $APP_URL
git fetch --all
git reset --hard origin/$SEMAPHORE_GIT_BRANCH
# perform django migration task
source $ENV_FILE
source ~/.virtualenvs/$APP_URL/bin/activate
python manage.py migrate
# restart web application
touch /var/www/"$(echo $APP_URL | sed 's/\./_/g')"_wsgi.py</code>
The variables will be updated with correct values when the CI/CD process runs. The special variable $SEMAPHORE_GIT_BRANCH always contains the Git branch that triggered the workflow.
Push the new script to the Git repository:
$ git add deploy.sh
$ git commit -m "add deploy.sh"
$ git push origin master
Production Deployment Pipeline
We’ll create a new pipeline to push the application updates to PythonAnywhere with a single click.
Click on the Add Promotion button on the right side of the CI pipeline. Name your new pipeline “Deploy to Production”.
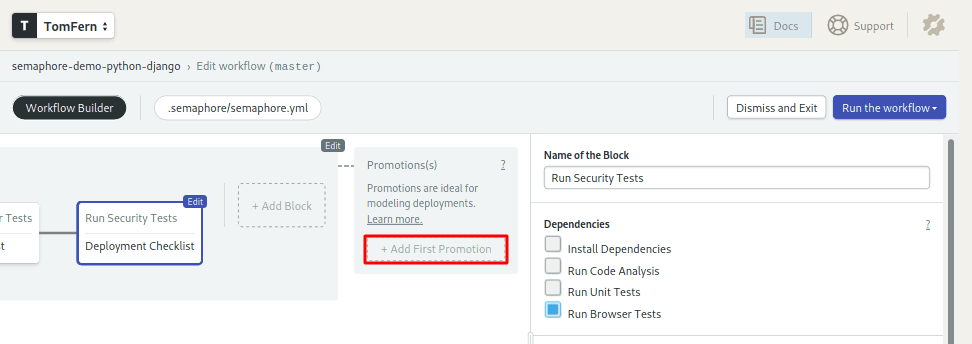
To create the deployment block click on the first block in the new pipeline. Rename the block as “Deploy to PythonAnywhere”.
In the environment variables section fill in the following values:
- SSH_USER = your PythonAnywhere username.
- APP_URL = the website URL (e.g USERNAME.pythonanywhere.com)
- ENV_FILE = the path to the environment file:
~/.env-production
In the secrets section, choose the two secrets you created earlier: ssh-key and env-production.
In the Jobs section, set the name of the job to “Push code” and add the following commands:
checkout
envsubst < deploy.sh > ~/deploy-production.sh
chmod 0600 ~/.ssh/id_rsa_pa
ssh-keyscan -H ssh.pythonanywhere.com >> ~/.ssh/known_hosts
ssh-add ~/.ssh/id_rsa_pa
scp -oBatchMode=yes ~/.env-production ~/deploy-production.sh $SSH_USER@ssh.pythonanywhere.com
ssh -oBatchMode=yes $SSH_USER@$ssh.pythonanywhere.com bash deploy-production.sh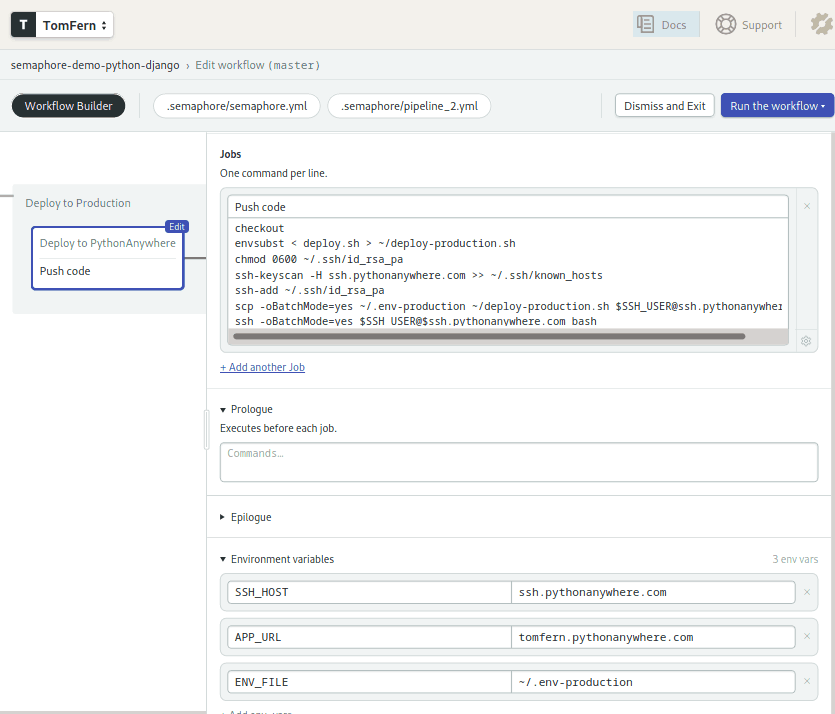
Some notes about the previous commands:
- envsubst: replaces the environment variables with their corresponding values.
- ssh-keyscan: validates the PythonAnywhere SSH key.
- ssh-add: tells SSH to use our private key.
- scp and ssh: copies the files to PythonAnywhere and runs the deployment script.
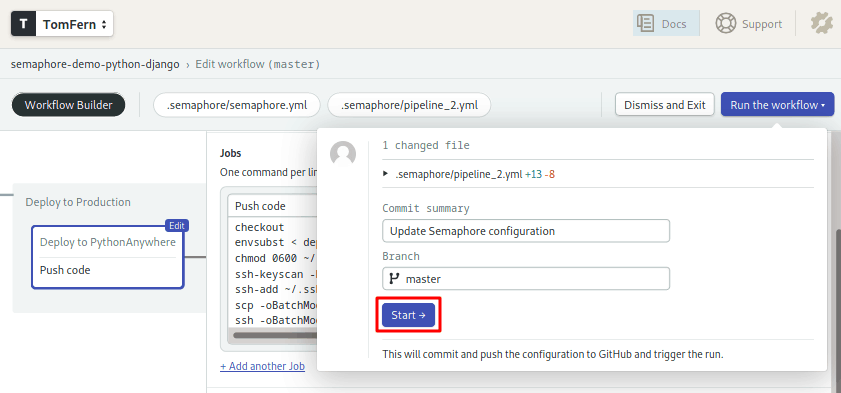
The pipeline is ready to work. To save the workflow press on Run the workflow and click on the Start button.
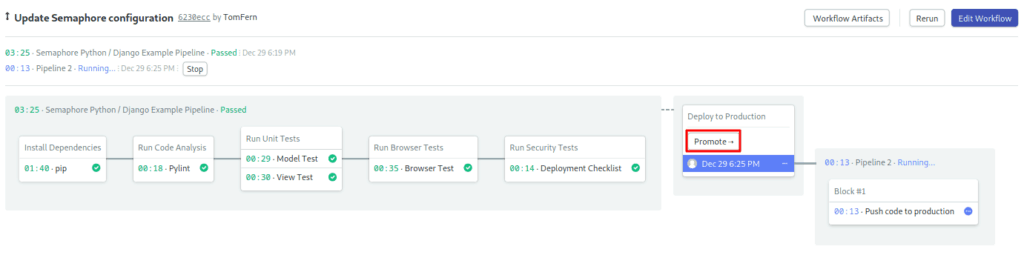
This will trigger the execution of the CI pipeline. Once it is complete, click on the Promote button to start the deployment.
Staging Website and Pipeline
I’ll leave to you the creation of the staging website. It won’t be hard, I promise, just repeat the steps we’ve already done:
- Create a “pydjango_staging” database.
- Create an
.env-stagingenvironment file that connects to pydjango_staging DB. - Upload
.env-stagingas a secret to Semaphore. - On PythonAnywhere: source the staging environment and create new website with
pa_autoconfigure_django, you’ll need a different address than production. - Modify the
WSGI.pyfile for the new site, load the staging environment file. - If using a custom domain, add a CNAME for the new site on your DNS provider.
- Reload the application.
The only trick here is that you can’t use the same address as in production.
Once the staging site is up, create another pipeline branching off the main CI. Repeat the steps you did to create “Deploy to Production” but replace the ENV_FILE environment variable with ~/.env-staging.
Click on the new pipeline and check the option Enable automatic promotion. This will start the pipeline automatically when all tests pass.

Excellent! No errors, we can deploy to production safely.
Conclusion
We’ve discovered the incredible potential of a CI/CD platform. I hope that the tools and practices discussed here can add value to your projects, improve your team effectiveness and make your life easier.
For the next steps, I suggest learning more from Semaphore’s docs and, of course, setting up continuous integration and deployment for your own Python apps.
If you’re want to use Flask instead of Django, check our CI/CD Python Flask tutorial.
Good luck!
Want to discuss this article? Join our Discord.