Introduction
In this tutorial, we will demonstrate how to perform integration testing on a Java web application with WireMock, and automate the tests by running them on Semaphore.
The aim of integration testing is to expose the faults, defects, or bugs that can exist between various integrated units. This is done by validating their behaviour when working in tandem. In that sense, integration testing bolsters the confidence about the stability and reliability of the entire system.
There are two common coding styles when it comes to integration testing. Some developers prefer using the Given-When-Then specification and write their integration tests in a domain-specific language, using tools such as Cucumber.
Feature: Withdrawing money
  Scenario: An account has enough balance
    Given I have a valid account
      And I have 5,000 USD balance

    When I withdraw 200 USD at an ATM

    Then I should have received my money
      And I should have balance of 4,800 USD
      And I should have a receipt
      And I should have my card back
      And the transaction is logged
Most tests for open-source projects are written in the constructs of the programming language used in the project. The specification above would look like this in Java:
public void testWithdrawMoneyWithEnoughBalance()
  throws Exception {
  Account me = new Account();
  me.setBalance(5000, "USD");

  ATMMachine atm = new ATMMachine(me);
  Transaction txn = atm.withdraw(200, "USD");
  me.reload();

  assertThat(atm.getLastStatus()).isEqualTo("withdrawing");
  assertThat(me.getBalance()).isEqualTo(4800, "USD");
  assertTrue(atm.isReceiptPrinted());
  assertTrue(atm.isCardEjected());
  assertTrue(me.hasTransaction(txn));
}
In this tutorial, we will perform integration testing using WireMock in JUnit. We’ll make a RESTful web application from scratch and test it.
We’ll be using Dropwizard to develop our RESTful web service. However, the techniques described here can be easily adapted to other frameworks, such as Spring.
Prerequisites
This article assumes that you have Maven and Java 1.8 installed on your machine.
Getting Started with Dropwizard
Dropwizard, is a collection of popular, elegant, and light-weight frameworks that make writing a web application in Java a pleasant experience. It contains various components that help with connecting to a database, requests handling, HTTP calls, and etc.
The following command will download all the required dependencies of Dropwizard 1.1.0 and allow us to create a new project in an interactive mode.
$ mvn archetype:generate -DarchetypeGroupId=io.dropwizard.archetypes \
 -DarchetypeArtifactId=java-simple -DarchetypeVersion=1.1.0
The interactive mode will ask us several questions regarding the application, such as its groupId, artifactId, and so on. You can answer all the questions with the answers listed bellow.
Define value for property 'groupId': com.acmestore
Define value for property 'artifactId': store-backend
Define value for property 'version' 1.0-SNAPSHOT: : 1.0.0
Define value for property 'package' com.acmestore: :
[INFO] Using property: description = null
Define value for property 'name': StoreBackend
[INFO] Using property: shaded = true
Confirm properties configuration:
groupId: com.acmestore
artifactId: store-backend
version: 1.0.0
package: com.acmestore
description: null
name: StoreBackend
shaded: true
 Y: : Y
Now, let’s try building our application by cd-ing to the just created store-backend folder, and then execute:
mvn clean installIn a few moments, Maven will build our application. The building process verbosely prints log messages in the terminal. Upon successful compilation, the result is a shaded JAR file which contains our application and all of its dependencies.
[INFO] --------------------------------------------------------------------
[INFO] BUILD SUCCESS
[INFO] --------------------------------------------------------------------
[INFO] Total time: 8.265 s
[INFO] Finished at: 2017-05-08T11:49:49+07:00
[INFO] Final Memory: 46M/590M
[INFO] --------------------------------------------------------------------
We can now start our application by executing the following command:
java -jar ./target/store-backend-1.0.0.jar serverWhen it boots, we can interact with it on the default port of 8080 at the localhost (127.0.0.1). When we go to that address, we will see nothing but an error message.
{"code":404,"message":"HTTP 404 Not Found"}Nevertheless, this proves that our application is running and listening on the port.
Creating a Resource
A resource is the heart of a Dropwizard web application. A resource is simply a class with a lot of functions, most of them dealing with endpoints you want your application to have. In that sense, a resource class is a lexical equivalent to “controller” in a lot of other web frameworks.
To begin with, let’s create a HelloWorldResource.java on com.acmestore.resources:
package com.acmestore.resources;

import javax.ws.rs.Consumes;
import javax.ws.rs.GET;
import javax.ws.rs.Path;
import javax.ws.rs.Produces;
import javax.ws.rs.core.MediaType;
import javax.ws.rs.core.Response;
import java.util.HashMap;
import java.util.Map;

/**
 * Created on 5/14/17.
 */
public class HelloWorldResource {
}
Let’s annotate the class:
/**
 * Created on 5/14/17.
 */
@Path("/hello")
@Produces(MediaType.APPLICATION_JSON)
@Consumes(MediaType.APPLICATION_JSON)
public class HelloWorldResource {
}
That way we are telling Dropwizard that the resource should produce and consume a JSON document. Also, all endpoints in the resource are accessible with the /hello prefix.
Let’s now add a new Response function, which can be accessible through the browser. In other words, we will be adding a GET endpoint.
@GET
@Path("/world")
public Response getWorld() {
    Map<String, String> values = new HashMap<>();
    values.put("message", "World");
    return Response.status(Response.Status.OK)
            .entity(values)
            .build();
}
That is how we return a JSON document. Dropwizard also supports other return types, such as redirection. We may also use another response code, but we chose to return a 200 OK instead.
Although we have annotated the resource class and the function, our application will fail to recognise the path. Trying to access the path will return a 400 error response.
In Dropwizard, we have to manually let it know of the resource by manually registering it. This is the reason behind our failure. To fix that, open the StoreBackendApplication.java:
public class StoreBackendApplication
   extends Application<StoreBackendConfiguration> {
    @Override
    public void run(final StoreBackendConfiguration configuration,
                    final Environment environment) {
        JerseyEnvironment jersey = environment.jersey();
        jersey.register(new HelloWorldResource());
    }

}
Now, let’s rebuild our package by using mvn clean install and then run java -jar ./target/store-backend-1.0.0.jar server. Try visiting http://localhost:8080/hello/world again, and it should display a 200 OK response.
Creating an Endpoint for an Item
Our tutorial serves to demonstrate how to fake RESTful requests using WireMock.
We will create a /book endpoint. The user can send a GET request with a book ISBN, and the system will find the book from its memory. If no book is to be found, the system will send a request to a third party system through an API call. Then, it will save the book into the memory.
@Path("/book")
@Produces(MediaType.APPLICATION_JSON)
@Consumes(MediaType.APPLICATION_JSON)
public class BookResource {
    @GET
    @Path("/get")
    public Response getBook(@NotNull @QueryParam("isbn") String isbn) {
        Client client = ClientBuilder.newClient();
        return client.target("http://openlibrary.org/api/books")
                .queryParam("bibkeys", "ISBN:" + isbn)
                .queryParam("format", "json")
                .queryParam("jscmd", "data")
                .request()
                .accept(MediaType.APPLICATION_JSON).buildGet().invoke();
    }
}
Rebuilding and restarting the server will enable us to visit this endpoint: http://localhost:8080/book/get?isbn=0201558025 which will retrieve:
{
  "ISBN:0201558025": {
    "publishers": [
      {
        "name": "Addison-Wesley"
      }
    ],
    "pagination": "xiii, 657 p. :",
    "identifiers": {
      "lccn": [
        "93040325"
      ],
      "openlibrary": [
        "OL1429049M"
      ],
      "isbn_10": [
        "0201558025"
      ],
      "librarything": [
        "45844"
      ],
      "goodreads": [
        "112243"
      ]
    },
    "subtitle": "a foundation for computer science",
    "title": "Concrete mathematics",
    "url": "http:\/\/openlibrary.org\/books\/OL1429049M\/Concrete_mathematics",
    "classifications": {
      "dewey_decimal_class": [
        "510"
      ],
      "lc_classifications": [
        "QA39.2 .G733 1994"
      ]
    },
    "notes": "Includes bibliographical references (p. 604-631) and index.",
    "number_of_pages": 657,
    "cover": {
      "small": "https:\/\/covers.openlibrary.org\/b\/id\/135182-S.jpg",
      "large": "https:\/\/covers.openlibrary.org\/b\/id\/135182-L.jpg",
      "medium": "https:\/\/covers.openlibrary.org\/b\/id\/135182-M.jpg"
    },
    "subjects": [
      {
        "url": "https:\/\/openlibrary.org\/subjects\/computer_science",
        "name": "Computer science"
      },
      {
        "url": "https:\/\/openlibrary.org\/subjects\/mathematics",
        "name": "Mathematics"
      }
    ],
    "publish_date": "1994",
    "key": "\/books\/OL1429049M",
    "authors": [
      {
       "url": "http:\/\/openlibrary.org\/authors\/OL720958A\/Ronald_L._Graham",
       "name": "Ronald L. Graham"
      },
      {
       "url": "http:\/\/openlibrary.org\/authors\/OL229501A\/Donald_Knuth",
       "name": "Donald Knuth"
      },
      {
       "url": "http:\/\/openlibrary.org\/authors\/OL2669938A\/Oren_Patashnik",
       "name": "Oren Patashnik"
      }
    ],
    "by_statement": "Ronald L. Graham, Donald E. Knuth, Oren Patashnik.",
    "publish_places": [
      {
        "name": "Reading, Mass"
      }
    ],
    "ebooks": [{
  "formats": {},
  "preview_url": "https:\/\/archive.org\/details\/concretemathemat00grah_444",
  "availability": "restricted"}]
  }
}
We can save the JSON response, into the memory:
private Map<String, Map<String, Object>> books = new HashMap<>();

@GET
@Path("/get")
public Response getBook(@NotNull @QueryParam("isbn") String isbn) {
    Map<String, Object> book = books.get(isbn);

    if (book == null) {
        System.out.println("MISS: " + isbn);

        Client client = ClientBuilder.newClient();
        Response response = client.target("http://openlibrary.org/api/books")
                .queryParam("bibkeys", "ISBN:" + isbn)
                .queryParam("format", "json")
                .queryParam("jscmd", "data")
                .request().buildGet().invoke();
        book = response.readEntity(Map.class);
        books.put(isbn, book);
    } else {
        System.out.println("HIT: " + isbn);
    }

    return Response.ok().entity(book).build();
}
Our application can be more useful if we could track how many times a book is retrieved. With that data, it won’t be hard to determine how relatively popular a book is.
private Map<String, Integer> bookViews = new HashMap<>();

public Response getBook(@NotNull @QueryParam("isbn") String isbn) {
    ...
    Integer viewCount = bookViews.getOrDefault(isbn, 0);
    viewCount += 1;
    bookViews.put(isbn, viewCount);

    Map<String, Object> data = new HashMap<>();
    data.put("viewCount", viewCount.toString());
    data.put("book", book);

    return Response.ok().entity(data).build();
}
Now that our playground is set up, let’s see WireMock in action.
Integration Testing with WireMock
There are three primary issues with running real HTTP requests during testing:
- They require an internet connection for the RESTful tests to pass,
- They can be very time-consuming, and
- They may overwhelm the remote server when the testing executes at a large scale in a continuous integration setup.
Luckily we can easily make use of WireMock to mock an HTTP request with an expected response from a remote server. The requests will hit our WireMock’s endpoints instead of the actual endpoints.
Installing WireMock
Currently, WireMock comes with two flavours, and we will plug in the standard JAR flavour which only contains WireMock, without its dependencies.
<dependency>
    <groupId>com.github.tomakehurst</groupId>
    <artifactId>wiremock</artifactId>
    <version>2.6.0</version>
</dependency>
We would also need to require dropwizard-testing, which will help us start our application in a test file.
<dependency>
    <groupId>io.dropwizard</groupId>
    <artifactId>dropwizard-testing</artifactId>
</dependency>
Stubbing Requests
Let’s begin with creating a BookResourceTest.java inside test/java/com/acmestore/resources folder.
package com.acmestore.resources;

import com.acmestore.StoreBackendApplication;
import com.acmestore.StoreBackendConfiguration;
import com.github.tomakehurst.wiremock.core.WireMockConfiguration;
import com.github.tomakehurst.wiremock.junit.WireMockRule;
import io.dropwizard.testing.junit.DropwizardAppRule;
import org.junit.ClassRule;
import org.junit.Rule;
import org.junit.Test;

import javax.ws.rs.client.Client;
import javax.ws.rs.core.Response;

import static com.github.tomakehurst.wiremock.client.WireMock.*;
import static org.assertj.core.api.Assertions.assertThat;

/**
 * Created on 5/16/17.
 */
public class BookResourceTest {
    @Test
    public void testGetBook() {
    }
}
Our test will need a real application to start. Therefore, we should define a ClassRule. For something to be annotated with @ClassRule, it has to be public, static, and final.
@ClassRule
public static final
DropwizardAppRule<StoreBackendConfiguration> app = new DropwizardAppRule<>(
            StoreBackendApplication.class,
            ResourceHelpers.resourceFilePath("config.yml"));
private Client client = app.client();
We can use the client variable to send an HTTP request to the backend.
The configuration for the testing environment is better to be set using a different file, since the development and the production environment each have their respective files. That distinct configuration file allows us to customise database utilised for each setting, to have more verbose messages, or to set up different arrangements, depending on the runtime environment.
Since we are going to read a configuration located in the resource folder, let’s create a new file named “config.yml” at the test’s resource folder with the same content as “config.yml” in the application root folder:
logging:
  level: INFO
  loggers:
    com.acmestore: DEBUG
Now, let’s start writing some real tests. Type the following into the testGetBook function:
Response response = client.target(hostUrl + "/book/get")
        .queryParam("isbn", "0201558025")
        .request().buildGet().invoke();
Map<String, String> data = response.readEntity(Map.class);
assertThat(data.get("viewCount")).isEqualTo("1");
Running the test spec will perform an actual request to OpenLibrary, as it won’t use any stubbing yet. Let’s make a stub for the request.
@Rule
public WireMockRule wireMockRule = new WireMockRule(
  WireMockConfiguration.wireMockConfig().port(9090));
The @Rule annotation allows for each running test to have a clean state of stubbing rules.
Then, inside our test method, we’ll define the stubbing rule as follows:
wireMockRule.stubFor(any(urlPathEqualTo("/api/books"))
    .willReturn(aResponse()
            .withHeader("Content-Type", "text/json")
            .withStatus(200)
            .withBody("{}")));
This won’t do any good to our test since our resource would still issue a net request to OpenLibrary. We need to tell our resource where the endpoint is, depending on the environment the application runs on. If the application is running in the testing environment, the book resource must issue all HTTP requests to localhost:9090.
// BookResource.java file
private final String endpoint;

public BookResource(String endpoint) {
    this.endpoint = endpoint;
}
Our getBook endpoint now need to refer to the endpoint variable, set to a value at runtime.
Response response = client.target(this.endpoint + "/api/books")
        .queryParam("bibkeys", "ISBN:" + isbn)
        .queryParam("format", "json")
        .queryParam("jscmd", "data")
        .request().buildGet().invoke();
At StoreBackendApplication.java, we pass in the value for the endpoint, which is read from the config file.
jersey.register(new BookResource(configuration.getOpenBookEndpoint()));We must define the getOpenBookEndpoint() complete with the field in StoreBackendConfiguration.java:
@JsonProperty("openBookEndpoint")
@NotBlank
private String openBookEndpoint;

public String getOpenBookEndpoint() {
    return this.openBookEndpoint;
}
Since we have declared a new property openBookEndpoint as a non-blank value, we must set a value for it in the config file located in the root folder of the project.
openBookEndpoint: http://openlibrary.org
logging:
  level: INFO
  loggers:
    com.acmestore: DEBUG
On the contrary, the config file for our test environment will use our WireMock server:
openBookEndpoint: http://localhost:9090Now, running the spec will no longer perform HTTP requests to OpenLibrary.
Request Matching with Complex Rules
Our rule should resemble the real HTTP requests’ properties.
To employ a more accurate request matching rule, we can match an entire URL using urlEqualTo, instead of urlPathEqualTo. Nevertheless, to describe query parameters, we can simply use urlPathEqualTo and specify the query parameter one by one using a helper function as later demonstrated.
It is also a good idea to be very specific with the HTTP verb, instead of simply using any. This should be the go-to way when defining a stub.
wireMockRule.stubFor(get(urlPathEqualTo("/api/books"))We could also make our stubbing more specific by including the query parameters for the third-party API using withQueryParam.
wireMockRule.stubFor(get(urlPathEqualTo("/api/books"))
    .withQueryParam("bibkeys", equalTo("ISBN:0201558025"))
    .withQueryParam("format", equalTo("json"))
    .withQueryParam("jscmd", equalTo("data"))
    .willReturn(aResponse()
            .withHeader("Content-Type", "text/json")
            .withStatus(200)
            .withBody("{}")));
We may as well target a specific header if so deemed necessary:
wireMockRule.stubFor(get(urlPathEqualTo("/api/books"))
    .withHeader("Accept", containing("json"))
    .withQueryParam("bibkeys", equalTo("ISBN:0201558025"))
    ...
However, a typical case when the header is needed is usually when the stub requires an Authorization header to match. In the case of Basic Auth header, we don’t need to calculate it manually. We can simply use withBasicAuth helper function.
wireMockRule.stubFor(get(urlPathEqualTo("/api/books"))
    .withHeader("Accept", containing("json"))
    .withBasicAuth("USER", "PWD")
    ...
Most of the time when the request is POST, we should be able to match exactly on the payload too. To do that, we could use withRequestBody.
In case that we need to pay attention to the cookie as well, we can match it via withCookie function.
Custom Response
Responses from an HTTP request can significantly vary. Some responses need to redirect, which can be easily covered using either permanentRedirect(String location) or temporaryRedirect(String location) function.
wireMockRule.stubFor(post(urlPathEqualTo("/api/books/add"))
    .willReturn(permanentRedirect("/api/books/insert")));
We can also simulate delayed response using withFixedDelay(Integer milliseconds).
wireMockRule.stubFor(get(urlPathEqualTo("/api/books"))
    .willReturn(aResponse()
            .withFixedDelay(200)
            .withHeader("Content-Type", "text/json")
            .withStatus(200)
            .withBody("{}")));
A good test should also cover the red scenarios, such as those when the response is simply empty, e.g. because of a timeout. We could simulate that in WireMock using withFault:
wireMockRule.stubFor(get(urlPathEqualTo("/api/books"))
    .withHeader("Accept", containing("json"))
    .willReturn(aResponse()
            .withFault(Fault.EMPTY_RESPONSE)));
Using Fixtures
Sometimes our response can be very long: such as when embedding a dynamic SVG image as well as having HTML inside an XML Soap document. Such responses require a huge portion in the file, and writing them in the same test file can make it difficult to read.
Thankfully, there is a way to load response from a fixture. First. let’s create a folder named fixtures in our test’s resources folder. This step is mostly not required as Dropwizard should have created this folder for us.
Next, create the fixture file containing the response body. In this example, let’s name it open_library_get_book.json. We may nest the file into subfolders if necessary.
In that fixture, copy the response body of a request. Such as the JSON response as demonstrated earlier from querying the OpenBook endpoint.
Then, we could refer to this fixture using a static fixture function from FixtureHelpers.
wireMockRule.stubFor(get(urlPathEqualTo("/api/books"))
    .withHeader("Accept", containing("json"))
    .withQueryParam("bibkeys", equalTo("ISBN:0201558025"))
    .withQueryParam("format", equalTo("json"))
    .withQueryParam("jscmd", equalTo("data"))
    .willReturn(aResponse()
            .withBody(FixtureHelpers.fixture("fixtures/open_library_get_book.json"))
            .withHeader("Content-Type", "text/json")
            .withStatus(200)));
Setting Up Integration Testing on Semaphore
Semaphore is a continuous integration tool that helps us automate running our tests. By running our tests on the fly, we don’t need to execute them locally and spend our time waiting to see if the build has succeeded or not. Instead, we can rely on Semaphore to run our tests automatically and in parallel, and spend our engineering time working on more important tasks.
Firstly, sign up for a Semaphore CI account here if you don’t already have one. Secondly, you need to set up a repository from which Semaphore can fetch the code, and push our code there.
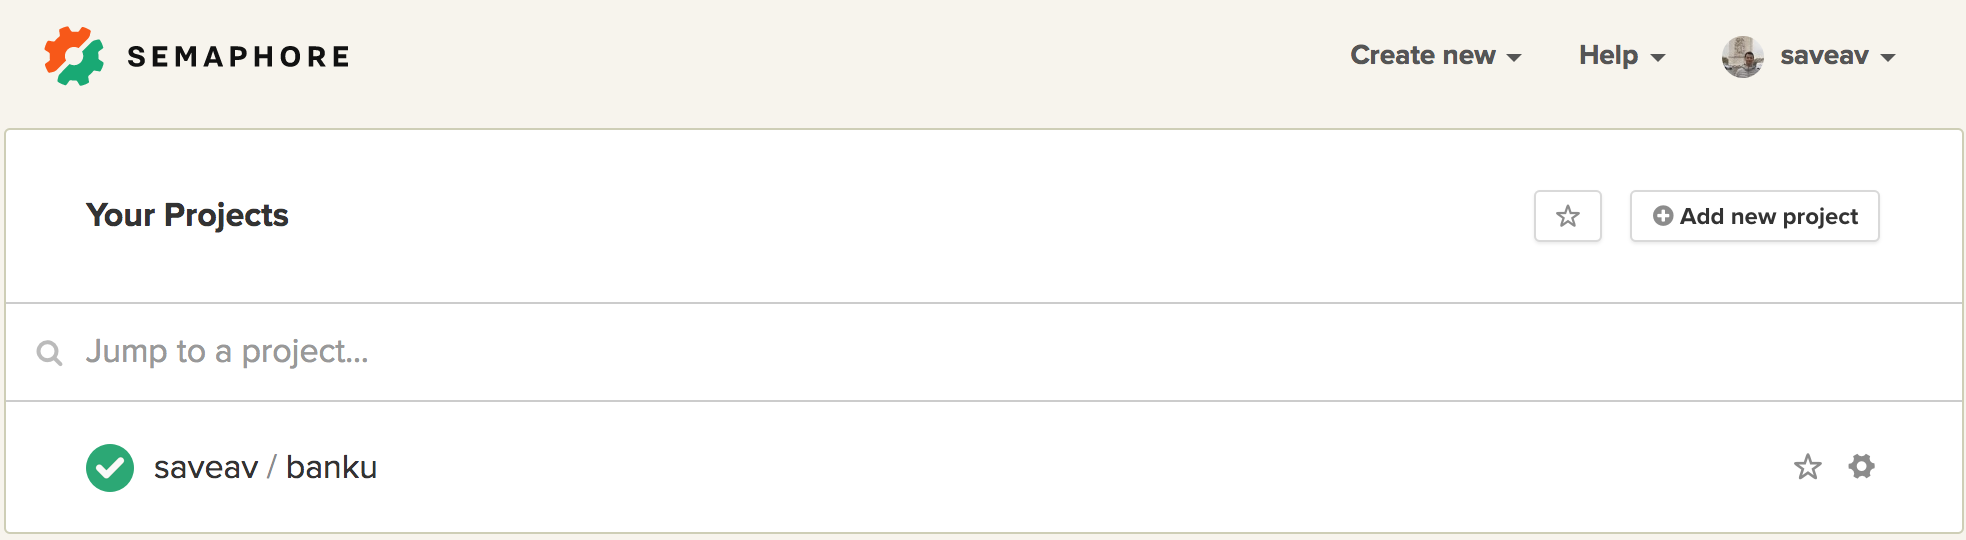
After that, you need to log in on the dashboard page and click the “Add new project” button.

On the “Select repository” page, we can type in the name of our repository.
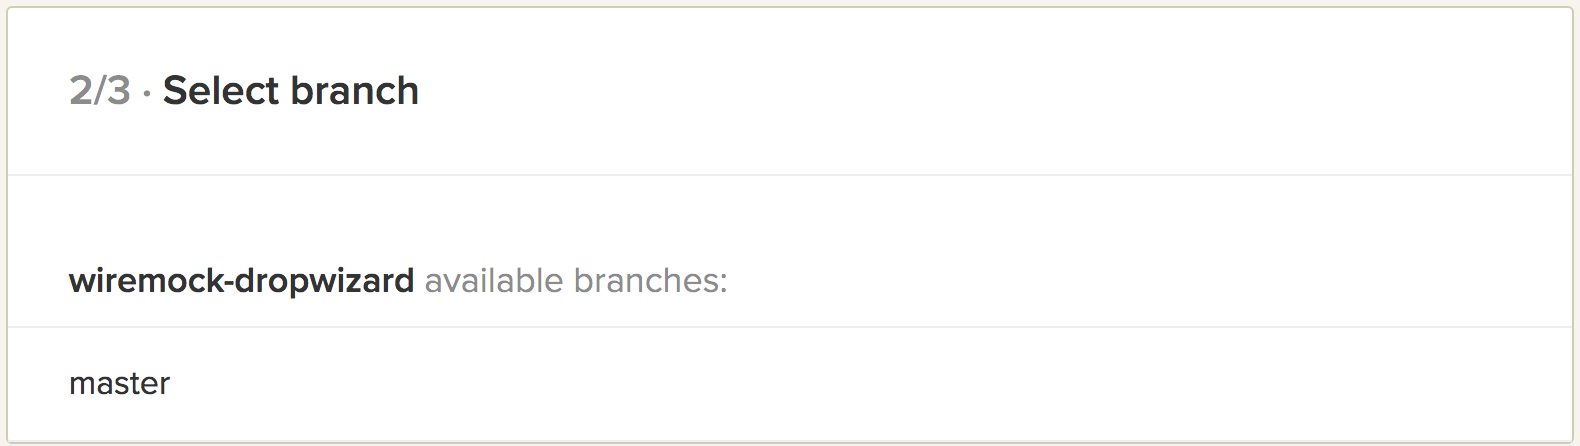
On the select branch page, we need to choose one of the branches in our repository as the default branch. This branch can give onlookers information about the build status.
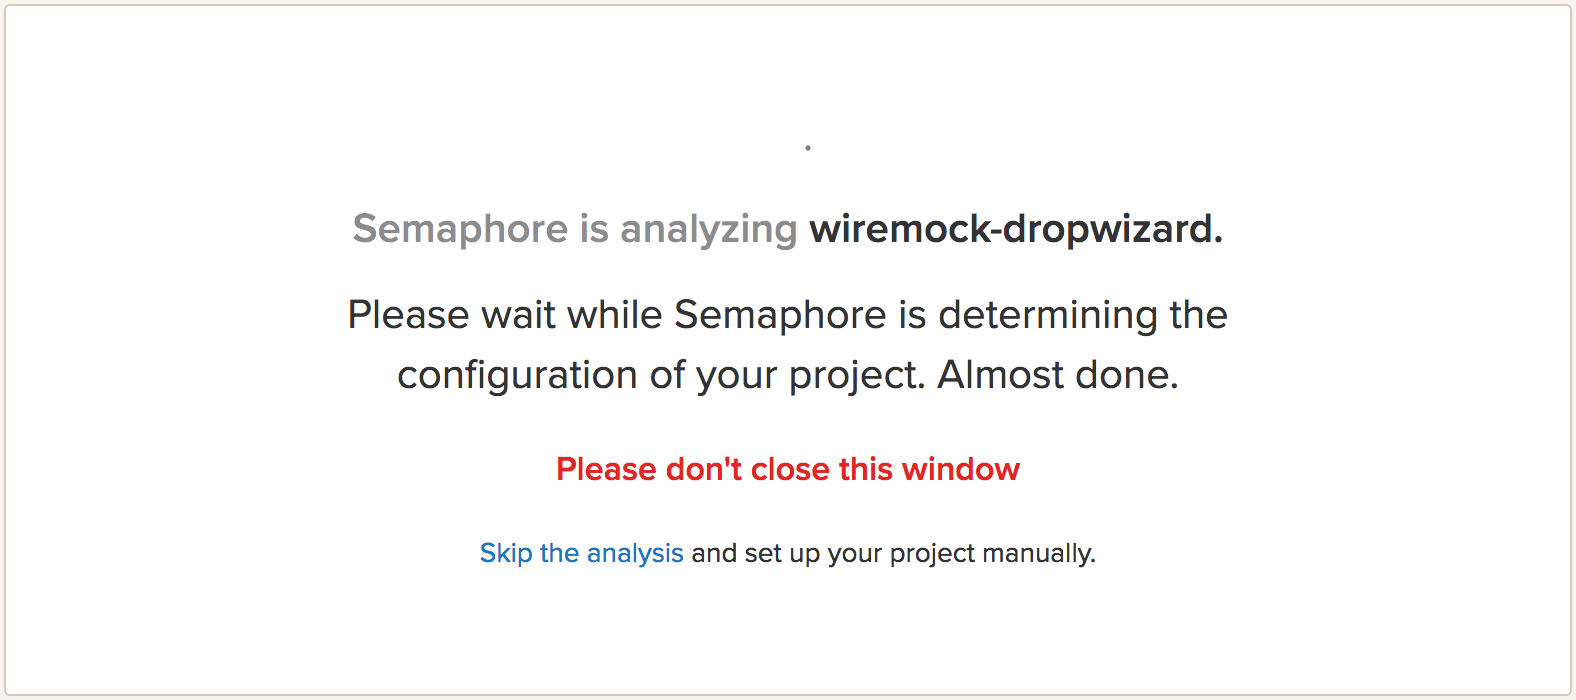
Wait for Semaphore to quickly scan the project and determine how the test should run.
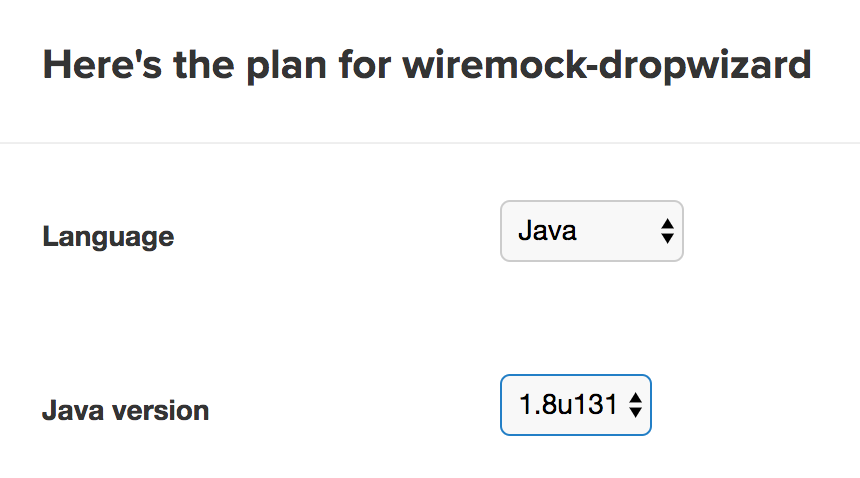
Some small changes may be needed, e.g. in this case we need to change the Java Runtime used from version 1.7 to 1.8, in order for it to match the version we used in this tutorial.
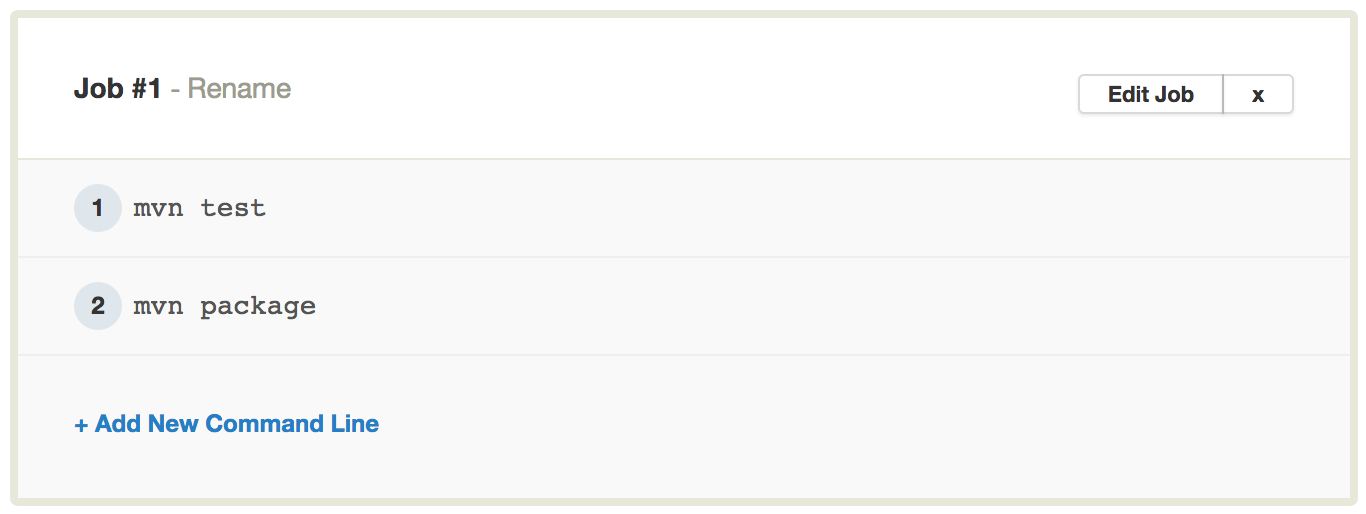
We can also rename the job to give it a better description, e.g. to “Perform test.”

Now that we’ve set everything up, Semaphore will run the build for our repository on the fly. We can also see the results of all builds on the project’s dashboard page.
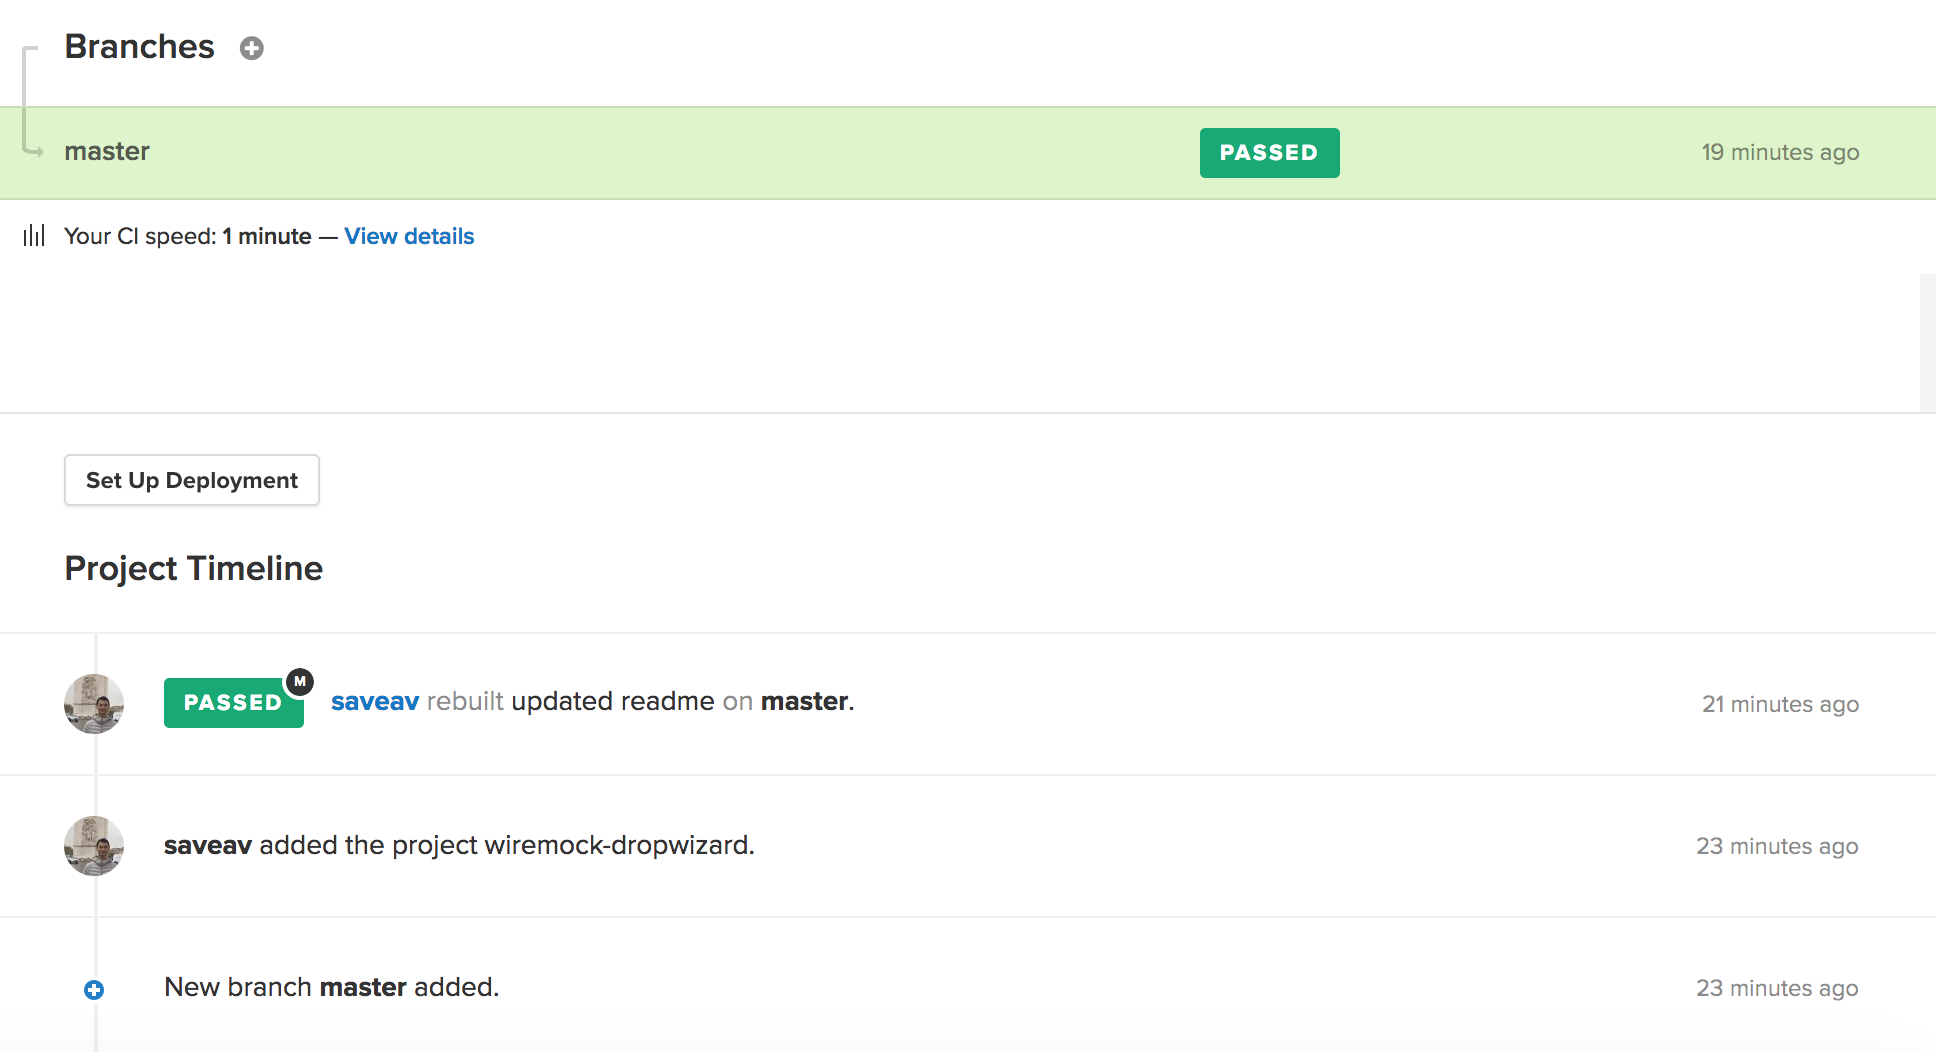
We now have a straightforward, quick, and effortless way to set up a testing environment on the fly.
Conclusion
You should now know how to stub HTTP requests in Java using WireMock and set up continuous integration for your project using Semaphore.
You can find the complete source code for this article here.
If you have any questions or comments, feel free to leave them in the section below.
Want to discuss this article? Join our Discord.