As software programs grow in complexity, so does the possibility of bugs that disrupt the program’s operations. Manually testing applications is not feasible or reliable and can lead to unreliable software that is prone to crashes or unexpected behavior.
Unit testing is a software testing method that involves testing individual units or components of a software application in isolation from the rest of the application. It aims to validate that each code unit is working as intended and to catch any bugs or errors early in the development process before they become more challenging to fix.
In this article, you will learn how to write and run high-quality unit tests in Node.js using the popular testing framework Jest.
Setting up Jest in Node.js
Before you can start writing unit tests with Jest, you have to install it as a dependency in your project and create test files.
Run the command below to install Jest:
npm install --save-dev jestAfter you have successfully installed Jest, run the command below to create a folder for your Jest test files:
mkdir testThe folder created by the command above will store all your test files.
Next, you will create a test file. Test files are files you write your tests in. Jest considers files with the .test.js and .spec.js extensions to be test files.
You can create a test file by running the command below:
touch example.test.jsFinally, add the command below to your scripts in your package.json file:
"scripts": {
    "test": "jest"
  }
The script above allows you to run all your test files with a single command.
Creating tests with Jest
Recall that Jest considers files ending in .test.js to be test files. Thus, all your tests should follow this naming convention.
For example, consider the function below:
//index.js
function isEven(number) {
  if (number < 0) throw new Error("Number must be positive");
  if (typeof number !== "number") throw new Error("Number must be a number");
  return number % 2 === 0;
}

module.exports = isEven;
The function above takes a number as an argument and returns true if the number is even and false if it is not.
To test this function, import it into your test file and create a test suite for the function.
A test suite is a collection of test cases grouped together to test a specific functionality or feature. In this case, your test suite will test the functionality of the isEven function.
The things you’d need to test in the isEven function include if:
- It returns true if the number is even.
- It returns false if the number is odd.
- It throws an error if the number is negative.
- It throws an error if the argument is not a number.
Here’s an example of a test suite created with Jest that tests all the possible scenarios for the isEven function:
//example.test.js
const isEven = require("../index");

describe("isEven", () => {
  test("returns true if number is even", () => {
    expect(isEven(2)).toBe(true);
  });

  test("returns false if number is odd", () => {
    expect(isEven(3)).toBe(false);
  });

  test("throws an error if number is negative", () => {
    expect(() => isEven(-1)).toThrow();
  });

  test("throws an error if number is not a number", () => {
    expect(() => isEven("1")).toThrow();
  });
});
In Jest, the describe function is used to group related test cases. In this case, the test cases are related to the isEven function, so we use "isEven" as the description. The function takes a callback housing all the individual tests related to the feature you’re testing. In this case, the individual tests for the isEven function.
The test function defines a single test case, similar to the describe function but for a single case. In the first two test cases, the test confirms if the function returns the appropriate boolean by passing an even and odd number, respectively. It confirms the return values using the Jest matcher toBe.
In the last two test cases, the test confirms if the function throws an error when called with an invalid argument (negative number/not a number) using the Jest matcher toThrow.
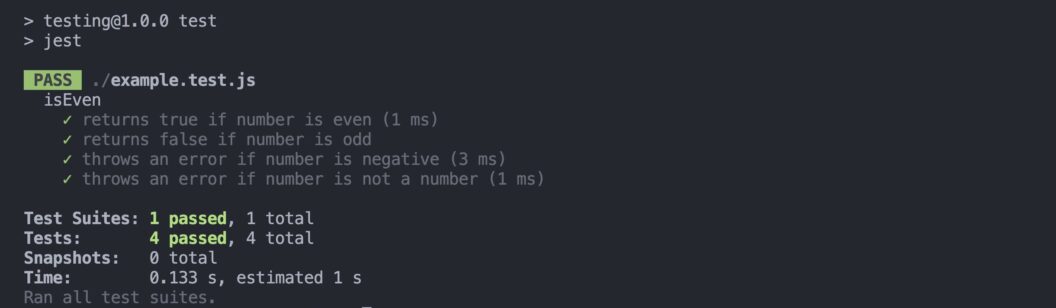
You can run the test suite by executing the command below:
npm testRunning the command should produce the output in the image below, as all tests should pass.
Testing Asynchronous Code
Not all JavaScript code runs synchronously; some runs asynchronously to avoid blocking code execution because it takes time to complete.
By default, Jest’s tests complete once they reach the end of their execution. That means that when you test asynchronous code, you need to let Jest know when the code it is testing has finished executing before it can move on to another test. Else the test will not work as intended.
Take the code block below as an example:
// fetchdata.js

function fetchData() {
  return new Promise((resolve, reject) => {
    setTimeout(() => {
      resolve(JSON.stringify({
        name: "Jon Snow",
        age: 30,
        email: "jonsnow@housestark.com",
      }));
    }, 1000);
  });
}
This fetchData function in the code block above is asynchronous. It doesn’t return a value directly but instead takes a callback function as a parameter, which it calls with the data after a delay of 1 second.
Here’s a test for the fetchData function that doesn’t account for its asynchronous nature:
// fetchdata.test.js
test("fetchData returns the correct data", () => {
  const data = fetchData();
  expect(data).toEqual(
    JSON.stringify({
      name: "Jon Snow",
      age: 30,
      email: "jonsnow@housestark.com",
    })
  );
});
Although the test looks like it should pass, if you run the test above, it will fail, as shown in the image below.
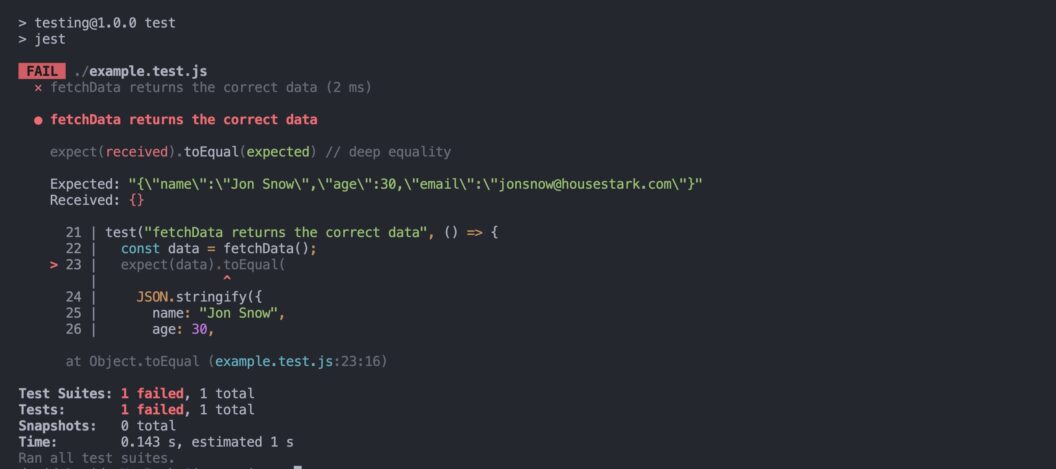
The test failed because Jest completed its testing before the fetchData function could return its value.
Jest has several ways to test asynchronous code, including using Promises, async/await, callbacks, and Jest’s resolves/rejects matcher.
Using Jest’s resolves matcher, you can rewrite the test like so:
test("fetchData returns the correct data", () => {
    return expect(fetchData()).resolves.toBe(
      JSON.stringify({
        name: "Jon Snow",
        age: 30,
        email: "jonsnow@housestark.com",
      })
    );
  });
The resolves matcher extracts the value of a fulfilled promise so you can chain any other matcher to make your assertions. With this matcher in place, the test should pass.
Mocking Dependencies with Jest
Mocking dependencies is a common practice in testing; by replacing a real dependency with a fake one that you can control and manipulate during the test. This can be useful for testing code that relies on external resources or services, such as APIs or databases.
Jest provides built-in mocking capabilities that make creating and using mock functions and modules easy.
For example, suppose you have a module called user.js that depends on a module called database.js for database operations.
Here’s how you can mock the database.js module to test the user.js module without actually accessing the database:
// user.test.js
const user = require("./user");
const database = require("./database");

jest.mock("./database");

describe("getUser", () => {
  test("should return the user with the given userId", () => {
    const userId = "123";
    const userObj = { id: userId, name: "John" };
    database.getUser.mockReturnValue(userObj);
    const result = user.getUser(userId);
    expect(result).toBe(userObj);
  });
});
Here, we’re mocking the database.js module using Jest’s built-in jest.mock() function. This function replaces the actual module with a mocked version, which you can configure to return specific values or behave in a certain way.
In the getUser test case, we’re using the mockReturnValue method of the mocked database.js module to specify that when the getUser function is called with a certain userId, it should return a specific userObj. Then, we’re calling the getUser function of the user.js module with the same userId and expecting it to return the same userObj.
By mocking the database.js module, you can isolate and test the getUser function of the user.js module without actually accessing the database.
Comparing TDD vs. BDD patterns on Jest
Test-Driven Development (TDD) is a software development methodology that involves writing tests before writing the code.
The process begins by writing a failing test case, which tests a small unit of code. Then you write the minimum amount of code necessary to pass the test case. Once the test case passes, you can refactor the code as required and repeat the process for the next test case.
On the other hand, Behavior-Driven Development (BDD) is a software development methodology that focuses on describing the behavior of the software in plain language that is understandable to all team members.
In BDD, tests are written as “scenarios” that describe the expected behavior of the software from the user’s perspective. BDD tests are often written using a natural language syntax that makes them more readable and understandable by non-technical team members.
Jest supports both TDD and BDD patterns, and you can choose to use either approach based on your preference and the needs of your project.
TDD with Jest
Let’s walk through a scenario that explains TDD in Jest using a function that returns the product of two numbers.
Let’s start with writing out the test for a function that returns the product of two numbers.
// multiply.test.js
const multiply = require("./multiply");

describe('multiply function', () => {
  it('should return the product of two numbers', () => {
    expect(multiply(2, 3)).toEqual(6);
    expect(multiply(0, 5)).toEqual(0);
    expect(multiply(-2, 3)).toEqual(-6);
    expect(multiply(-2, -3)).toEqual(6);
  });
});
Next, run the test and see it fail. Running the test above would fail because multiply doesn’t exist yet.
Then, implement the function from the results obtained from your failed tests, like so:
function multiply(a, b) {
  return a * b;
}
Rerun the test and see if it passes. Now that you’ve written the multiply function, the tests should pass.
The final step in TDD is to refactor the code if necessary. In this scenario, we implemented a multiply function that doesn’t need refactoring.
BDD with Jest
Let’s walk through a scenario that explains BDD in Jest using a function that returns the product of two numbers.
The first step is to describe the function’s behavior in a way that both technical and non-technical people can understand. You can achieve this using the Gherkin syntax.
After you have described the function’s behavior, you’ll create a Jest test file and implement the tests for this scenario following the described behavior, like so:
// multiply_bdd.test.js
describe('Multiplication', () => {
  test('Multiply two numbers', () => {
    // Given
    const a = 5;
    const b = 10;

    // When
    const result = multiply(a, b);

    // Then
    expect(result).toEqual(50);
  });
});

function multiply(a, b) {
  return a * b;
}
Following the BDD approach ensures that your tests are closely aligned with the desired behavior of your code.
Jest vs. Mocha
Jest might be a very easy-to-use and powerful testing library, but is it the right testing framework for your project? Other testing frameworks like Mocha and Puppeteer, among others, are alternatives with unique features that make them stand out.
Jest and Mocha are both popular JavaScript testing frameworks you can use for writing unit tests. Here’s a table highlighting some of the differences between the two.
Jest | Mocha | |
Configuration | Jest is an opinionated framework. This means that it comes with preconfigured settings and testing utilities out-of-the-box. | Mocha requires a lot of configuration and setup before you can use it for testing. |
| Assertion Library | Jest comes with its own assertion library. | Mocha doesn’t have a native assertion library. You have to use it with dedicated assertion libraries, such as Chai. |
| Mocks | Jest has a built-in mocking library. | Mocha does not have a built-in library for mocks. It depends on other packages, such as Sinon, for mocks. |
| Performance | Jest is generally known for having faster test execution times than Mocha. Jest achieves this by combining parallelization, intelligent test file selection, and caching. | While it may be slower than Jest out-of-the-box, Mocha can be optimized for faster test execution times using plugins and configurations. |
Ultimately, the choice between Jest and Mocha depends on your needs and preferences. Jest might be the better choice if you want a framework with a lower learning curve and more out-of-the-box functionality. If you prefer a more customizable framework and want to work with your own assertion and mocking libraries, Mocha might be the better choice.
Conclusion
In this article, you learned how to set up Jest in Node.js, create and run test suites, and mock dependencies for your tests using the Jest testing framework. Additionally, you explored BDD and TDD testing patterns and how to implement them in Jest. Finally, to give you a wide array of testing frameworks to choose from, we compared Jest to Mocha, another popular testing framework in the Node.js ecosystem.
You can learn more about Jest in the official Jest documentation.
Learn more about testing:
- A Deep Dive into Unit Testing
- The Testing Pyramid: How to Structure Your Test Suite
- The 6 Principles of Test Automation
Want to discuss this article? Join our Discord.