Mocha is a testing library for Node.js, created to be a simple, extensible, and fast. It’s used for unit and integration testing, and it’s a great candidate for BDD (Behavior Driven Development).
This article will walk you through its installation and configuration, as well as demonstrate its usage by implementing a color converter that can translate from RGB (red, green, blue) to hexadecimal color representation. In addition, we will create a web server that exposes the above converter and demonstrates how to test asynchronous code.
Bootstrap
We will start by creating an empty directory.
$ mkdir converter
$ cd converter
Node’s official package manager — npm — will help us set up an empty project. Npm’s init command-line option will launch a wizard, which creates a package.json for our project.
For the purpose of this tutorial, answer its questions as follows:
$ npm init

{
  "name": "converter",
  "version": "0.0.0",
  "description": "",
  "main": "index.js",
  "scripts": {
    "test": "echo \"Error: no test specified\" && exit 1"
  },
  "author": "",
  "license": "ISC"
}
Our project’s structure will contain an app directory that with the main code, and a test directory with the Mocha test files:
$ mkdir app
$ mkdir test
Next, we will install our testing framework, and an expectation library called Chai that serves as a nice replacement for Node’s standard assert function.
$ npm install --save mocha chaiNote that we are using the --save option to automatically save these dependencies in our package.json file.
During the server testing phase, we will need a way to send HTTP requests. Request is an excellent choice. Install it as follows:
$ npm install --save requestFinally, we will also need the Express package that defines a simple DSL (domain-specific language) for routing and handling incoming HTTP requests:
$ npm install --save expressAt this point, we are finished with the bootstrap process. However, we will configure one more thing to make running the test suite easier. We will set up the test command inside the package.json file, in order to run our tests simply by executing npm test from the command line.
The following command is used to invoke the Mocha binary installed locally in the ./node_modules directory:
$ npx mocha --reporter specNote that we have many different report formats to choose from. You can explore other reporters on Mocha’s official website.
Next, we will update the test command in package.json to contain the above command. That file should now look like this:
{
  "name": "converter",
  "version": "0.0.0",
  "description": "",
  "main": "index.js",
  "scripts": {
    "test": "mocha --reporter spec"
  },
  "author": "",
  "license": "ISC"
}
Describing the Color Converter
We will follow the TDD (test-driven development) practice, and begin our project by creating tests before the implementation.
Let’s start by creating a test file:
$ touch test/converter.jsMocha gives us the ability to describe the features that we are implementing by giving us a describe function that encapsulates our expectations. The first argument is a simple string that describes the feature, while the second argument is a function that represents the body of the description.
Our color converter description:
describe("Color Code Converter", function() {
  // specification code
});
In the body of that description, we will create fine-grained segments that represent our feature in a little bit more detail:
describe("Color Code Converter", function() {
  describe("RGB to Hex conversion", function() {
   // specification for RGB to HEX converter

  });

  describe("Hex to RGB conversion", function() {
   // specification for HEX to RGB converter
  });
});
We will set up a concrete thing we are testing using the it feature. The it function is very similar to the describe function, except that we can only put expectations in the body of the it function. Let’s use it for our color converter:
describe("Color Code Converter", function() {
  describe("RGB to Hex conversion", function() {
    it("converts the basic colors", function() {

    });
  });

  describe("Hex to RGB conversion", function() {
    it("converts the basic colors", function() {

    });
  });
});
We can now introduce our first expectation. We will use the Chai library and its expect keyword to compare the result of our feature’s implementation and the result we expect to get. Of course, we first need to require the Chai library:
var expect    = require("chai").expect;
var converter = require("../app/converter");
Note that our implementation code doesn’t exist at this point, but this need not bother us, and we can write our tests as if the implementation already exists.
In the body of our first it function, we will test the rgbToHex color converter. As its name says, it converts from a (red, green, blue) tuple to hexadecimal. We will test it by converting the basic colors. The final test/converter.js looks like:
// test/converter.js

var expect    = require("chai").expect;
var converter = require("../app/converter");

describe("Color Code Converter", function() {
  describe("RGB to Hex conversion", function() {
    it("converts the basic colors", function() {
      var redHex   = converter.rgbToHex(255, 0, 0);
      var greenHex = converter.rgbToHex(0, 255, 0);
      var blueHex  = converter.rgbToHex(0, 0, 255);

      expect(redHex).to.equal("ff0000");
      expect(greenHex).to.equal("00ff00");
      expect(blueHex).to.equal("0000ff");
    });
  });

  describe("Hex to RGB conversion", function() {
    it("converts the basic colors", function() {
      var red   = converter.hexToRgb("ff0000");
      var green = converter.hexToRgb("00ff00");
      var blue  = converter.hexToRgb("0000ff");

      expect(red).to.deep.equal([255, 0, 0]);
      expect(green).to.deep.equal([0, 255, 0]);
      expect(blue).to.deep.equal([0, 0, 255]);
    });
  });
});
Notice the .to.deep.equal part of the above snippet. It is called a matcher, and it matches the result of a feature with an expected value.
There are of course many other matchers defined in the Chai libary, that can match expectations by various criteria. For example, to check the equality of two simple objects, we could write:
expect(1+1).to.equal(2)In the above example, we have used the deep.equal because we were comparing two nested objects. The .deep part tells Chai to match all the elements of the arrays, one by one.
If we run npm test at this point, it will complain about a missing implementation file for our color converter:
$ npm test

module.js:340
    throw err;
          ^
Error: Cannot find module '../app/converter'

npm ERR! Test failed.  See above for more details.
npm ERR! not ok code 0
Don’t worry, this is perfectly normal.
Implementing the Color Converter
We will implement our converter in the following file:
$ touch app/converter.jsThe first description for our color converter describes an RGB to hexadecimal color conversion. It takes three arguments and returns a string that represents the color in its hexadecimal representation.
We will use the toString method of the incoming numbers, combined with the number 16, to invoke a conversion to hexadecimal representation.
// app/converter.js

exports.rgbToHex = function(red, green, blue) {

  var redHex   = red.toString(16);
  var greenHex = green.toString(16);
  var blueHex  = blue.toString(16);

  return pad(redHex) + pad(greenHex) + pad(blueHex);

};

function pad(hex) {
  return (hex.length === 1 ? "0" + hex : hex);
}

. . .
Notice that we have padded the resulting value with a zero prefix if it is only one character long because a valid hexadecimal representation must always contain two characters.
To implement the function that converts from hexadecimal to RGB representation, we will use the parseInt function with the base 16 to convert parts of the incoming strings into valid decimal RGB values.
Add the following function to app/converter.js:
// app/converter.js

. . .

exports.hexToRgb = function(hex) {

  var red   = parseInt(hex.substring(0, 2), 16);
  var green = parseInt(hex.substring(2, 4), 16);
  var blue  = parseInt(hex.substring(4, 6), 16);

  return [red, green, blue];

};
After this step, we can run our tests with npm test and should see that all our tests are passing:
Color Code Converter
  RGB to Hex conversion
    ✓ converts the basic colors
  Hex to RGB conversion
    ✓ converts the basic colors

2 passing (8ms)
Implementing the Web Server
In this step, we will expose the color converter through an HTTP API, and demonstrate writing tests for asynchronous code using Mocha.
First, we will create a test file:
$ touch test/server.jsThe same as in the previous test, we will require chai. To test the HTTP request, we will also require the request package.
// test/server.js

var expect  = require("chai").expect;
var request = require("request");
Here is the description of the functionality we want to implement, nicely laid out with Mocha’s descriptions:
describe("Color Code Converter API", function() {

  describe("RGB to Hex conversion", function() {
    it("returns status 200", function() {});
    it("returns the color in hex", function() {});
  });

  describe("Hex to RGB conversion", function() {
    it("returns status 200", function() {});
    it("returns the color in RGB", function() {});
  });

});
We will store the full path to the resource we want to test in a variable. Before running the tests, we will run our web server on the localhost port 3000.
describe("Color Code Converter API", function() {

  describe("RGB to Hex conversion", function() {

    var url = "http://localhost:3000/rgbToHex?red=255&green=255&blue=255";
    it("returns status 200", function() {});
    it("returns the color in hex", function() {});

  });

  describe("Hex to RGB conversion", function() {

    var url = "http://localhost:3000/hexToRgb?hex=00ff00";
    it("returns status 200", function() {});
    it("returns the color in RGB", function() {});

  });

});
Note that in a bigger test suite, it is probably easier and nicer to put the host part of the URLs in a global constant, and reuse it in all tests.
To make a request, we will use the Request package. We need to pass two arguments to it: a URL to visit, and a function to be invoked when the request is completed. We will set up our expectations inside those callback functions.
describe("Color Code Converter API", function() {

  describe("RGB to Hex conversion", function() {

    var url = "http://localhost:3000/rgbToHex?red=255&green=255&blue=255";

    it("returns status 200", function() {
      request(url, function(error, response, body) {
        expect(response.statusCode).to.equal(200);
      });
    });

    it("returns the color in hex", function() {
      request(url, function(error, response, body) {
        expect(body).to.equal("ffffff");
      });
    });

  });

  describe("Hex to RGB conversion", function() {
    var url = "http://localhost:3000/hexToRgb?hex=00ff00";

    it("returns status 200", function() {
      request(url, function(error, response, body) {
        expect(response.statusCode).to.equal(200);
      });
    });

    it("returns the color in RGB", function() {
      request(url, function(error, response, body) {
        expect(body).to.equal("[0,255,0]");
      });
    });
  });

});
If we run the above code, something strange will happen. Nothing will fail, but, at the same time, no expectation will be checked. This happens because we didn’t give Mocha enough time to wait for the requests to finish. In other words, the code inside the request’s callback is never actually executed.
Fortunately, Mocha gives us a nice abstraction for this issue. For every it that needs to wait for a response value, we will inject a done callback function and call it only when our expectations were executed. This way, Mocha will know it needs to wait for some of the expectations.
The final test/server.js should look like:
// test/server.js

var expect  = require("chai").expect;
var request = require("request");

describe("Color Code Converter API", function() {

  describe("RGB to Hex conversion", function() {

    var url = "http://localhost:3000/rgbToHex?red=255&green=255&blue=255";

    it("returns status 200", function(done) {
      request(url, function(error, response, body) {
        expect(response.statusCode).to.equal(200);
        done();
      });
    });

    it("returns the color in hex", function(done) {
      request(url, function(error, response, body) {
        expect(body).to.equal("ffffff");
        done();
      });
    });

  });

  describe("Hex to RGB conversion", function() {
    var url = "http://localhost:3000/hexToRgb?hex=00ff00";

    it("returns status 200", function(done) {
      request(url, function(error, response, body) {
        expect(response.statusCode).to.equal(200);
        done();
      });
    });

    it("returns the color in RGB", function(done) {
      request(url, function(error, response, body) {
        expect(body).to.equal("[0,255,0]");
        done();
      });
    });
  });

});
When we run our tests again with npm test, all the expectations will fail. Of course, this happens because we don’t have a matching implementation for our color converter yet.
Color Code Converter
  RGB to Hex conversion
    ✓ converts the basic colors
  Hex to RGB conversion
    ✓ converts the basic colors

Color Code Converter API
  RGB to Hex conversion
    1) returns status 200
    2) returns the color in hex
  Hex to RGB conversion
    3) returns status 200
    4) returns the color in RGB


2 passing (29ms)
4 failing
A Web API for the Color Converter
Let’s create a new file for our API implementation:
$ touch app/server.jsWe will use the Express framework to create a simple web API:
// app/server.js

var express = require("express");
var app = express();

. . .
We will also include our previous color converter implementation:
. . .

var converter = require("./converter");

. . .
Express gives us a nice DSL for defining the routes for our API:
. . .

app.get("/rgbToHex", function(req, res) {

});

app.get("/hexToRgb", function(req, res) {

});

app.listen(3000);
The listen method runs a web server on the provided port (in our case port 3000).
The only thing left is to parse our incoming parameters, pass them to the converter, and send the results back to the client.
Our final version of app/server.js should be:
// app/server.js

var express = require("express");
var app = express();
var converter = require("./converter");

app.get("/rgbToHex", function(req, res) {

  var red   = parseInt(req.query.red, 10);
  var green = parseInt(req.query.green, 10);
  var blue  = parseInt(req.query.blue, 10);
  var hex = converter.rgbToHex(red, green, blue);
  res.send(hex);

});

app.get("/hexToRgb", function(req, res) {

  var hex = req.query.hex;
  var rgb = converter.hexToRgb(hex);
  res.send(JSON.stringify(rgb));

});

app.listen(3000);
To run our tests, we will first need to run our server:
$ node app/server.jsWe can now run our tests with npm test in a separate shell session:
Color Code Converter
  RGB to Hex conversion
    ✓ converts the basic colors
  Hex to RGB conversion
    ✓ converts the basic colors

Color Code Converter API
  RGB to Hex conversion
    ✓ returns status 200
    ✓ returns the color in hex
  Hex to RGB conversion
    ✓ returns status 200
    ✓ returns the color in RGB

6 passing (50ms)
Continuous Integration for NodeJs
Continuous Integration (CI) is a software development practice where developers integrate the code into a shared repository several times a day. Having everything in a central location allows for continuous testing. CI allows us to create a short feedback loop, we know immediately the exact point where an error has been introduced..
Teams using CI can merge many times per day, shortening development cycles while improving on software quality.
To get started, we need to push the code to GitHub.
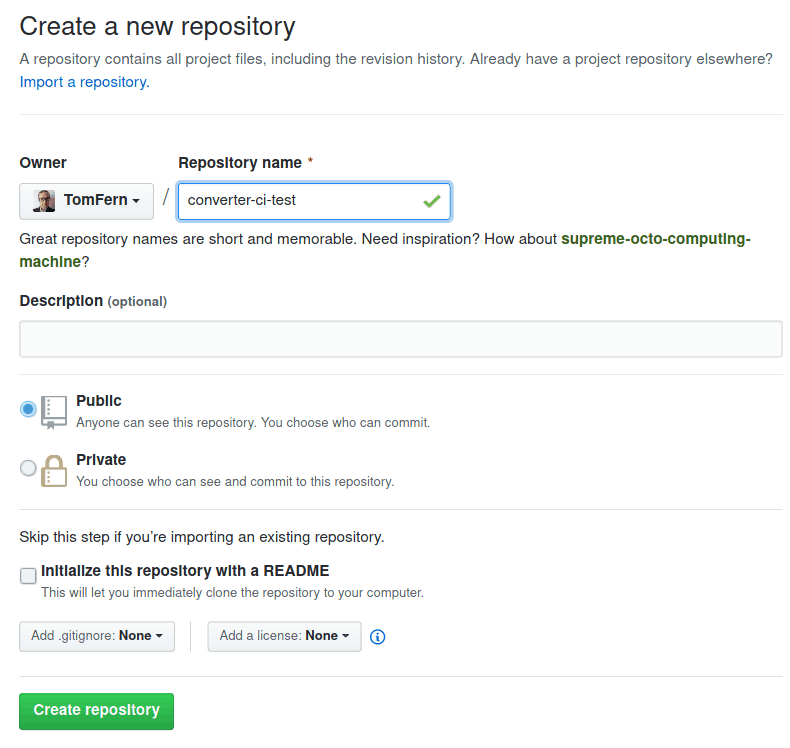
- Sign up for a GitHub account.
- Create an empty repository, follow the create a repo steps:
- Copy the repository URL:
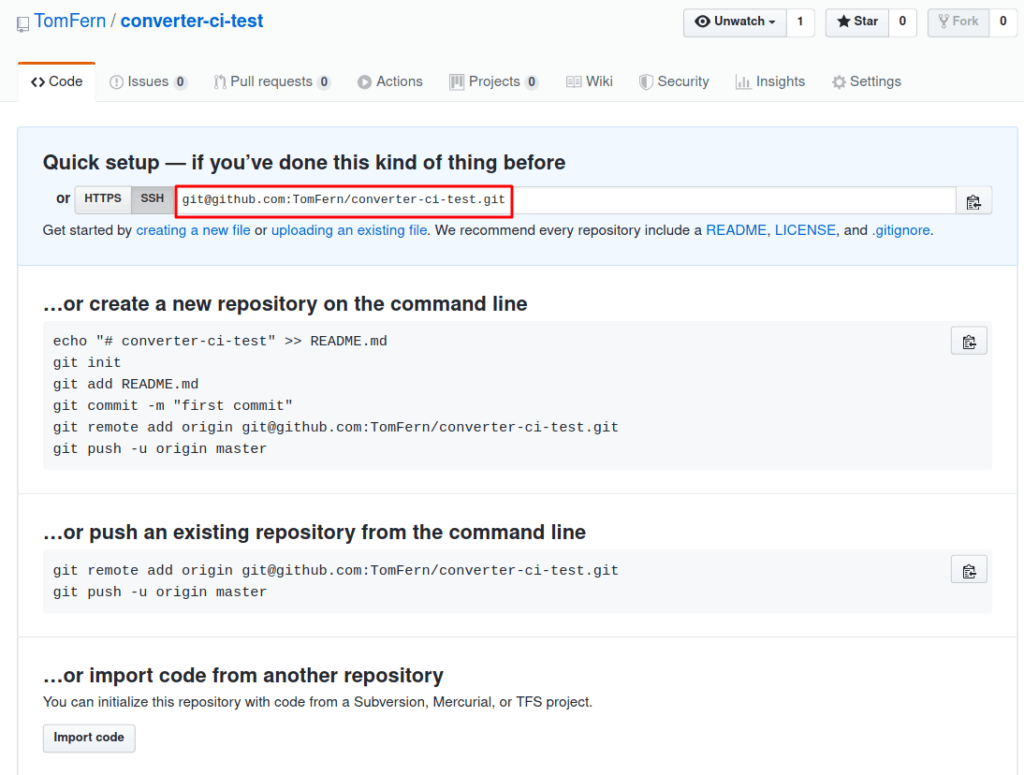
- And use it to push the code:
$ echo "node_modules/" >> .gitignore
$ git init
$ git remote add origin YOUR_REPOSITORY_URL
$ git add -A
$ git commit -m "initial commit"
$ git push origin master
Add the Project to Semaphore
Adding CI to the project takes only a few minutes.
Follow these steps to create a CI Pipeline:
- Head over to Semaphore and use the Sign up with GitHub button to create a free account.
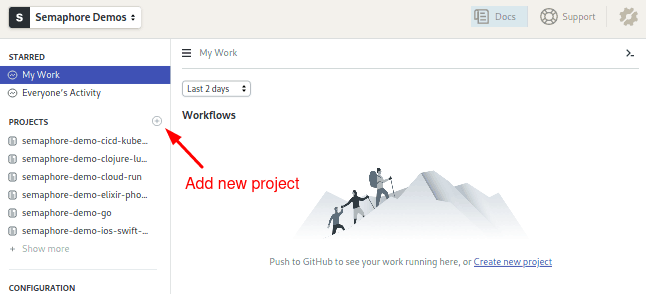
- On Semaphore, use the + (plus sign) next to Projects to add your repository:
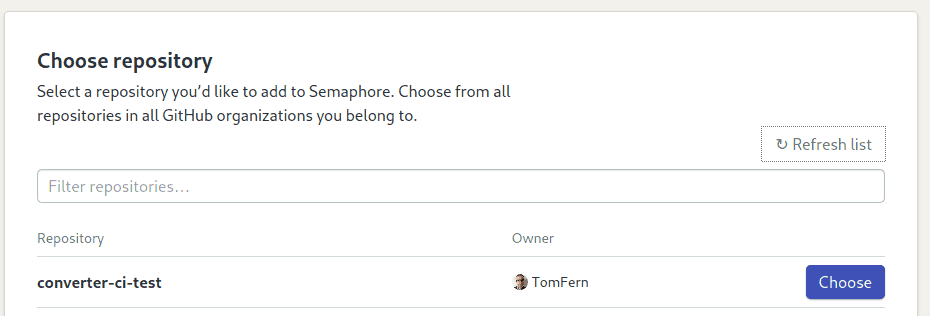
- Pick your repository and click on Choose:
- Select the NodeJS starter workflow and click on Customize it first:
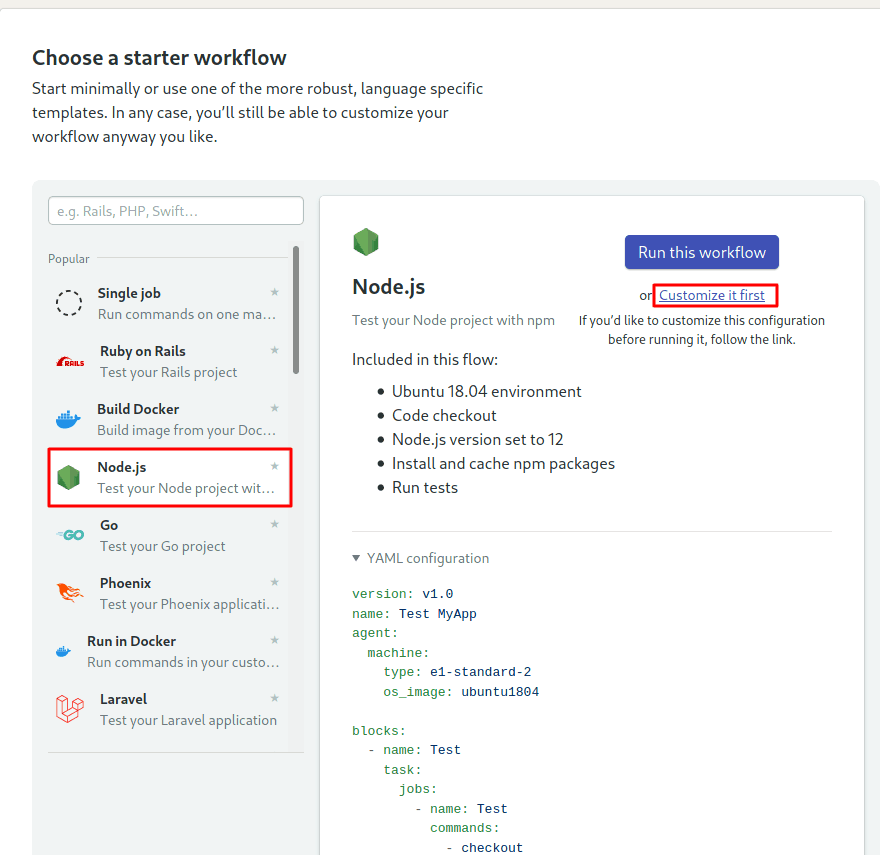
When we choose to Customize it, Semaphore shows us the Workflow Editor screen, which consists of the following components:
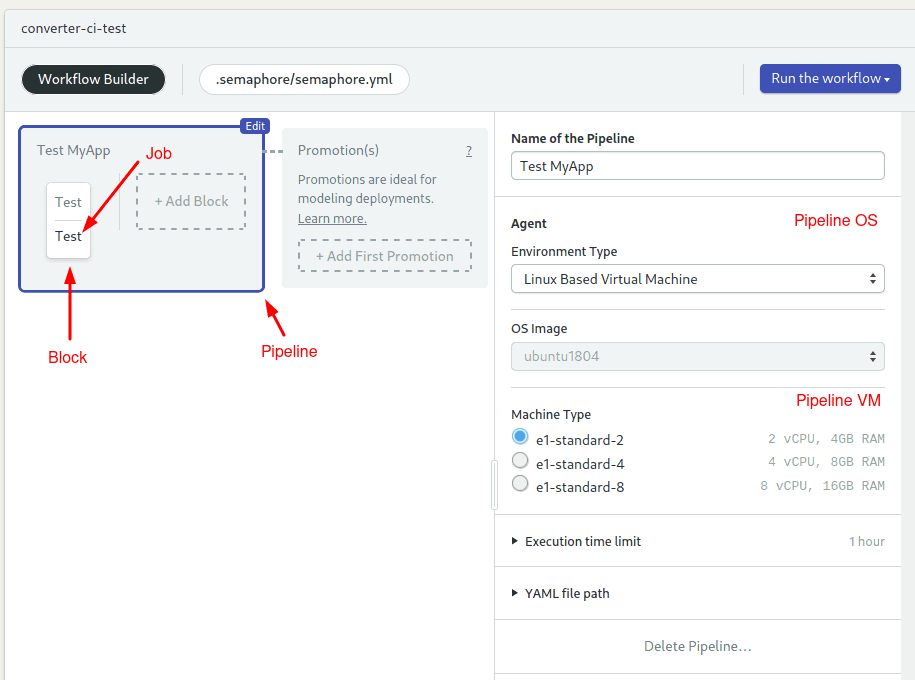
- Pipeline: A pipeline has a specific objective, e.g. building or testing. Pipelines are made of blocks that are executed from left to right in an agent.
- Agent: The agent is the virtual machine that powers the pipeline. We have three machine types to choose from. The machine runs an optimized Ubuntu 18.04 image with build tools for many languages.
- Block: blocks group jobs that can be executed in parallel. Jobs in a block usually have similar commands and configurations. Once all jobs in a block complete, the next block begins.
- Job: jobs define the commands that do the work. They inherit their configuration from their parent block.
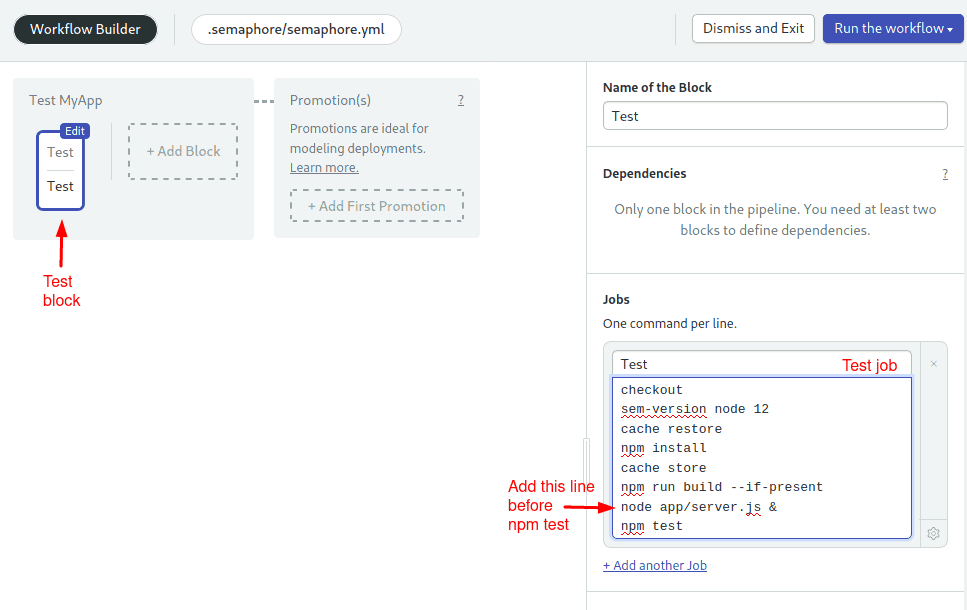
We need to make a small change before we can run our pipeline. We have to ensure the application is running before we try the tests:
- Click on the Test block.
- On the right side, add the following line before
npm test:node app/server.js &
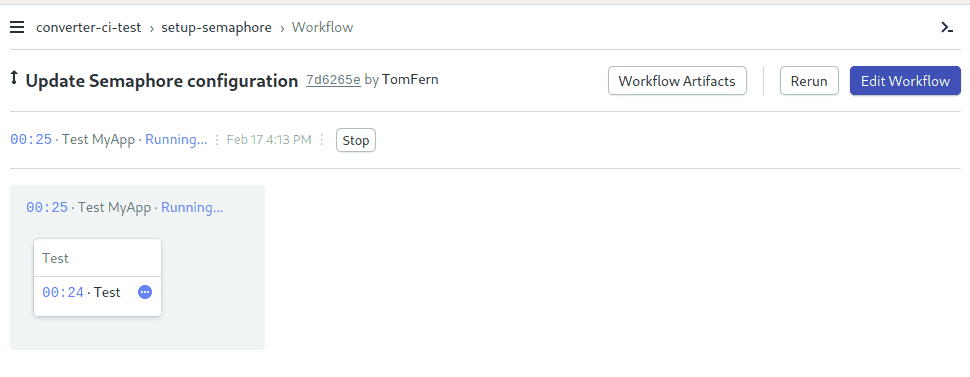
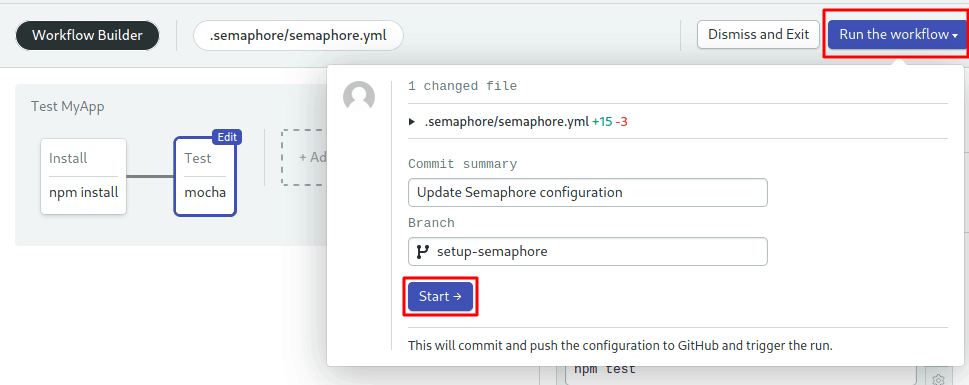
- Click on Run the Workflow and Start to run the pipeline for the first time:
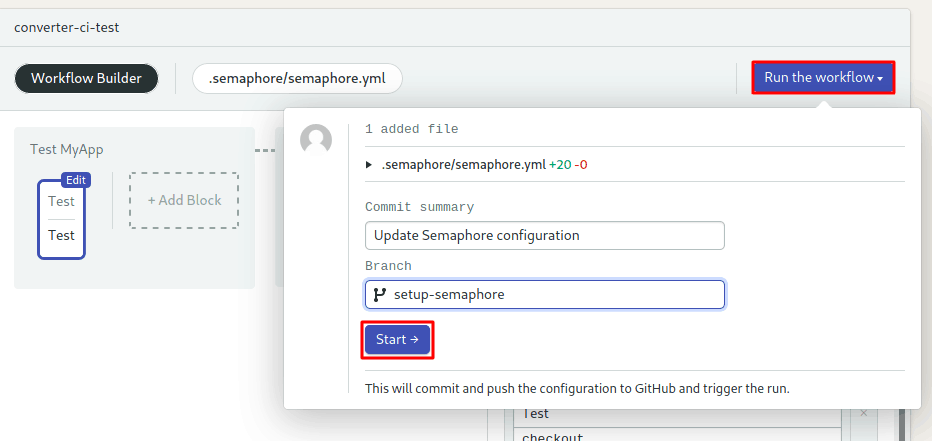
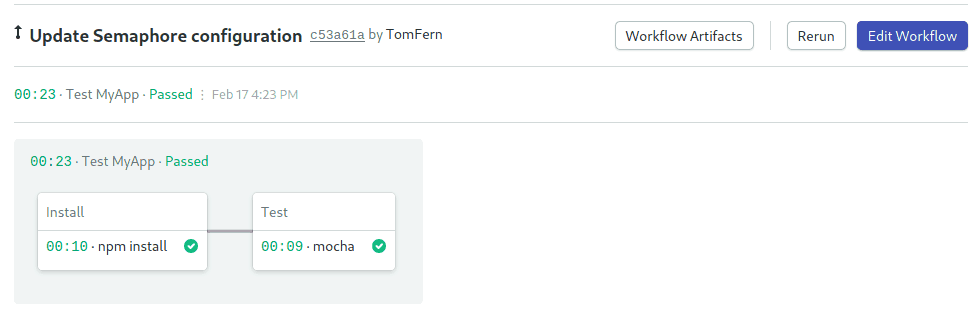
The pipeline is now running the tests in the CI environment:
Improving the Pipeline
We can make our pipeline run faster and scale better by making a couple of modifications:
- Split the install and test steps into different jobs.
- Save the NodeJS dependencies in the cache. If we don’t use the cache, Semaphore will have to re-download all the node modules every time the pipeline runs.
Semaphore has a complete toolbox with commands to help us manage the CI workflow:
- checkout: the checkout commands clones the correct revision of the GitHub repository and changes the directory. It’s usually the first command in a job.
- sem-version: with sem-version, we can switch the active version of a language. Semaphore fully supports many languages, including NodeJS and JavaScript.
- cache: the cache is your project file storage. Cache smart enough to figure out which files have to be stored and retrieved. We’ll use the cache to persist the
node_moduledirectory.
Install Block
We’ll start by replacing the Test block with the Install Block:
- Click on the Test block and rename it to “Install”.
- Rename the job to “npm install”
- Type the following commands in the job box:
checkout
sem-version node 12
cache restore
npm install
cache store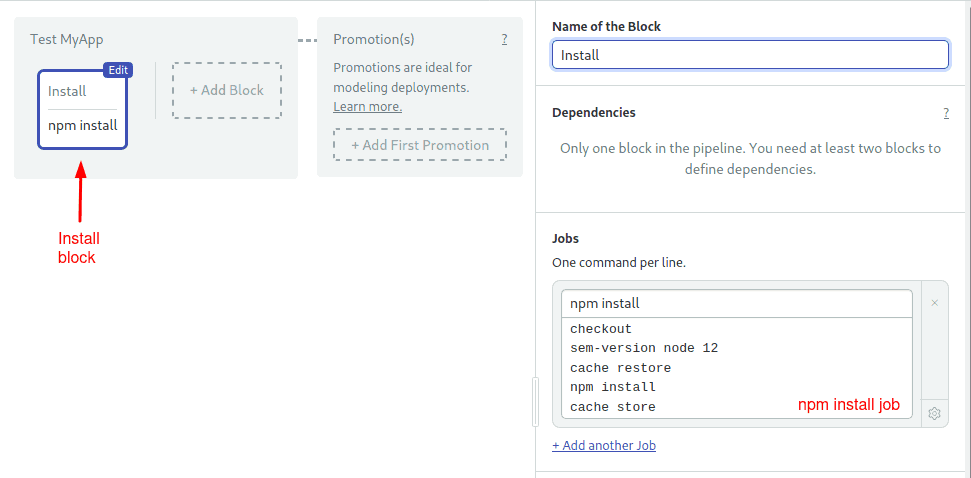
Test Block
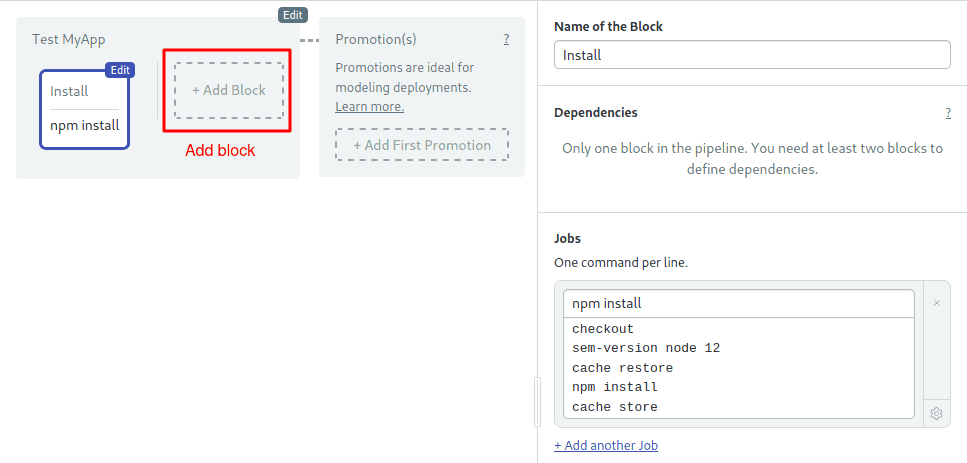
The next step is to create a Test Block:
- Click on the +Add Block dotted line button to create a new block:
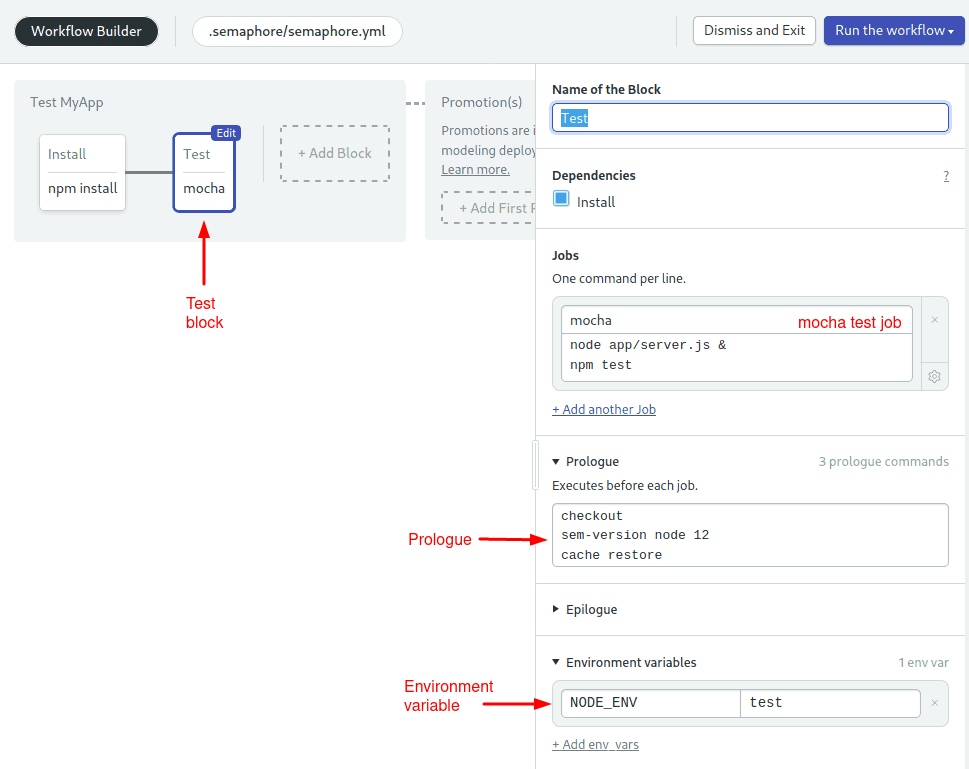
- Set its name to “Test”
- Change the name of the job to “mocha”
- Type the following commands in the job box:
node app/server.js &
npm test- Open the Prologue section, which is executed before all jobs in the block, and type the following commands:
checkout
sem-version node 12
cache restore- Open the Environment Variables section and use the +Add env_vars link to define the variable:
NODE_ENV = test
- Click on Run the Workflow and then Start:
Congratulations! You have an optimized pipeline, a solid foundation for your NodeJS projects.
Next Reads
Don’t miss these great JavaScript and NodeJS tutorials. Learn to test and deploy applications to Serverless and Kubernetes:
- Releasing NodeJS with Docker & Kubernetes:
- JavaScript and Serverless deployments:
Summary
Mocha is a nice and easy DSL that makes writing tests a great pleasure. Mocha’s strength comes from its modularity, and while in this tutorial we didn’t use any other library other than chai, I encourage you to explore other libraries such as Sinon and Should.js.
Want to discuss this article? Join our Discord.